Introducción
La mayoría de los aparatos electrónicos contienen un conjunto vertiginoso de conectores de cable de alimentación y de datos. Nada detiene un proyecto como romper accidentalmente un conector.
Usa esta guía para familiarizarte con los tipos de conectores más comunes y aprende sobre las herramientas y las técnicas que necesitarás para poder desconectarlos y conectarlos de forma segura.
Qué necesitas
-
-
El zócalo ZIF (por su sigla en inglés Zero insertion force, o fuerza de inserción cero) comúnmente es un problema para los principiantes. Los zócalos ZIF se usan para asegurar cables planos delicados, como este cable de trackpad.
-
Para desconectar el cable, usa la punta de un spudger o la uña de un dedo para voltear la aleta hacia arriba. Luego, se puede extraer de forma segura el cable.
-
-
-
A veces encontrarás un cable plano que simplemente se extrae de su zócalo, sin solapa de bloqueo. La cinta es normalmente más robusta que las usadas con conectores ZIP y el final está a menudo reforzado con una película de plástico duro.
-
Estos conectores se encuentran a menudo en dispositivos más grandes como impresoras, proyectores y consolas, como en esta placa de PS3.
-
Para desconectar el cable, sácalo directamente del conector.
-
-
-
Para desconectar conectores planos como este, usa una herramienta para levantar cada lado. Luego, levanta el conector directamente de su zócalo.
-
-
-
Coloca la punta de su herramienta debajo del borde del conector y saque el conector directamente de su zócalo.
I have an idea,/Request that I'm sure would be worth the effort, and fit right into this subject. how about a step by step guide on fixing the mistake of fudging up the socket yes on the mother board Guilty, right now it's a 500 dollar paper weight!! ! And I'm sure there's a long line of us,right guys, since you guy's are Awesome at it! Where to source the female sockets that's go onto the board and the proper steps and tecniques , would be greatly appreciated, keep up the great work!!
Sorry to hear that! My usual advice would be to take it to a repair shop that performs board-level repairs (a.k.a. microsoldering). Replacing a damaged connector socket typically requires a lot of skill, practice, and tools that likely cost more than the full retail price of your device. So, it’s not exactly DIY-friendly! But if you’re interested, you can find a good introduction to board-level repairs on our YouTube channel.
Is there a specific name for this type of connector? (brand, etc).
Stack-type Board-To-Board connector. JAE is a big manufacturer. FPC (Flexible Printed Circuit), what we commonly know as flex cables usually - is considered a board in this context.
-
-
-
Los conectores coaxiales como estos, también llamados conectores de antena, U.FL o IPEX, tienen una cabeza de metal que encaja sobre un zócalo circular en la placa. Estos conectores vienen en diferentes tamaños y se utilizan a menudo para conectar cables de antena.
-
Para desconectar el cable, desliza una palanca delgada a prueba de ESD o unas pinzas debajo del cuello metálico del conector y levántalo hacia arriba desde la placa.
Hello, I am repairing a tablet and the head to my coaxial cable fell off. What do I do?
-
-
-
-
Para separar el conector, empuja suavemente la punta de un spudger debajo del clip. Luego, mueve el clip sobre el enchufe, de modo que quede plano contra el cable.
-
Sosteniendo el clip y el cable juntos, tira suavemente en la dirección del cable para quitar el conector de su zócalo.
-
-
-
Aquí hay otro tipo de conector de cinta, que se encuentra comúnmente en las consolas de juegos Xbox.
-
Para quitarlo, usa un spudger o una uña limpia para levantar la pestaña azul transparente del conector.
-
Luego, usa la punta del spudger para empujar la pestaña de bloqueo de plástico hacia afuera del zócalo; solo debe moverse unos 2 mm.
-
Saca el cable plano del conector en la dirección del cable.
-
-
-
Algunos conectores requieren un poco de persuasión antes de que abandonen sus cables. Este conector del cable de altavoz del ROG Ally no tienes un lugar conveniente para hacer palanca o tirar.
-
Para desconectarlo, usa la punta de un spudger para empujar lados alternos del conector para "sacarlo" de su zócalo.
-
-
-
Los conectores del cable de alimentación como este tienen una pequeña pestaña en el costado que los asegura en su lugar.
-
Para separar el conector de su zócalo, presiona la lengüeta contra el conector y tira del conector hacia arriba del zócalo.
-
Los conectores JST son similares pero no tienen la pestaña de bloqueo. Hay algunos otros tipos similares, con o sin la pestaña, y que tienen 2 o 3, a veces hasta media docena o más cables. Estos se pueden encontrar conectando un micrófono o un altavoz en una cámara, o interconectando las placas de circuito en una radio.
Hallo, ich habe genau wie auf dem Bild bei meiner PS3 Slim ein ähnliches Kabel von dem Laufwerk zu trennen versucht. Beim Ziehen ist nicht das Kabel abgerissen, sondern die Anschlusstelle an der Platine hat sich auf einer Seite gelöst. Muss man hier nun das Teil wieder dran löten oder kann man es irgendwie mit Klebern fixieren?
-
-
-
Si ves un cable compuesto por muchos cables envueltos individualmente que conducen a un solo conector, tirar del cable puede ser el mejor método.
-
Separa el cable del conector en la misma dirección que los cables individuales.
-
-
-
Para quitarlo, desliza con cuidado un spudger o una púa de guitarra debajo del cable para separar su adhesivo.
-
-
-
Algunos cables de alimentación y datos internos comunes, como estos cables SATA, funcionan de manera muy similar a los cables de audio / video normales que ya tiene en casa.
-
Para quitarlos, simplemente tira en la dirección del cable.
-
Mantén presionada la pestaña con el dedo y luego tira para quitar el cable.
-
-
-
También encontrarás cables que no fueron diseñados para ser removidos, y de hecho están soldados en su lugar.
-
No te preocupes, un soldador y una mecha de soldadura hacen un trabajo rápido de estos pequeños.
-
Si la soldadura aún no es lo tuyo, ¡dirígete a nuestra guía de técnicas de soldadura y aprende una nueva habilidad!
-
-
-
A menudo se encuentran en calculadoras de bolsillo, teléfonos y otros dispositivos con una pantalla monocromática simple de 7 segmentos. Se utilizan para conectar las pistas conductoras en el cristal de una pantalla LCD a un conjunto de almohadillas en una placa de circuito (Estas pantallas a veces sufren de segmentos muertos o filas de píxeles).
-
Los tornillos o las pestañas metálicas retorcidas generalmente aseguran un marco de metal, que comprime la tira elastomérica entre la pantalla LCD y la placa de circuito. Libéralos para separar la pantalla LCD y la tira elastomérica.
-
La tira elastomérica consiste en capas conductoras y no conductoras que se alternan a lo largo de su longitud. Hay varios para cada conexión a la pantalla LCD, lo que elimina la necesidad de una alineación precisa.
Hi
How do you fix this type of connection
Do I need a special glue or just reheat with soldering iron
Thank you
Nothing you can do with glue or a soldering iron. Disassemble and take out the elastomeric strip. Gently squeeze it sideways, i.e. in a direction perpendicular to its height. Gently clean the glass and the circuit board with isopropyl alcohol and reassemble making sure that the elastomeric strip is squeezed (in its height) as much as possible between the board and the glass. Alternatively, if you can get a replacement elastomeric strip of the same dimensions that would be even better but I think they’re only normally sold in large quantities to manufacturers.
-
-
-
Eventualmente, encontrarás un conector que nunca has visto en ningún otro lado.
-
Inspecciona el conector con cuidado e intente determinar cómo se separa.
-
Si aún tienes problemas, busca guías de dispositivos similares para ver si brindan alguna pista o solicita ayuda en nuestro foro de Respuestas.
Hi,
I've just been wrangling with a 25ish year old Kenwood stereo. There were some connectors on it that I couldn't work out - which led me to this guide. The specific connectors aren't shown here. It turns out theybare spring-loaded, and you have to push the upper part (that I initially thought was a plug) down into the board - and this releases the ribbon cable. On the stereo, there are some shorter ones (8-pin), and some longer ones (15pin). On the longer ones, if you look close enough, they helpfully say ‘push' on them.
I've taken some photos of you'd like to add them to this guide?
-


Cancelar: No complete esta guía.
361 personas más completaron esta guía.
Un agradecimiento especial a estos traductores:
100%


Estos traductores nos están ayudando a reparar el mundo! ¿Quieres contribuir?
Empezar a traducir ›


20 comentarios
Beautiful work. However, my modern LCD flat screen TV set uses the "No-Fuss Ribbon Cable Connectors" and I think they are fairly common in this application.
"Step 2 — No-Fuss Ribbon Cable Connectors
Occasionally, you'll find a ribbon cable that simply pulls out of its socket, with no retaining flap.
<snip>
These kinds of connectors are fairly rare, so check carefully for a way to release the connector before you resort to pulling on the ribbon cable."
This was great! thanks for the detailed pictures. I have a question though on a very specific port used on apple tv 1.
here's the link to my post
It's important to note that ZIF connectors often do require force to insert, for example the digitizer ribbon cable on the Nexus 6, which has a bit of negative tension from being curved. It has to be pushed in using the little raised portion with a fingernail, and held so the line on the cable matches the line on the PCB before closing the retention bracket or else it will not connect properly.
I have a visio T-con board that has two flat ribbon connectors the one to the screen as a flip open latch you can do with your finger nail the other has a thin metal strip that over hangs the end on both sides. And ideas on how this one opens up? Rowland
Great post!
Would be great if Jeff or someone could help me with my question, doesn't look as though that connector type is covered in the the post above. Its listed here - Need help with these Connector latches
TIA,
Norm
good page, but I was looking for the display connectors for ipad air 2. They seem to just push on, but the pressure is so light I am not confident that they are seating correctly. It won’t turn on at any rate though the screen briefly comes up at boot.
Those are pop connectors—see Step 4. Align them carefully, and press them down; you should feel them click into place.
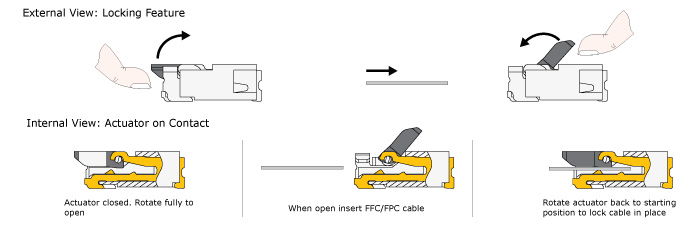
I recently ran into a FFC (Flat Flex Connector) type I didn’t know how to open exactly, and this page only refers to the flip-lock type. Turns out it was a slide-lock connector and the diagrams on the page below were very helpful. I simply used my tweezers to push on the two tabs towards the cable, the actuator moved easily once you knew which way to apply force.
Doing ifixit versions of these diagrams would be VERY helpful.
Slide Lock Diagram: ''https://gct.co/Images/products/ffc-con...
Flip Lock Diagram: ''https://gct.co/Images/products/ffc-con...
Parent Page: ''https://gct.co/ffc-connector''
Googling to find these hints was VERY difficult not knowing the terminology. But this ifixit page was at the top of the stack, update to save the next guy half an hour googling?
(Updating to say you DO mention ‘sliding’ connectors… but the mechanism of the actuator is not very clear and/or the photos didn’t quite get me there, mine was a smaller pin-pitch I think too).
@clickykbd This is a great idea! I’d love to add it to the guide. Do you mind sharing the name of the device you were working on, so we can try to get some photos of that connector in the wild? Or do you have some photos of your own? For copyright reasons, we usually can’t borrow other people’s images or graphics for our guides without permission. Thanks for sharing!
Jeff, It was a Marshsall VLCD70MD-3G on-camera/field monitor. The connector was for the LCD ribbon flexible pcb cable.. I’ve still got it apart as I am trying to source a LCD, so I can try to get some half decent photos in a day or so. I’m pretty sure I’ve run into these before and they came apart with the “just pull” method… but reseating them without mangling the flat-flex was very difficult without knowing the trick if I recall. Thought I would do my homework this time.
Bonjour
Je voudrais retirer un câble nappe écran sur la carte mêre de mon téléviseur LG 47LE5510 il y a dessus un petit levier qui se lève à l’ongle mais le câble semble collé et je n’ose pas forcer. Sur le connecteur est indiqué FS60 et le câble est un EAD60974135.
Pouvez-vous m’aider car je ne voudrais rien casser et ces 2 câbles coûtent cher en piece détachée.
Merci d’avance
Thank you, thank you, thank you. My husband really needed this.
Some ZIF ribbon connectors I’ve found, have the latch on the side of the insertion of the cable, some others on the oposite side. So be sure to pull on the correct side, or you will damage the connector. Another tip is to pull them very gently and when closing it, also with not much pressure, I have spoiled some hinges in the process, what is left to do is replace the whole connector.
Great article, but just one question… WhatWhat happens if you break one of these? Can you suggest a fix for something like the ZIF connector.
Is it pretty much a write off if you snap the latch on some of these connectors?
I have a 3D printer from China, it is an Artillery Sidewinder X1 v4 model . It uses ribbon cables from the power supply to the heated nozzle and the heated print bed. It is my understanding that power is sent along a couple (or more) of the wires to distribute the load, and I get a good deal of heat at the connector site, on the ribbon cable itself. It is enough heat that I believe the connection and/or the ribbon cable itself will fail.
It is a friction fit connection and I imagine it is difficult to keep the connections inline at the connecting point. The printer uses 20 wire and 30 ribbon wire cables as can be seen at: https://www.amazon.com/Artillery-Ribbon-...
My question, and I do understand the value of your time, is – what can I do to better align the connections? Is there some sort of heavier gauge ribbon I can use and, perhaps, do so through some sort of adapter at the connection point?
Anything you can suggest is appreciated.
Hi,
i need the connector in step 10.
Where can i buy this?
Thank Manuel
Merci : très clair et complet. Je vais pouvoir aider un ami à rebrancher le connecteur de son GPS
Where may I purchase these zif ribbon connectors?
What if I break the ZIF connector itself (were the ribbon goes), is my tablet ruin?
elainegb27 - Contestar
Unless you are good with a soldering iron or hot air station I would suggest taking it to someone that can do it.
deswaite -
“…Be sure to pry up on the hinged flap, not the connector socket….” but we’re not going to provide any further information than this and good luck with that :-)
andyescribe - Contestar
That’s what the photos are for—providing a visual example. There are a million different implementations of ZIF connector out there, so it’s not possible to provide specific instructions for each one in a single guide. For that, you need to search for the guide for your specific device. Unfortunately, looking at your post history, it appears you attempted to do that, but the guide you were following (Nexus 6) mislabeled the battery connector as a ZIF connector. I’ve corrected the guide. Sorry for the trouble!
Jeff Suovanen -
You have provide awesome tips which is very helpful. I have issue with FPC that not connecting with Cable
Ralph Vale - Contestar
hola he intentado cambiar el cristal de mi apple watch 2 despues de conseguirlo me he dado cuenta que he retirado el cable sin bajar la pestaña o no se que he doblado los pines despues de intentar una y otra vez el conector zip de la derecha ha quedado inservible es posible comprar ese conector en algun lugar o sabrian que nombre de conector debo buscar ya que no viene en ninguna expecificacion gracias
Fran Ansio - Contestar
Great tutorial, thanks. Had I not seen it, I would have irreparably damaged my keyboard. Perhaps it lacks a bit more guidance on how to place the cables back. I found that part to be the hardest actually.
Juan Dueñas - Contestar