
iBook G4 14" 933 MHz-1.33 GHz Hard Drive Replacement

Introducción
Ir al paso 1You can install hard drives up to 9.5mm thick.
Qué necesitas
Partes
Herramientas


Ver más…
-
-
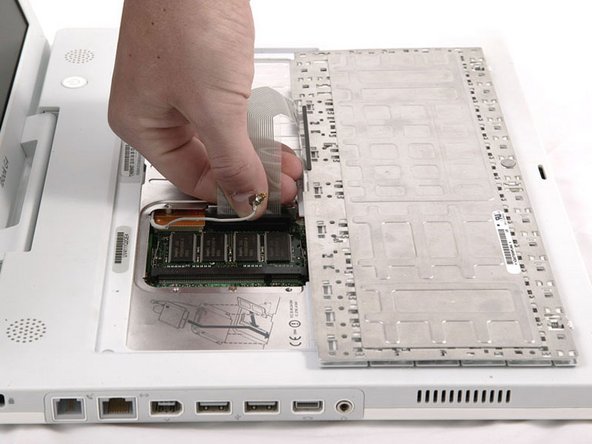
Pull the keyboard release tabs toward you and lift up on the keyboard until it pops free.
-
Flip the keyboard over, away from the screen, and rest it face-down on the trackpad area.
-
-
-
Use a pin (or anything you like) to remove the three rubber feet from the lower case.
-
-
-
Remove the three hex screws using a T8 Torx screwdriver (or Allen screws using an Allen key if these are used).
Cita de dalekaty:
Why use a T8 Torx when these screws are metric hex 2? The T8 didn't work at all. Other than that this was a very easy repair. It cost $29 instead of the $150 that I paid the last time a Mac shop made the same repair.
Had the same issue with a T8, although I blamed that on my T8 being quite stripped. Finding an appropriate bit was quite a challenge... but I'm pretty certain a T8 isn't correct. The screws have a hex head, not a Torx... maybe T8 is the closest thing that tends to fit...
Not Torx, but allen key (British wrench), 2mm
I attempted this last night following all the steps correctly, when I was done my ibook would not turn on. Now sure where I went wrong? Any ideas. Thank you
-
-
-
-
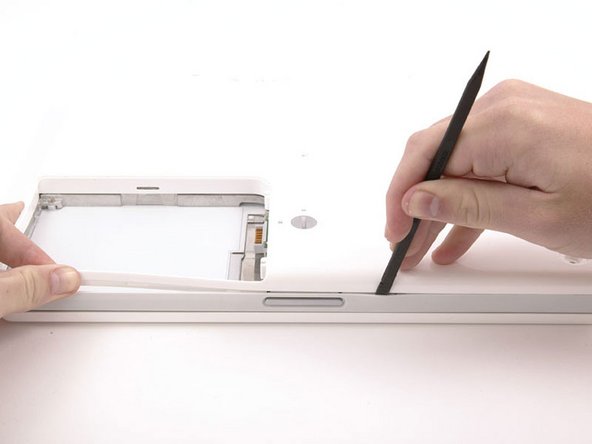
Push the thin rims of the lower case surrounding the battery compartment in, bending them past the tabs, and then lift up to free that corner of the lower case.
I printed these instructions out, and this one was at the top of page 2. I found the first paragraph amusing enough that I had to show my boss.
-
-
-
Continue to run the spudger around the front, right corner. There are two tabs on the port side of the computer, one near the front corner and one near the sound-out port.
For me, this was really the toughest part! Trying to find/get a good grip on the iBook and really *forcing* that spudger around. All without scratching the display.
Once you loosen the the front the seam is very tight. I was able to slide the spudger in the middle of the port side instead of starting at the corner.
-
-
-
Once the front and sides of the lower case are free, turn the computer so that the back is facing you and pull the lower case up and toward you until the back tabs pop free (it may be helpful to jiggle the case up and down).
This was the scariest part for me. I had to wiggle it a lot as it seemed to be stuck. But it did come loose.
There are 4 tabs in the back. It'll come off easier if you use an spudger to release those.
-
-
-
Remove the following 10 screws from the bottom shield:
-
Six 3 mm Phillips
-
Three 7.5 mm Phillips
-
One 14 mm Phillips
-
-
-
Lift the bottom shield off.
My dc board had 2 screws. for some reason when i tried to screw them both back in only one got tight. the other one just kept twirling so i left it out. i didnt want to have a loose screw rattling around in my computer.
also had trouble laying down the wire to the dc board. it wouldnt lay flat but i was able to get it flat enough. overall it worked and the computer is now up and running!
thank you! it was pretty easy
-
-
-
Remove the single Phillips screw securing the DC-In board.
At this point alternate hard drive can be connected to logic board for testing. Alternate hard drive and drive cable req'd. Remove hard drive cable from logic board. Plug in alternate cable and drive.
-
-
-
Disconnect the DC-In cable from the logic board.
My entire black woven cable cover was stuck down pretty well w/ 2x stick tape.
-
-
-
Deroute the cable from around the optical drive, removing tape as necessary, and angle the DC-In board out of its compartment.
Went pretty smoothly as described. I used an egg crate marked for each step where screws were removed to keep them all sorted out (OCD vs. old age). Only other tip was that in step #5 the rings and screws at the corners of the back seemed to be integrated and came out together, the rubber feet came up by pulling from the side - didn't really require a thumb tack. Otherwise, having the right tools (described) made it a snap.
Cita de drscole:
Went pretty smoothly as described. I used an egg crate marked for each step where screws were removed to keep them all sorted out (OCD vs. old age). Only other tip was that in step #5 the rings and screws at the corners of the back seemed to be integrated and came out together, the rubber feet came up by pulling from the side - didn't really require a thumb tack. Otherwise, having the right tools (described) made it a snap.
I agree - having the right tools is the key to this going smoothly. It would have useful to have more detail around where the long and short screws go on the heat shield. This is minor niggle and overall good instructions.
Cita de drscole:
Went pretty smoothly as described. I used an egg crate marked for each step where screws were removed to keep them all sorted out (OCD vs. old age). Only other tip was that in step #5 the rings and screws at the corners of the back seemed to be integrated and came out together, the rubber feet came up by pulling from the side - didn't really require a thumb tack. Otherwise, having the right tools (described) made it a snap.
The egg crate is a good idea. I use a piece of cardboard and I label each step and layout the screws visually as I pulled them out.
-
-
-
Remove the following 11 screws from the bottom of the computer:
-
Three 3 mm Phillips around the battery compartment. (Some models may only have two screws.)
-
Three 4.5 mm Phillips along the optical drive bezel. (a magnetic screwdriver may help to lift these screws out)
-
One 11 mm Phillips in the lower right corner. (if present)
-
Four 14.5 mm Phillips.
The middle screw along the optical drive got sucked sideways into an opening by something magnetic and proved impossible to get out with a bit of blutack on the end of a screwdriver. In the end turning it over and giving it a smart tap worked.
-
-
-
Turn over the computer and open it.
-
Remove the 2 Phillips screws (3mm) from the edges of the keyboard area.
-
Remove the 4 mm Phillips screw from the lower left corner.
-
-
-
Lift the upper case enough to disconnect the blue and white power cable from the logic board. Using your fingernails or a dental pick, carefully pry the connector from its socket. Make sure you're pulling only on the connector and not on the socket.
I skipped this and the next step altogether. Instead of taking the risk of breaking the power and/or speaker sockets, I left them connected. I put a stack of big books just to the left of the iBook. I swiveled the top case off and let it lean against the books. I removed the top shield and carefully swiveled it off and to the left, so it is now leaning on the top case. I had to move the power cable out of the way, and re-orient the top case so it's resting on it's back edge while the shield was resting on it's left edge. Then I slid the iBook towards the edge of the table and disconnected the HD ribbon from below! I then proceeded with removing the HD and putting in the new one.
When putting the rings back you will need to figure out their correct orientation. Just rotate each ring until you find the position that will make it flush with the case. There are three possible positions but only one of them is the right fit.
As the other comments make plain, you can't overemphasize that the power connector is in tight, and it is much easier to pull the connector off the board. That's what happened to me -- I'm really bad at soldering, so I will be looking for a replacement board. Oh well.
-
-
-
Carefully disconnect the multicolored speaker cable from the logic board. As before, make sure you're pulling only on the connector and not on the socket.
-
-
-
Remove the following 16 screws:
-
Thirteen 3 mm Phillips.
-
One 3 mm Phillips. (actual screw not present in image)
-
Two 4 mm Phillips.
Missing in this photo is the Bluetooth antenna present in some iBooks. It is located at the upper right corner of the battery compartment, just above the 4mm screw. You can see the bracket for the antenna in the photo. It is the two I-shaped holes just above the 4mm screw that must be removed in this step. To remove the antenna, slide it toward the LCD, and tilt it vertically back towards yourself. In the next step, where the shield is removed, you will need to slide the antenna through the lower I-shaped hole.
-
-
-
Lift the top shield up from the right side, minding the upper left corner, which may catch on the metal framework.
-
If your iBook has Bluetooth, as discussed in the previous step, you will need to slide the antenna through the lower I-shaped hole in the shield before completely removing the shield.
-
-
-
Turn the computer over and disconnect the orange hard drive cable, removing tape as necessary.
On my iBook, the hard drive was much easier to deal with than it appears in the Guide. My hard drive was connected to the board with a ZIF-type connector, held in place with a gray plastic bracket secured by two screws. After removing the bracket, I just had to ease the drive up and out. Then the gray plastic connector had to be pulled off the pins and transferred to the new drive along with the bumpers, etc.
-
-
-
Remove the four Phillips screws securing the hard drive to the metal framework.
-
-
-
Remove the hard drive brackets from the left and right sides of the hard drive.
-
-
-
Use the transparent orange loop to disconnect the large orange ribbon cable from the hard drive.
When you replace the new drive, and before you close up the case again, make sure that the ribbon connector is pushed firmly onto the correct pins on the HD. Check that the jumpers on the drive (if it has any set) are set to Master. Also make sure that the other end of the ribbon connector is pushed well onto the socket on the main circuit board. You may find that the drive isn't seen if the connections aren't correct. Best to check before you put all those screws back in!
I was doing great, right up to the point where I realized my new HDD was SATA, instead of EIDE....Sigh.
I follow everything, and
It's Work !
Take care of the mouse pad before of re-assemble everything.
I just change the Hard Drive with a 933 MHz with 640 Mo with 10.5 and it's work perfectly.
Thanks’ a lot for iFixit!
-


To reassemble your device, follow these instructions in reverse order.
To reassemble your device, follow these instructions in reverse order.
Cancelar: No complete esta guía.
158 personas más completaron esta guía.
Documentos Adjuntos

17 comentarios
isit really possible change 320gb hard drive to ibook g4 1.33 14". i heard motherboard doesnt support bigger than 128Gb?
I put one in and now the machine doesn't recognize the drive.
I'm gonna just pull it out and use it as an external until I can figure it out.
Cita de chacal:
isit really possible change 320gb hard drive to ibook g4 1.33 14". i heard motherboard doesnt support bigger than 128Gb?
I just went through the whole process and it worked fine. Used super duper to copy the original drive then restored using target disk mode and my MBP
Make sure that you print out the screw sheet (PDF), and lay out all the screws on the 3 sheets of paper. It makes it easy to keep track of all the screws, and you won't make a mistake when putting every thing back. Also, go slow and take your time. You don't want to rush on the HD replacement. It took me about 2 hours. The hardest part was take the case apart. You may want to look at a youtube video called "iBook G4 Hard Drive Swap", by smalldog.com. The video shows how the case comes apart, and puts your mind at ease when you hear the cracking sounds as the tabs are released. The instructions on the ifixit.com web site were awesome.
Cita de sapugh:
I just went through the whole process and it worked fine. Used super duper to copy the original drive then restored using target disk mode and my MBP
I too installed a 320 gb WD Hard Drive in a iBook G4. No problems. However, I did test the drive with one of my hard drives utilities to make the sure there were no write errors before installing the drive.
Just follow the instructions step by step and take your time, it all worked - it took me four hours but I moved very slowly and cautiously. Two things worth mentioning:
- Somewhere I read a note from someone who suggested using a guitar pick for working around the edge of the case to get it open. Turned out to be an excellent idea. The guitar pick plastic is a little softer than the case so there is no chance of nicking or gouging the case.
- The three screws along side the optical drive are deeply recessed. A magnetic screw driver is a necssity.
Tried using a deviled egg plate to put the screws in as I took them out, a fresh spot for each step and size of screw, made it easy to go backwards for re-assembly.
ok, works. but why are steps 24 thru 26 necessary? I did not remove the DC cable and it worked out anyway. Why should one remove it? Otherwise, everything turned out to be exactly as described, except the screw in step 33, next to the display, it was not there, but a different screw in a different place. I left it, bent up the shield carefully to access the HD. Used a Linux based machine to dd the old 40GB Fujitsu MHT2040AT drive to a 64GB Supertalent IDE SSD FHM64GW25H, which might waste some 15GB of the new device, but with no TRIM command around it's a good idea to keep the SSD partially unused for performance reasons.
On the 1.33 Ghz and 1.42 Ghz, there is a different hard drive connector, and is easier to remove. Also on these two specific models the airport card is not above the RAM, it is to the left of the heatsink, on the logic board. Pretty great guide! I always love ifixit's guides.
OK, I know it's hard to believe anybody still uses these, but I have a friend who uses hers for just one special app. She has a new MBP as well, but didn't want to give this old G4 up. So when the HDD failed, I scrounged up a legacy ATA 320 GB drive and followed the intrepid iFixit guide. The "storal of the morey" is, it's good that you guys keep all your old stuff on the site. Thanks a lot, and send me some more of those cool I Fixed It! stickers!
There is support for a big hard drive in this type of ibook, at least if i can beleive mactracker, and i have to say, very usefull guide!!! I love the way things are explained, they even tell you where to pay extra attention, and if you reverse the guide, that also works amazingly well . . . Love you guys!
Thank you for this "how to" I have just finished re-assembling my G4 iBook having replaced its 60GB with an 80GB I had lying around - 20GB extra capacity will make a difference and the 60GB will be kept safe as a backup :-)
I used Carbon Copy Cloner to clone the 60GB (with the 80GB in a USB enclosure) before I did the swap.
I had previously dismantled a friend's old very broken G4 iBook to get the hard drive out for data transfer to his new macBook but not with instructions as reassembly was pointless as the power circuits were fried due to dropping from a great height.
I used a compartmented box to hold the screws and bits from each stage. I couldn't get the speaker and other 2 coloured cable disconnected but was careful with the upper case - kept the screen part of the case apple symbol down on the desk and lent the cables dangling case against the side of my Chromebook that I was viewing this "how to" on :-)
I just bought TWO 60GB 7200 rpm Ex-IBM HDD’s for $10 ppd. on eBay.
A seller in Oakland sent me 2 for 1
And a couple sticks of PC-2100 DDR2 200 pin RAM.
I put the drive in the chassis, then boxed the lot..
Screws went into small zip locks and old camera filter cases
those last from my decade as a camera repairman .
Egg cartons work nicely, TOO!
I’ll stick to MacBook’s, Lombard’s, Pismos’s and ThinkPads
Those 40 screws!!
The Tamperer!
Boxed because it was 59F out!
I cleaned and lubed my Bianchi Tangent 21 speed Cross Bike
Then looked after our courtyard garden & rose bushes.
The iBook will be fine, next cold day…
Or next WINTER
J.C.
The - Tamperer!