
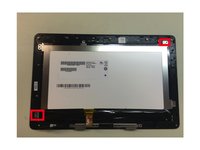
Asus Transformer T100 Front Panel Digitizer Replacement
Introducción
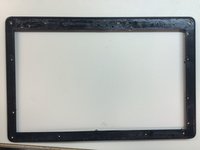
Ir al paso 1This is a guide how to change the Digitizer screen on an asus T-100 transformer book.


-
-
In order to get the back cover off, use a tool you are familiar with to pry it open carefully.
-
-
-
Insert a pick, and slowly go around the edge of the tablet to loosen the back shield
-
-
-
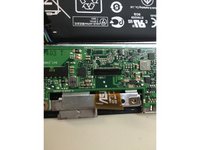
Use a Phillips #1 screw driver to loosen all the screws.
-
Make a system to organize the screws, since they have different sizes.
-
-
-
Loosen the tape of the battery connection.
-
Be careful you don't break the wires. They can seem stuck and hard loosen up.
-
Separate the cable from the connecter.
-
-
-
-
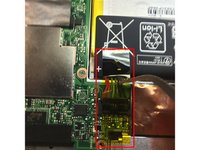
Under the tape is there a connection we have to take off, plus another screw.
-
As in step 9 later there is a white strip under the black sticky sponge that lifts to allow the ribbon tape to come out easily.
The sticky black plastic was half over the ribbon cable. When trying to get it off the cable, I broke the motherboard connection piece. Go slow…
-
-
-
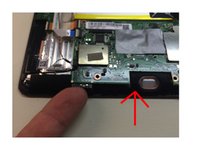
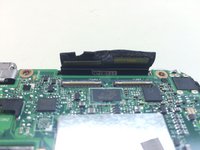
Next we have to take out the speaker because it has a connection on the motherboard.
-
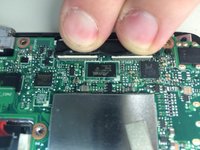
In order to get the speaker out you have to lift up the motherboard just a little bit. You can use your finger or any other tool you feel familiar using.
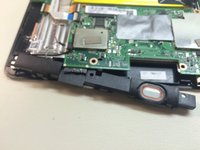
Take a brief moment to really understand the positioning of the speakers because not both of them sit in the same manner.
It could be useful to kindda start removing them and half way into it, sit them back the way they were just to get the good feel and confidence you would be able to get them back the way they should be in, once completely taken out.
-
-
-
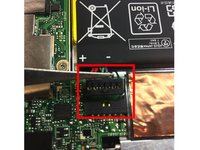
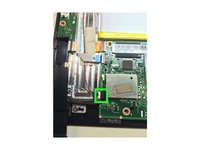
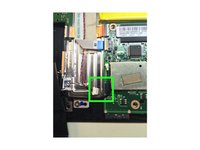
Next step is a little tricky. We have to disconnect the digitizer. ! Be very careful you don't ruin the closing mechanism. Simply pull back and pull slowly until the connection comes out.
-
-
-
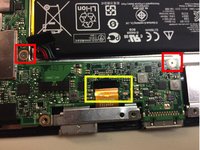
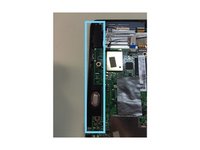
We are now ready to take out the motherboard. This is done by following all the steps to this point.
-
Carefully lift the board in both ends or in 2 of the 4 corners and slowly lift it off to the side.
Be aware that you need to peel a black somehow sticker(I suppose is the antenna) on top left.
Also there is another screw that you need to remove also top left before being able to take out the motherboard
-
-
-
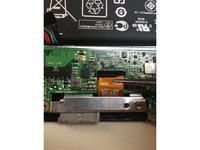
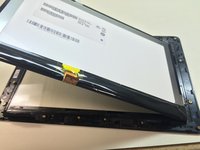
Next step is to take out the LCD. Depending on the model # of your device screws can be placed different corners.
-
Take out the screws and lift out the LCD screen
I have one more screw in the upper left corner. Don't forget it during reassembly.
It is worth noticing that spare parts sellers can sell you both frame and screen panel already put together as in one part to save you the trouble of disassembling the frame. In my case, I paid for both of them and actually skipped this step as well as the following one, thus replacing the screen panel with the frame was a matter of just reconnecting it as a whole.
-
-
-
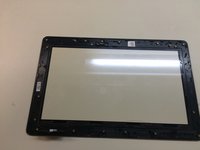
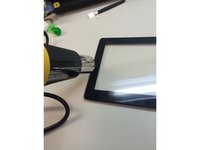
The last step is to separate the plastic frame from the old Digitizer glass.
-
I recommend using a heat gun to heat up the glue and then easily separate the old digitizer.
-
You are now ready to put your new digitizer on the plastic frame and assemble the T-100.
a warning when reassembleing the digitizer and bezel, DO NOT APPLY ANY FORCE TO THE BASE OF THE DIGITIZER CABLE, IT WILL LIFT OFF TE PANEL AND RENDER YOUR NEW GLASS COMPLETELY USELESS.
-


To reassemble your device, follow these instructions in reverse order.
To reassemble your device, follow these instructions in reverse order.
Cancelar: No complete esta guía.
32 personas más completaron esta guía.
27 comentarios
Thanks so much for the guide, it was a long process but we'll worth it.
Hope it was helpful and that it was detailed enough :) thank you for looking :)
Great guide, however I would make one small addition. In the final instructions just a little warning about keeping the heat very low, similar to a hair dryer and take your time. I discovered the hard way that the plastic bezel has quite a low melt/warp temp and I effectively ruined one of the two I was repairing. Sourcing a new digitizer with bezel or bezel alone is proving to be incredibly challenging.
Thank you for the heads up I will edit that as soon as possible
Please, can you give the clearer instructions about 3 different screw sizes, where are they locations. I mixed them up...
What step did you mix them up at ? and did you figure it out
Great guide, Nick. Thank you very much. Could you possibly add a little more information about which screws go in which holes in the tablet? When I replaced the digitizer I lost track of where long and short screws went. This meant that I put a long screw in the wrong place; this created a bulge that cracked the new digitizer when I tried to snap the case back together. Since I lost track of where each screw came from I don't know how to reassemble it correctly after I install the (second) new digitizer. Thanks!
I have a asus t100ta the screen turn on grey but dose not show a imagining
check that the display cable is fully inserted, the little white lines on the cable should line up with the edge of the connector.
For future people who are having this issue, on mine it was caused by the part of the motherboard where the keyboard connects pushing on part of the screen below it.
Thanks for the guide. Could you provide better information on how to remove the connector under the copper tape? Mine seems quite stuck. Also, some of the screws are really tight and couldn't be unscrewed with two of my screwdrivers. Could you give a tip on removing them?
What step is it ? I'll try guide you through it if you need a hand
you have to flip up the white part of it
To keep the screws organized I suggest having a piece of corrugated cardboard that you can draw a crude drawing of the computer and then push the screws into the cardboard in the appropriate places in the picture.
That being said I thought of this after I mixed up all of the screws and now the computer won't boot due to a screw being in the wrong place and shorting out the screen, so if you have a drawing of the screw locations I would very much appreciate a copy. Thanks
Not a bad idea sir, I might actually use this is the future :)
Anybody has got a picture of the screw organisation please ? I have mixed them all !!
Thanks for the guide!
Unless you're experienced, maybe aside two hours to take it apart, and one hour to put it together again. And some time to clean away glue residue - I had no good product for that, so that took at least an hour trying out acetone, scraping and oil to get it almost OK.
Some useful comments to the pictures, like the additional screw/antenna tape. I also discovered that the LCD was glued to the glass - which could have been step 11b.
I have also replaced the digitizer of an iPad, and compared to that - I would not rate this Asus job as EASY. At best medium. Think I spent less time on the iPad.
I organized the screws by plugging them into the styrofoam wrapping the came with my new screen bought on eBay. Thanks for all the tips.
Thanks for the guide. I completed it, and looks OK, but now battery isn't charging properly and orange LED only blinks. The computer did turn on, but battery was showing 0% and it wasn't showing charging though it was plugged in. Any thoughts?
There is a little chance that a battery is in the deep discharge and Laptop electronic just can't charge. You could try to do it from the outside power supply like this https://youtu.be/1ZzauxB-Wkg?t=98
tailz-z -
It seems the digitizer is not held on by any of the screws. So it is not clear why one can not simply remove the digitizer and front glass using heat (or cold) without having to remove the logic board or much of anything else.
Sorry for the late response.. Everything is glued together. The reason why you have to take everything out, is because it is easier that way to unhook the cables that is connected to the screen
Thx for this Tutorial. I replaced the display. But i cant plug in the copper tape (MB Top) because the Socket is defekt. Where can i buy a new socket?
Followed this tutorial and fixed my broken T100. I had not replaced a digitizer before and spent about 2 hours. I used iFixit’s magnetic mat to keep all the screws organized, which was essential since there were three types of screws. I struggled with the last step to figure out the proper technique to separate the two (how much heat to apply and how to leverage the parts apart), but got through it in the end. Thanks!
step # 9: Yes, very tricky! as I was pulling off the connector one of the white strips came off and damaged the metallic “pins” . I’m assuming this is screwed; what can I do?
La procédure de démontage est bien détaillée et effectivement c’est préférable d’utiliser un séchoir pour retirer l’écran cassé.
Toutefois, c’est dommage qu’il n’y ait pas de conseil pour la phase de remontage, car il y a des étapes avec des problèmes potentiels, comme la 6 et la 9. Pour la 6, j’aurai voulu savoir si la nappe pouvait ou non toucher la plaque du dessous et la 9 si on pouvait mettre un nouveau scotch, que celui d’origine. En ce qui me concerne, une fois après avoir terminé le remontage, la tablette s’est allumée, mais pas l’écran. C’est à ce moment là que je me suis dit que le tutorial ne comprenait pas une phase de test pour vérifier que l’écran neuf était fonctionnel et sans défaut.
J’ai été obligé de re-démonter plusieurs fois l’ordi et j’ai fini par casser l’interrupteur ON/OFF. En fait il faut faire plus qu’attention au moment de refermer l’ordi sous peine de le détériorer. Finalement changer l’écran soit même comporte des risques, même si en théorie la procédure est simple.
Extremely easy. I used two plastic prying tools.
jan - Contestar