Introducción
Esta guía de reparación fue creada por el personal de iFixit y no ha sido respaldada por Google. Obtén más información sobre nuestras guías de reparación aquí.
Usa esta guía para reemplazar la placa base en tu Google Pixel 6a.
Para tu seguridad, descarga la batería por debajo del 25% antes de desarmar tu teléfono. Esto reduce el riesgo de incendio si la batería se daña accidentalmente durante la reparación. Si tu batería está hinchada, toma las precauciones adecuadas.
Nota: esta guía se realizó con el modelo Verizon GB62Z, que cuenta con una antena 5G mmWave. Ignora los pasos que incluyen la antena 5G mmWave si tienes otro modelo, ya que el procedimiento es idéntico.
Necesitarás adhesivo de repuesto para completar esta reparación.
Qué necesitas
-
-
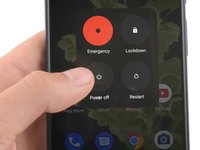
Apaga completamente tu teléfono y desconecta todos los cables.
-
-
-
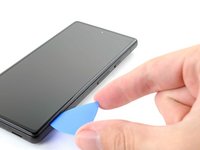
Inserta una herramienta de expulsión de SIM, una broca o un clip de papel enderezado en el orificio de la bandeja de la tarjeta SIM.
-
Presiona la herramienta de expulsión de SIM en el orificio de la bandeja de la tarjeta SIM para expulsar la bandeja de la tarjeta SIM.
-
Retira la bandeja de la tarjeta SIM.
-
-
-
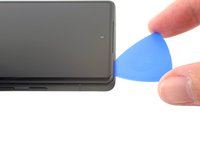
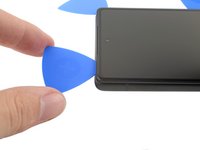
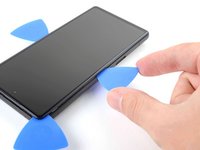
Costura de la pantalla: esta costura separa la pantalla del resto del teléfono. No hagas palanca en esta costura.
-
Costura del bisel: aquí es donde el bisel de plástico diseñado para proteger la pantalla se encuentra con el marco. Se mantiene en su lugar mediante clips de plástico. Aquí es donde debes hacer palanca.
Don't actually perform this step now - read a few more steps first!
If changing the glass on only would you not separate the screen seam?
It's pretty stupid, that most Pixel dissasembly videos don't talk about the two different seams.
On the first one I've opened it was very hard, because I've applied not enough heat before and maybe also because it was the seam that losses together with the screen bracket, which seems harder to open in one step.
The 2nd one came off pretty easy after first enough heat was applied and then I had to searately remove the screen bracket to get out the mainboard - BUT then only the top seam opened and the screen bracket itself remained in the case. So how to fix that? Is there another seal available for it, just add small amount of B-7000 or what is the best way to seal it well? -
-
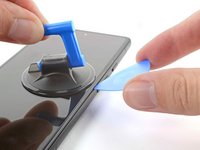
Herramienta utilizada en este paso:Clampy - Anti-Clamp$24.95
-
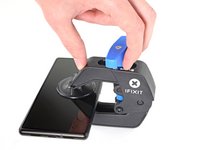
Tira de la empuñadura azul hacia atrás para desbloquear los brazos de la pinza.
-
Desliza los brazos sobre el borde derecho de tu teléfono.
-
Coloca las ventosas cerca del centro del borde derecho del teléfono: una en la parte delantera y otra en la trasera.
-
Apriete las ventosas para aplicar succión.
-
-
-
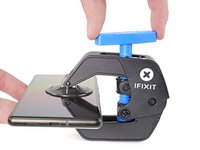
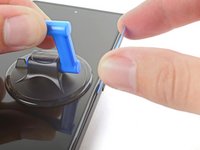
Tire de la empuñadura azul hacia delante para bloquear los brazos.
-
Gire el mango en el sentido de las agujas del reloj 360 grados o hasta que las copas empiecen a estirarse.
-
Asegúrese de que las ventosas permanecen alineadas entre sí. Si empiezan a desalinearse, afloje ligeramente las ventosas y vuelva a alinear los brazos.
-
-
-
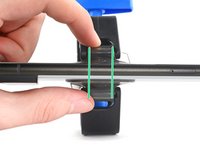
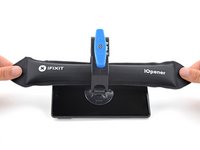
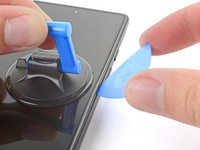
Calienta un iOpener y pásalo por los brazos del Anti-Clamp de modo que quede apoyado en el borde derecho del teléfono.
-
Espera un minuto para dar al adhesivo la oportunidad de soltarse y presentar un hueco de apertura.
-
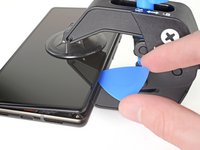
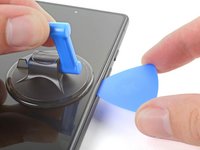
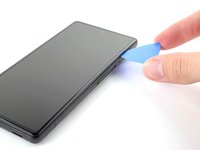
Inserta una púa de apertura bajo el marco de la mampara cuando el cree un hueco lo suficientemente grande.
-
Sáltate los dos pasos siguientes.
-
-
-
Calienta un iOpenery aplícalo en el borde derecho de la pantalla durante dos minutos.
I used a hair dryer to heat up the adhesive. Unfortunatly the IOpener did not work for me. Even with the hair dryer, it was quiet difficult to soften the adhesive. It might have been due to the phone beeing only a few months old.
It was quiet difficult to seperate the screen, but it eventuelly worked. I feel like it took the heat a while to move through the cover and heat up all of the adhesive. After almost giving up, I tried again after a few minutes without heating it again and it suddenly worked. So keep that in mind.Agree with LetsTryThisNext's comment -- it takes a while for the adhesive to loosen. Expect to be at it for 20, 30 minutes -- with the iOpener not working (for me either), re-microwaving the iOpener, then hair dryer, then suction cup not sticking, etc. Good idea to give it a few minutes between each heating attempt.
The iOpener worked for me - once I got the expectation right that it was going to take a while.
Went through about 5-6 cycles of:
* Heating for 40 seconds (1100W microwave); applying to phone for 2 minutes; heating for 30 seconds; applying to phone for 2 minutes; allow to cool for 10 minutes
Could probably have done with one more cycle to get glue even more sticky TBH but when it lifted it was obvious.Took me 3 heat cycles with the iOpener. Basically I did 30 seconds in 1000W microwave and left to heat adhesive for 5 mins, then after stuggling to get the pick in for a few minutes, I did 10 seconds microwave then a couple of mins warming adhesive and a couple of mins failing to get the pick in. Then on 3rd attempt after anothe 10mseconds in the microwave, i got in easily. Seems like the adhesive really takes a while to melt. I also improved my technique with the suction cup which seemed to help lift the screen. Once you are in it is easy to release the remaining clips.
I started with a single edge razor blade and made 1-2 inch cuts to the bezel seam, then applied the opener with a hair dryer on low about 6 inches away. After no more than 2-3 minutes I applied the suction cup, and used a combination of the straight edge razor and picks to open the screen. It was very easy.
The iOpener worked for me, but I went for multiple applications to loosen the adhesive. I think the pins are too big and that's the main issue for people. I used a thin cutter to make a wedge. It probably ran the risk of some damage to the battery. I'd recommend something plastic, thin, and preferably somewhat wide to make enough space for the iFixIt wedges.
The iOpener worked for me. I just insisted on using it until the screen visibly moved upward (some creaking is also noticeable). It was heated for 35/45 seconds with 800 watts in the microwave oven every 10/15 minutes.
-
-
-
Aplica una ventosa a la pantalla, lo más cerca posible del centro del borde derecho.
-
Tira hacia arriba de la ventosa con fuerza firme y constante para crear un espacio entre el bisel y el marco.
-
Inserta una púa de apertura en el espacio.
Would be helpful to have alternative solutions offered here for those with shattered screens, since suction cups don't work.
Hi Paul.
Thank you for your comment! I have updated the step to provide an alternative solution for shattered screens.
Would just like to note that in my particular case even tape or super glue did not work, due to the screen being shattered right along the spot where you need to place the suction cup. I ended up resorting to inserting a razor blade into the seam to open it just enough to insert the pick.
I'm in the same boat as mkirwin no amount of pulling with the suction cup worked, I had to use a razor blade to get the seam separated enough to insert a pick. Maybe I didn't heat up the adhesive enough but that stuff is super strong
If your suction cup is not working properly: Heat it up a little bit and it will have a lot more suction.
I'm having trouble pulling on the suction cup, keeping the phone down and inserting the pick all at the same time. The suction doesn't hold unless I use my other hand to keep the phone down, but then I can't use the pick. Is there a way Im supposed to keep the phone locked down?
Would something like this suffice in lieu of a razor blade?
I, too, cannot a gap with the suction cups.
Pick is nowhere near good enough to start the process, and the suction cup is really weak. I didn't have an iOpener because I didn't want to buy it. I had one or two cracks near the middle of the screen, not that bad but enough that pulling the suction cup just made it come loose. I had to 1) apply packing tape to the screen, 2) soak the suction cup in a bit of near-boiling water for a minute or two, 3) use the edge of my pocket knife (had no razor blades), and most importantly 4) hold the phone with the bottom edge against my chest, top edge in my off-hand, point the screen toward my offhand, and pull the suction cup with my offhand. This position was WAY easier than having the phone flat on the desk.
If the screen glass is particularly broken and/or the suction cup has lost elasticity: rely heavily on clear wide packet tape by putting a smooth layer on the screen and sticking another raised layer over it so you can grip it with your hand.
Use the Jimmy if the opening pick is not thin enough to fit through the slot, being extremely careful not to smear the phone shell and not to abruptly insert the pick inside the phone causing serious damage to internal components. Then use it to create just enough space to insert the first pick, then continue with the picks.The Jimmy is also useful for cutting the strands of adhesive that stick to the screen and make it difficult to separate from the shell, while keeping in mind the warnings in the previous point.
-
-
-
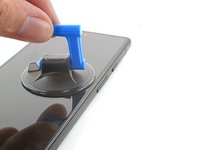
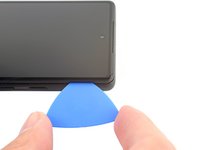
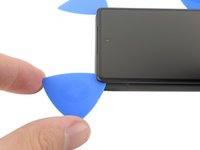
Mientras sigues aplicando succión, gira la púa hacia arriba en un ángulo pronunciado.
-
Empuja con cuidado la púa mientras haces palanca para volver a colocar la púa de apertura en la costura del bisel.
Unfortunatly my plectrums I got with the pro tool kit bent way too easy to open up this first crack between screen and housing. But the reason might have been, that the adhesive was not soft enough yet
I gave up with the suction cup. My screen was too cracked. Instead, after applying heat to loosen the glue, I used a very tiny flat head precision screwdriver to prise the screen open. Not recommended as it leaves a tiny scratch, but saves a lot of hassle. See also https://www.youtube.com/watch?v=vxdaaTd7....
-
-
-
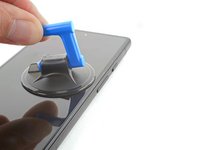
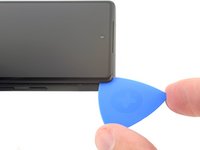
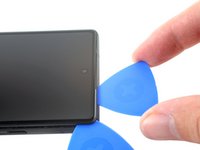
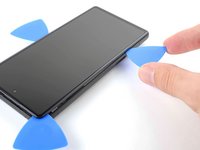
Desliza la púa a lo largo del borde derecho para soltar los clips de plástico que sujetan el bisel al marco.
-
Coloca la púa en el borde superior derecho antes de pasar al siguiente paso.
-
-
-
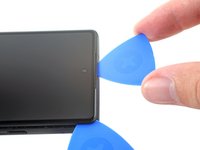
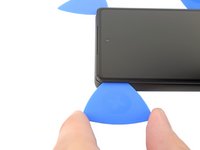
Gira la púa de apertura alrededor de la esquina superior derecha del teléfono para soltar los clips.
-
Deja la púa de apertura en la esquina superior derecha para evitar que los clips se vuelvan a bloquear.
-
-
-
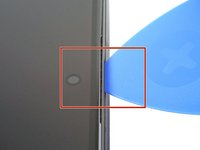
Inserta una nueva púa de apertura en el espacio que acabas de crear.
-
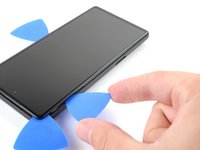
Desliza la púa a lo largo del borde superior para soltar los clips.
-
-
-
Gira la púa de apertura alrededor de la esquina superior izquierda del teléfono para soltar los clips.
-
Deja la púa de apertura en la esquina superior izquierda para evitar que los clips se vuelvan a bloquear.
I found that using the side of the pick instead of the point made it easier to keep from over-inserting the pick and it provided more area to keep the glass separated from the frame. It was also easier to slide it around the edges this way. Still had to use the point to get under the frame initially.
-
-
-
-
Inserta una nueva púa de apertura en el espacio que acabas de crear.
-
Desliza la púa a lo largo del borde izquierdo para soltar los clips.
-
Repite el procedimiento de rotación y deslizamiento para el borde restante.
-
-
-
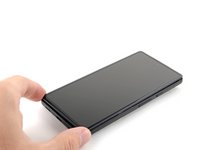
Levanta el borde derecho de la pantalla hacia arriba y hacia el lado izquierdo del dispositivo, como si estuvieras abriendo un libro.
-
Coloca la pantalla boca abajo y paralela al marco antes de continuar.
-
-
Herramienta utilizada en este paso:Tweezers$4.99
-
Usa pinzas para doblar el lado izquierdo del soporte hacia arriba, liberando el clip de metal.
-
Retira el soporte del cable de la pantalla.
-
Durante el reensamblaje, inserta primero el lado derecho del soporte antes de presionar el otro lado. De lo contrario, podrían producirse chispas y daños en la placa lógica.
Does anyone know what happens if I lost the metal clip to secure the display cable?
Hi Emmanuel.
Oh no! Unfortunately, this clip is pretty important for securing your screen's press connector, and we don't sell it separately. You should be fine as long as you don't drop your phone...but you may be able to tape it down with some masking tape as a rough fix. Another alternative would be to find a destroyed Pixel 6a and scavenge the clip.
I'm confused about the instructions and the pictures. The pictures imply that the clip should be bent, but the text may describe the method that I applied:
I inserted tweezers at the left side of the clip (there where the springy part snaps under a metal tab). By carefully placing each 'tweeze' of the tweezer on both sides of the tab, it is possible to gently pushing the springy part to the right, and then it releases without having to deform that entire bracket.
After re-reading the instructions, that may be what is implied, but if one were to look at only the pictures it could suggest something different.Yes I did Hugo's method and it worked well. Using tweezers I directly pried the springy part from under the metal tab.
If you look right at the bottom end of the bracket there's a couple sets of holes right next to the screw. If you insert each end of the tweezers into those holes and tilt the tweezers the bracket pops right out.
Danielle is right! It's absolutely the case! Dang thing flew out!
Thank you Danuelle! Worked perfectly!
I forgot to replace the bracket after putting the screen back on, what are the chances it is fine?
-
-
-
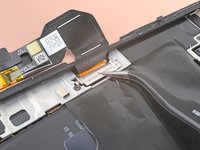
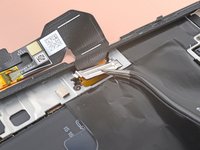
Tenga mucho cuidado al realizar este paso, ya que corre el riesgo de dañar pequeños componentes alrededor del conector de prensa.
-
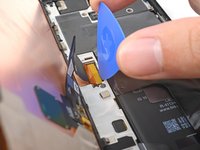
Haz palanca y desconecte el conector de prensa del cable de la pantalla.
-
Para volver a colocar conectores de presión como este, alinea con cuidado y presiona hacia abajo en un lado hasta que encaje en su lugar, luego repítelo en el otro lado. No presiones hacia abajo en el medio. Si el conector está desalineado, las clavijas pueden doblarse y causar daños permanentes.
be incredibly careful when removing and installing the cable, the many tiny components along the edge and under the tab are incredibly fragile. This is one of, if not, the most important step.
At this step I had some trouble to reattach the connector. When I pushed down one side the other would pop up again. I solved the issue by carefully pressing down both sides with the tweezers.
silly me totally forgot to reattach "The display cable bracket is secured with metal clips." soooooo maybe tell silly people like me to do that at the end lol. phone will work, but i feel if i drop it the cable may disconnect.... oh well
Don't put the ribbon back in until you have cleaned the old adhesive off and installed the new adhesive!
Obviously the most critical step.
When reassembling 2 things helped me:
1/ You can actually let the new screen rest on the phone at a 90+ degrees angle (thanks to the small plastic edges on the screen) , which leaves you both hand free2/ You can gently unfold the display cable to make it more flexible
During reattachment, make sure you fully plug in the cable. I tested as indicated by turning on the screen and all seemed good. Closed down the screen and then realised it was not reacting to touch... Was very worried but reopening it, turns out I hadn't fully plugged in the screen connector. All good now
I think this is why my screen was defected in the first place. I did not have to do anything to remove the cable. It came off just by looking at it!
Follow very carefully the specific guide for connecting the press connectors.
-
-
-
Sigue esta guía para volver a aplicar adhesivo a la pantalla.
-
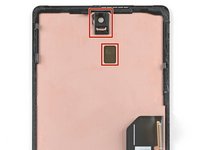
Asegúrate de quitar todos los revestimientos adhesivos de la pantalla de reemplazo, incluido el hueco de la cámara frontal.
-
Realiza una calibración del sensor de huellas dactilares.
Don't forget the display cable bracket folks! This was my first at home repair and Im kicking myself forgetting the bracket.
me too RIP so sad
I just did the same thing. I feel like I pressed the connector down well enough but I wonder how long this will last until it comes loose.
This step should have been made more obvious in the guide.
How long did it last without the bracket? Same mistake here
The fingerprint sensor calibration is impossible to complete in some cases. No matter what, I get an error "Your phone's current software version: TQ2A.230305.008.E1 is newer than this repair tool has." from the google software updater. This indicates it is a known issue "https://issuetracker.google.com/issues/2... not fixed for a year. The Google USB driver does not help if you're not on Windows and get this error. I tried on both mac and linux, no dice.
I'm SOL without a fingerprint sensor. Screen works again though, and everything else went ok with the repair.
A couple of sweaty freaky steps in there - but was able to complete successfully as a first time repairer
For anyone with issues with the Fingerprint Calibration: just spent a few hours so I figured I should post my solution.
I kept going to https://pixelrepair.withgoogle.com/udfps and being met with error messages.
Here's what to do:
1. Go to https://developer.android.com/studio/run... and choose "Download the Google USB Driver ZIP file (ZIP)." From there, ensure you know where the USB Driver is saved.
2. Put your phone into Fastboot Mode by shutting the phone down and then starting it with both the bottom volume button and the power button.
Do not have your phone all the way in Rescue Mode or it won't work
3. Connect the phone to your PC via. USB
4. Go to Device Manager and look under "Other devices" until you find your phone
5. Right click and choose "Update Driver" and choose "Browse my computer for drivers"
6. Click "Browse" and navigate to your downloaded driver from step 1, choosing "ok" and then "next." The driver update should go through.
7. Go to https://pixelrepair.withgoogle.com/ and follow it!
I followed this and worked perfectly, no more incompatibility issues of the software not working due to new os update.
thanks
Thank you very much for posting this -- I was helping a friend replace his screen and we would have been stumped without these directions!
zlsmith -
This worked perfectly for me as well. First I was a little worried I didn't reattach the display properly because the error message said (German): "Fingerprintsensor kann nicht gefunden werden.". However, the calibration process fixed the problem! Yay!
You absolute legend!!
I have followed all the above steps but get the error:
Couldn't find the unique calibration software for this device
Can anyone help?1. Go to https://developer.android.com/studio/run... and choose "Download the Google USB Driver ZIP file (ZIP)." From there, ensure you know where the USB Driver is saved.
2. Put your phone into Fastboot Mode by shutting the phone down and then starting it with both the bottom volume button and the power button.
Do not have your phone all the way in Rescue Mode or it won't work
3. Connect the phone to your PC via. USB
4. Go to Device Manager and look under "Other devices" until you find your phone
5. Right click and choose "Update Driver" and choose "Browse my computer for drivers"
6. Click "Browse" and navigate to your downloaded driver from step 1, choosing "ok" and then "next." The driver update should go through.
7. Go to https://pixelrepair.withgoogle.com/ and follow it!
When doing the fingerprint calibration and putting the phone into Fastboot Mode: Keep it on the screen with the red triangle (i.e. don't press the "Start" button) when plugging it in to your computer.
This was failing for me until I got it all the way into rescue mode. I had the fastboot screen up and rescue mode selected, but it would not connect at the website. Once I hit the button on 'rescue' and it went into rescue mode, then it connected. Then it told me my software was up to date and I didn't need a new install.
Is there a way to recalibrate the fingerprint without the equivalent of a factory reset?
IMPORTANT NOTE - if you buy the screen "part only" it does not come with adhesive!
If you already have the tools (and I have all the iFixIt stuff), ordering the "part only" means you'll have to get the adhesive separately, with another postage charge. Quite frustrating! Yes I suppose it's written down somewhere...
This looks to be no longer true--October 2024 I received a screen adhesive with my screen, and had ordered a separate one, so now I have two.
EMC -
Hi, the repair guide tells to Check the "camera area" and the "Sensor area". My replacement Display only has the black plastic part in the camera area shown in the picture. The black plastic part in the Sensor area is not there. I also checked the packaging but it is not inside. Did anybody else have this issue?
Thanks!
Hi Markus!
Thanks for pointing this out. It looks like the replacement screen didn't come with the black sensor bracket. We'll adjust the instructions shortly to cover this. Sorry for the inconvenience.
If you still have your original screen, please transfer the bracket over. The bracket is adhered to the screen with light adhesive. Use an opening pick to pry it up. If it feels difficult, heat the bracket with an iOpener and try again.
If you can't find the bracket on your original screen, it may actually still be attached to your phone. Check the motherboard as the bracket surrounds the sensor on it.
Hi Arthur,
You are right. The replacement does not come with the bracket. It was also not in my original display but your second hint to check the phone hit it. The bracket ist still attached to the sensor.
Thanks for your Support!
Markus
Markus -
I bought several screens for 6, 6a and 7. I always have to repeat the fingerprint calibration a few times until it works.
Last one, for a 6a, changes the colour temperature randomly and also is really dark under the sunlight, and a few issues else. I think this is not related to software but a defective screen. What do you think?
Similar to Miles' comment. The instructions in the How to Calibrate page should be modified. Steps are missing/in the wrong order. From a Windows machine, you can download the USB driver from Google, yes, but the USB driver cannot be installed to the phone via Device Manager until after you have booted the phone into Faststart mode and then connected to the USB cable.
For anyone who has problems calibrating the fingerprint sensor, I happened to find a pretty good solution. The only problem is that you need another Android device like a tablet or phone.
1. Go to https://pixelrepair.withgoogle.com/carri... on the working Android device
2. Follow the instructions until you are in fastboot mode on the repaired device
3. Do not select the rescue mode!!!!
4. Simply connect your repaired phone to the working Android device via USB
5. Press "Connection" on the working device and follow the instructions.
Once you have selected your repaired device, everything will go very quickly until your repaired phone reboots and your fingerprint sensor can be used again.
I already tried this with the rescue mode, but the fingerprint error was still not fixed. I accidentally connected my phone without selecting rescue mode and everything went pretty quickly to success.
Translated with DeepL.com (free version)
My Chromebook worked the best. Just had to fastboot and connect to Chromebook - no downloading files or anything. Spent two hours with no success going the Windows way.
David M -
bonjour.
il est ecrit "C'est un bon moment pour tester votre téléphone avant de le refermer. Reconnectez votre écran temporairement, allumez votre téléphone, et vérifiez toutes les fonctions. Avant de continuer le remontage, éteignez le téléphone et déconnectez l'écran.".
je ne comprends pas "deconnectez l'ecran" ??? si le but est de poursuivre le remontage il faut le laisser connecté après vérification, non ?
MerciBonjour @donnadieuf32097, vous avez raison ! Merci de la remarque. Le tuto a été changé en fonction. J'espère que vous avez pu mener à terme votre réparation ! Bien à vous, Claire
This actually went quite smoothly. Much easier repair than the previous time I did a repair (I think that was on my Pixel 3a or 4a or something). I remember in the past attaching the adhesive was a nightmare and it got totally tangled in itself, but applying it this time with the multiple liners was a breeze. In this repair, removing the old adhesive took the most time, easily 40 minutes. Total repair time was probably more like 2-2.5 hours because of the old adhesive.
Removing the old adhesive will take a long time.
After the fall, my Pixel has the top corners of the metal shell slightly flattened making the final part of reassembly difficult: the new screen remained raised at the top of the phone by a millimeter. To fix it, I laid the phone with the screen facing down and on top of a mouse pad to avoid damage from scratching or breaking the glass; I pressed my fingertips on the back of the top edge steadily and energetically until I heard the click of the plastic clip securing the screen. The screen looks brand new now.
I'm deeply confused- I ordered the screen and it just barely doesn't fit my phone. The clips prevent it from getting in. Even with the clips broken it's still just a quarter/half mm too large to get in there. I checked my amazon order, model's GX7AS, so the screen should have fit but right now I can't make it fit without removing the hard plastic exterior. Any tips guys?
Before attaching it to the phone, carefully remove the screen holder, which is placed to prevent the screen from bending or breaking. No need to cut the clips.
Alex26GC -
-
-
Herramienta utilizada en este paso:Tweezers$4.99
-
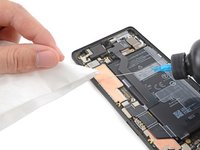
Usa pinzas para retirar la cinta plateada que conecta el marco medio y el altavoz superior.
-
-
-
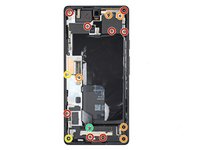
Usa un destornillador Torx T3 para quitar los 16 tornillos que sujetan el marco medio al marco:
-
Ocho tornillos de 4,3 mm
-
Cinco tornillos de 2,9 mm
-
Dos tornillos de 4,9 mm
-
Un tornillo de 4,6 mm
I need help, my google pixel 6a was a refurbished phone. Upon getting to this step, five of the screws were already badly stripped so I cannot get them off. Very disappointing. Is there any hope to fix my phone still? They are the Green one, all of the orange except for they top right and the pair of red screws on the top right (not the corner right red one that is on its own on the top right).
Sorry to hear that! Here's a guide with some tips and tricks - hopefully one works! Cómo quitar un tornillo barrido
-
-
-
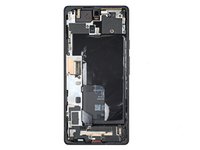
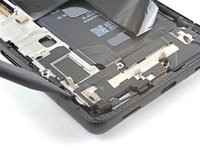
Inserta un spudger entre la parte superior del marco medio y el marco, cerca de la cámara frontal.
-
Haz palanca con el spudger para liberar la parte superior del marco medio de sus clips.
-
-
-
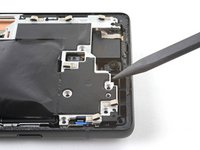
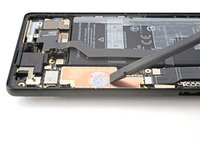
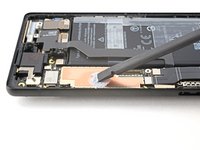
Usa el extremo plano de un spudger para raspar la pasta térmica.
-
Limpia cualquier resto de pasta térmica con alcohol isopropílico y un filtro de café o un paño sin pelusa.
-
Repite el proceso de limpieza de la pasta térmica en el marco medio.
-
-
-
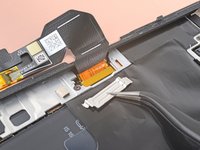
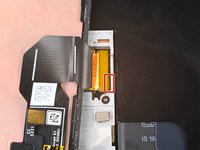
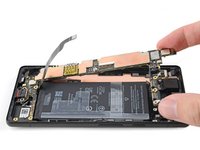
Usa un spudger para levantar y desconectar el conector de presión de la batería.
-
-
-
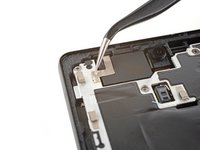
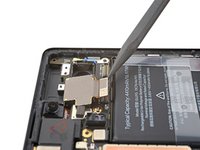
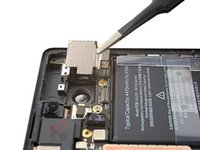
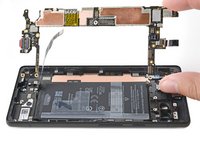
Utiliza un destornillador Torx T3 para quitar el tornillo de 2,9 mm que sujeta el soporte de la antena 5G mmWave.
-
-
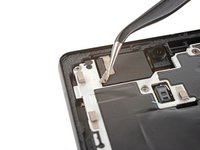
Herramienta utilizada en este paso:Tweezers$4.99
-
Usa pinzas o sus dedos para tirar del soporte hacia el borde derecho del teléfono y desconecta su clip.
-
Retira el soporte de la antena 5G mmWave.
-
-
-
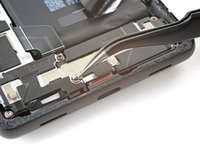
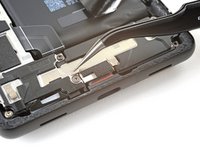
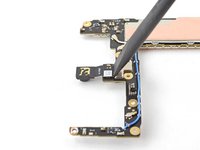
Usa un spudger para levantar y desconectar el conector de presión de la antena 5G mmWave.
-
-
-
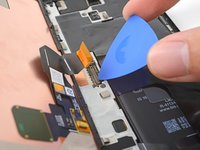
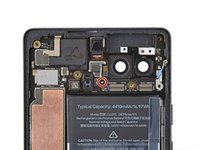
Usa un spudger para levantar y desconectar el conector de presión de la cámara trasera ultraancha.
-
Retira la cámara trasera ultraancha.
-
-
-
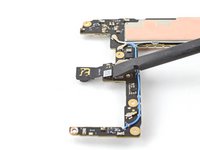
Usa un spudger para levantar y desconectar el conector de presión de la cámara trasera ancha.
-
Retira la cámara trasera ancha.
-
-
-
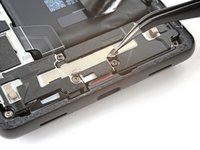
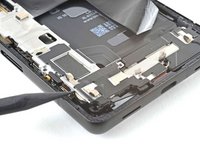
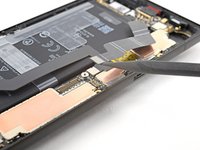
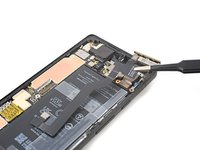
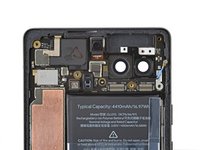
Usa un destornillador Torx T3 para quitar el tornillo de 2,9 mm que sujeta la placa base.
The tiny ribbon cable is here for the power and sound buttons. You forgot to mention that we need to undo the connection. This caused me a lot of trouble in figuring out why it wasn't turning on, and I ended up breaking the connection on the first phone because I wasn't privy to it being there.
Hi Eric!
You are 100% correct, and I want to apologize for missing this. I have updated the guide accordingly to have this disconnection.
-
-
-
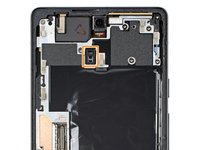
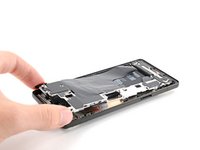
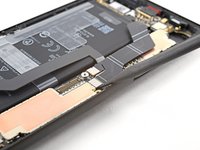
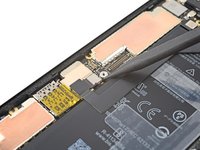
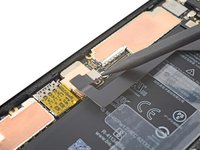
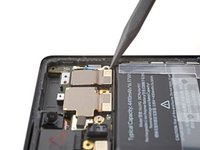
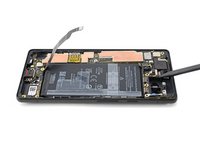
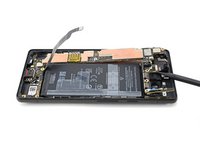
Inserta un spudger entre la parte superior de la placa base y el marco, cerca de la cámara frontal.
-
Haz palanca para levantar la placa base hasta que pueda sujetarla con los dedos.
-
-
-
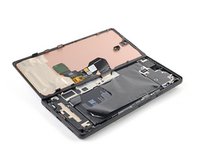
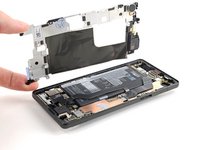
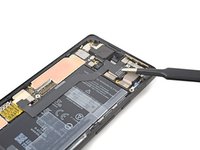
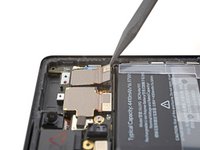
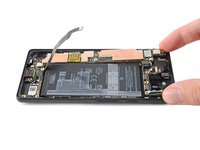
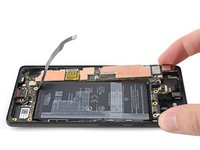
Inclina la parte superior de la placa base hacia arriba para liberar sus clips de plástico.
-
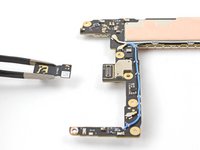
Retira la placa base.
MAKE ABSOLUTELY SURE that you have taken the SIM card out at this point. I just snapped my motherboard in half at the SIM card point. Luckily it's the one that didn't work anyways...
-
-
-
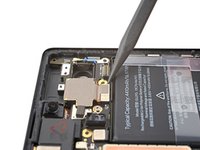
Usa un spudger para levantar y desconectar el conector de presión de la cámara frontal ubicado en la parte inferior de la placa lógica.
-
Retira la cámara frontal.
-


Compara tu nueva pieza de repuesto con la pieza original; es posible que debas transferir los componentes restantes o quitar los respaldos adhesivos de la nueva pieza antes de instalarla.
Para volver a armar tu dispositivo, sigue estas instrucciones en orden inverso.
Para ejecutar una prueba de diagnóstico con la herramienta Pixel Diagnostic incorporada, haz clic aquí.
¿La reparación no salió según lo planeado? Prueba algunas soluciones de problemas básicos o solicita ayuda a nuestra Comunidad de respuestas de Google Pixel 6a.
Cancelar: No complete esta guía.
3 personas más completaron esta guía.
Un agradecimiento especial a estos traductores:
100%


Estos traductores nos están ayudando a reparar el mundo! ¿Quieres contribuir?
Empezar a traducir ›


3 comentarios
As of right now, is it possible to get a replacement motherboard for the Pixel 6a? I spoke with a repair shop and they said the phone would need to be under warranty (which in the case of my wife's phone, it is not due to getting smashed in a car door) to get a replacement motherboard.
Hello. Do you have a schematic diagram of the pixel 6A? Thanks in advance
Great guide! Quick question. Where do I get the motherboard???
I can't turn off the phone because the screen is broken. Hence why I am trying to replace it.
fixedgerald - Contestar
I managed to turn my phone off by playing with the buttons on the side. I can't tell you exactly how I did it, but it is possible.
YuropeCat - Contestar
Strongly recommend before you start, get a headlamp like for camping and make sure it's charged up good. Even next to a bright south facing window I had difficulty with the shadows inside the phone and along the edges. Headlamp helped.
EMC - Contestar
Fully turn off the device by holding down the Volume Up button and the Power button.
Emanuele Artusi - Contestar