Introducción
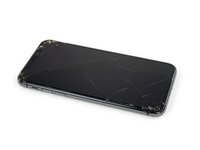
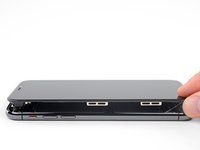
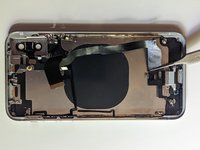
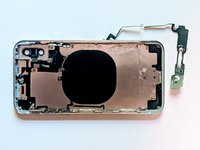
Usa esta guía para quitar todos los componentes de la carcasa trasera de su iPhone X. Esta guía te mostrará cómo quitar el altavoz, los cables, el motor táctil, la batería, la placa lógica y las cubiertas de los botones para que puedas reemplazar una cubierta rota, abollada o doblada.
Solo para que estés prevenido; esta es la reparación más difícil posible en un iPhone X que no implica microsoldadura.
Qué necesitas
-
-
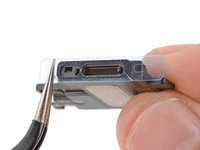
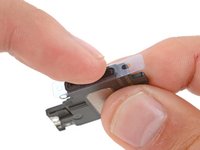
Inserte una herramienta de expulsión de la tarjeta SIM o un clip en el orificio pequeño de la bandeja de la tarjeta SIM, ubicada cerca del botón lateral en el borde del iPhone.
-
Presione firmemente para expulsar la bandeja.
-
-
-
Retire la bandeja de la tarjeta SIM del iPhone.
-
-
-
Apaga tu dispositivo para comenzar a desarmarlo
-
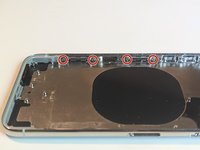
Remueve los dos tornillos pentalobe de 6.9 mm de largo de la parte inferior del marco del iPhone
same situation here
Same issue with the stripping. The tip of the iFixit P2 head in my $70 kit just ground off on the first screw and that was that. Not much you can do.
yes correct the same happened to me, the screws were perfect shaped never been open and as soon as i used the P2 it stripped the screws, seems like the P2 is slightly smaller but Dremel kit with a very small drill bits and precise knife tool is the way to go.
This step in automatically followed through, without any thought. Why remove these screws? Can anybody explain? The Screen is detachable all the same, with them well screwed in…
These screws attach to a plate that’s part of the screen half of the phone. If you succeed in detaching the screen without removing those, it would seem reasonable that you will have damaged that plate or its ability to keep the two halves together.
Dan Long -
@Dan Long is right
Uri -
Clean out the pentalobe screw heads first so the tool goes all the way in. A small sewing needle works well to loosen any build up and then press some putty/chewing gum into the screw head and pull away quickly for a final clean out.
Never opened my phone ever, when I went to look at the first step.. I noticed one of my screws was stripped. I thought it was impossible, but I removed the non stripped one, then once I got to the stripped one.. I learned my assumptions were correct. I bought this one straight from the apple site years ago ahaha Any tips to remove the stripped screw?
William Olstad's tip about cleaning the screws with a needle and a bit of poster putty worked well for me. There was a lot of crud in there! The opening is shallow, so it's easy to see how the screwdriver wouldn't catch with even a bit of grit in the way, No problem getting the pentalobe screws out with the ifixit screwdriver.
If all else fails, very carefully cut a slot across the head of the screw with a Dremel tool using a diamond bit that dentist will gladly give you - I ask my dentist for used bits; and chuck them in a drill bit chuck designed for Dremel. The slot allows you to use a tiny, straight blade screwdriver. You can reuse the screw or replace it with a new pentalobe screw.
-
-
-
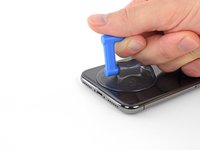
Mide 3 mm desde la punta, y marca dicha distancia sobre la púa de apertura usando un rotulador permanente.
Got to step 2 and realized the fix kit doesn't include an opening pick! Looks like a guitar pick, and I have those lying around. Is that expected? Looks like the pick is used in many steps below. There's a little blue crowbar that isn't mentioned in the instructions. Perhaps that replaces the opening pick?
Hi! I can't see which guide you were using when writing this comment. Can you reply here with which guide and fix kit you used?
I see you posted this in Meta. I hope it's resolved soon! In the meantime, a guitar pick may work well enough for your repair.
what fix kit?
My fix kit didn't include an opening pick either
My AliExpress refurbished screen came with a pick that has a coin-like circle that pops out, so no modification was necessary
It's not an Ifixit KIT if it doesn't include everything. You'll need to order the opening pic separately. Or head to Walmart like myself and look for guitar pics. Hopefully, this will work just as well.
No pick in mine as well. It’s really not clear that you have to order this separately when ordering an IPhone SE 202/2022 screen repair kit. Is this the case?
Frustrated, I ordered a compact package where everything was encapsulated. Useless suction tools could not separate the screen. If it is unable to decouple the screen, then why sucking suction tools you have provided.
For my kit the triangle pick was stuck inside the box with the screen not with the other tools maybe it's also there for you
Y’all are getting far, FAR too detailed with some of this stuff…. Measuring and marking the pick that you won’t actually use to open the device?!? lol that’s kinda funny. Just heat it up, grab a spudger, and the back just pops right off! The iFixit tech need to stick to the KISS method more often, you know KEEP IT SIMPLE STUPID!!! Like l, for reals, I’ve been doing this stuff for YEARS and using iFixit guides regularly and this is just ridiculous at this point!
Will the phone still work if the sensor assembly on the back of the screen is damaged?
-
-
-
Coloca tiras superpuestas de cinta de embalaje transparente sobre la pantalla del iPhone hasta cubrir toda la cara.
-
Si no puedes hacer que la ventosa se adhiera en los próximos pasos, dobla un trozo de cinta resistente (como cinta adhesiva) en un asa y levanta la pantalla con eso.
-
-
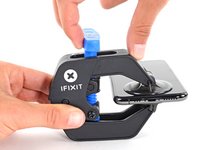
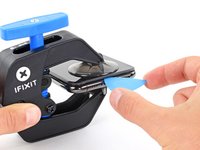
Herramienta utilizada en este paso:Clampy - Anti-Clamp$24.95
-
Tira de la manija azul hacia atrás para desbloquear los brazos del Anti-Clamp.
-
Desliza los brazos sobre el borde izquierdo o derecho de tu iPhone.
-
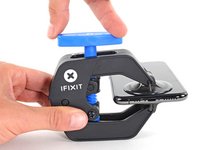
Coloca las ventosas cerca del borde inferior del iPhone, una en el frente y otra en la parte posterior.
-
Aprieta las copas para aplicar succión en el área deseada.
-
-
-
Tira del mango azul hacia delante para bloquear los brazos.
-
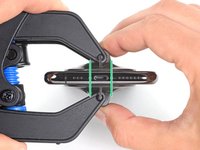
Gira el mango en el sentido de las agujas del reloj 360 grados o hasta que las copas empiecen a estirarse.
-
Asegúrate de que las ventosas permanezcan alineadas entre sí. Si comienzan a salirse de la alineación, afloja ligeramente las ventosas y vuelve a alinear los brazos.
-
-
-
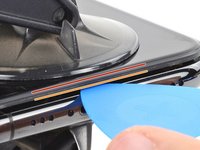
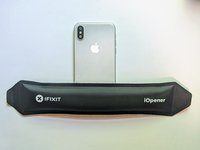
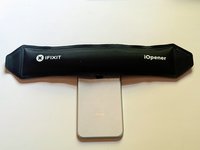
Calienta un iOpener y pásalo por los brazos del Anti-Clamp.
-
Dobla el iOpener de forma que quede sobre el borde inferior del iPhone.
-
Espera un minuto para que el adhesivo se despegue y se abra el hueco.
-
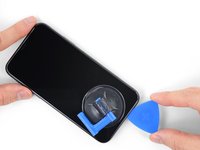
Inserta una púa de apertura en el hueco que hay debajo de la pantalla y el bisel de plástico, no en la propia pantalla.
-
Omite los siguientes tres pasos.
DO NOT separate the glass from the plastic bumper or rim around it. These instructions don't clarify that the pick has to be inserted between the plastic rim and the metal body. It is likely that the glass will lift slightly off the plastic surround before the plastic will lift out of the metal body. I had success sliding a card or pick back and forth along the bottom edge of the plastic rim while pulling on the suction cup. Eventually there was a space large enough for the pick to go under the plastic rim.
Thanks for pointing this out! I'll revise this step to clarify this point.
-
-
-
Usa un secador de pelo o una pistola de aire caliente o prepara un iOpener y aplícalo en el borde inferior del iPhone durante un minuto para ablandar el adhesivo que se encuentra debajo.
General tip regarding heating necessary to remove adhesive:
consider using a heated tip of a small screwdriver or metal spudger (not the one made of plastic, provided in kit), rather than to heat the device itself.
You then need to be careful about the temp of the tool which if hot enough can melt plastic components or harm them. Keeping the heat source (heat gun) far enough away from the object that you’ll eventually melt the glue but would be much harder to melt components. I try to keep 4” or 5” gap between the source & object
Thanks for the info. Could a air convector do the job
If you have a 3d printer, heat the bed to 80c and put the phone screen side down on it for 30 secs
thaks for this advise, I was looking for this as I dont have a heat gun haha, nice hack
-
-
-
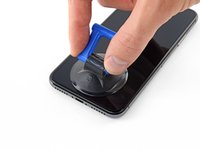
Si estás utilizando una sola ventosa, aplícala en el borde inferior del teléfono, evitando la porción curvada del cristal.
If you were using some form of screen protector, it may come off first as soon as you pull on the suction cup. Do not be alarmed. That is normal behavior.
3m VSB double stick tape will stick to the screen when the suction cups fail (see my comment on step 1)
-
-
-
Tira de la ventosa con una presión firme y constante para crear un ligero hueco entre el panel frontal y la caja trasera.
-
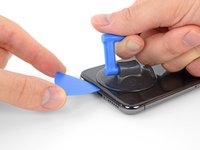
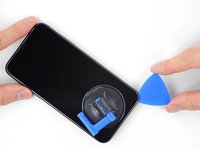
Inserta una púa de apertura en el espacio debajo de la pantalla y el marco de plástico, no en la pantalla en sí.
In addition to safety goggles, I would recommend you also wear good gloves to avoid getting cut with the glass as you try to pry it open.
The top about applying more heat and gently rocking the screen up and down to weaken the adhesive did the trick for me. Thank you!
There needs to be more clarity on where to shove the opening pick into. There is actually two openings that the pry tool can be forced into: one below the black plastic bezel, and one above the black plastic bezel. When I heated my screen with a warming pad and pulled up the suction cup, it actually pried apart above the black plastic bezel which removed the touch screen from the display panel. With this being the first newer iPhone I'd opened since the 3GS, I didn't realize that I was opening the wrong opening as the directions only mentioned one opening and did not warn of this. I was pretty disappointed in the lack of mentioning this, as I was taking my time and following it to the tee. As a result, it destroyed my original iPhone screen.
DO NOT separate the glass from the plastic bumper or rim around it. As someone else noted, these instructions don't clarify that the pick has to be inserted between the plastic rim and the metal body of the phone. When pulling upwards with the suction cup, it is likely that the glass will lift slightly off the plastic surround before the plastic will lift out of the metal body. I had success sliding a card or pick back and forth along the bottom edge of the plastic rim while pulling on the suction cup. Eventually there was a space large enough for the pick to go under the plastic rim.
Thank you for pointing this out! I've updated the step to reflect this.
The suction cup doesn't work at all... The minimum force I apply to lift it up, it comes off completely. This is very frustrating!!!
-
-
Wouldn’t it be better to put this part BEFORE the step where you have to pry open the phone?
-
-
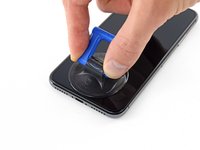
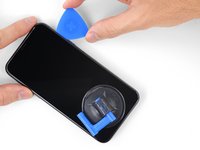
Re-inserta tu púa en el borde inferior del iPhone y deslízala a lo largo del lado derecho para continuar separando el adhesivo.
If you have flat feeler gauges (for adjusting engine valve tappet clearance, ignition points … old school) the .003” thick gauge goes right in. Work your way up in thickness until you can get the pic or supplied pry tool in. Don’t insert metal feeler gauge in too far, just enough to hold crack open. I didn’t need to use the suction cup. I used a hot/cold gel pack heated in microwave to heat edges to soften glue a bit. Made sure it wasn’t so hot I couldn’t stand it on my skin.
-
-
-
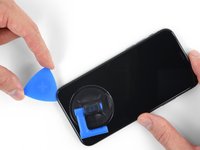
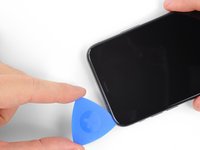
Desliza la púa de apertura alrededor de la esquina superior de la pantalla, mientras tiras suavemente o mueve la pantalla hacia abajo en la dirección del puerto Lightning.
-
Desliza la púa hacia la esquina opuesta y corte cualquier adhesivo restante que asegure la pantalla.
-
-
-
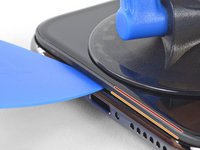
Abre el iPhone moviendo la pantalla hacia arriba desde el lado izquierdo, como si abrieras la contratapa de un libro.
-
Como se muestra, asegúrate de que el marco salga con la pantalla y no se quede atascado en el teléfono.
-
Apoya la pantalla contra algo para mantenerla en alto mientras trabajas con el teléfono.
My phone came apart in a different way and looks not right the little box at the top of the display as actually bolted to the top of the frame body I think something went really wrong when I opened it.
It opens like a book but be careful not to open it all the way — only as far as shown in the photo. Otherwise it will strain the thin cable that connects the sensor module and then no more FaceID for you (or, as it turns out me). This could have been made more explicit in the instructions.
It opens like a book but be careful not to open it all the way … the small stainless steel tabs that hold the screen around the metal frame, that are on the bend place (right side of the phone)… are tend to bend, you can straighten them back to 90 deg. but the plastic base that they are on? very fragile- watch out not to break the plastic bezel … it may come apart of the glass.
Advice for re-assembly: Before closing up the phone with the seal, check if phone is powering up again and speaker, mic and sensors are still working. If done this check even before installing the board connector bracket in Step 13.
-
-
-
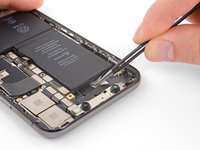
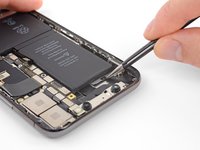
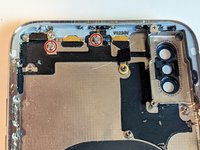
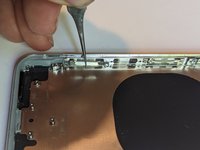
Remueve los cinco tornillos Y000 que sujetan el soporte de conector de la placa lógica y que tienen los siguientes largos:
-
Tres tornillos de 1.1 mm
-
Un tornillo de 3.1 mm
-
Un tornillo de 3.7 mm
One thing I found helpful for replacing the screws was to use only the 000screwdriver tip, without the handle. This way, the tip isn’t magnetized and the screw doesn’t tend to ‘roll’ off the screwdriver tip (the screw has almost no mass, so the head (largest surface) is pulled around to the side of the screwdriver tip when magnetized).
Rich May 23, 2020
My 3.1mm screw had a stripped head, could not remove it. (Factory defect, this iPhone was never opened)
So I had to give up removing the display assembly, and jumped directly to battery replacement, Step 20.
That was tricky as I had to keep the display at 90º with a risk of breaking display connectors, but hopefully the replacement went well.
I would not recommend to do this but to follow the guide, but, in case someone encounters a similar issue, that could help!
Be careful on reassembly. Keep the screen supported and not moving. I had difficulty getting the screws in and ended up ruining the screen connectivity at the back of the screen where the ribbon cables go in near the center. I was trying to hand hold the screen and it ended up moving around too much.
To keep track of the screws, I copy the photos showing their places, then arrange these photos on document in Pages, print it. Next I apply two sided sticky tape (the roll-on type). So all screws have their corresponding places …
-
-
-
Remueve el soporte.
I tested it, then proceeded to close up the device without the bracket. Do I need to reopen and install? All connections are good?
The bracket helps those many connectors underneath maintain good contact. Probably in the short term nothing bad will happen, but I’d hang onto the bracket and reinstall it when convenient.
Agree with Jeff
cgtyoder -
for me, the replacement battery was completely dead, small panic when the power-on button was pressed, but quickly realised that this was the situation, and now watching the phone take a power cycle.
Before clicking the screen assembly back, I tried to test the iPhone by pushing the start button, but nothing happened. After taking off the bracket, reseating the plugs I tried again - nothing happened! Then I plugged in the charging cable connected with the iMac, and it started immediately. So if the phone does not start using the startup button, it might just be a glitch when reconnecting the battery.
-
-
-
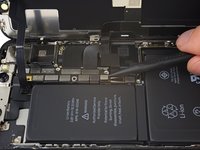
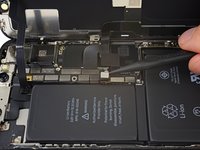
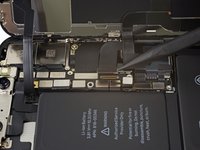
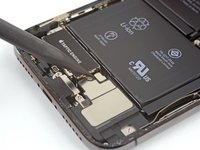
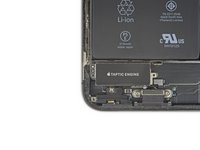
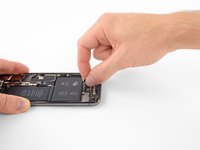
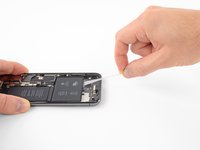
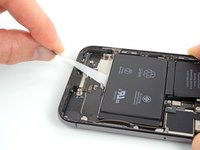
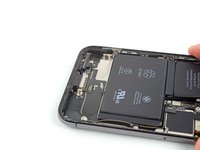
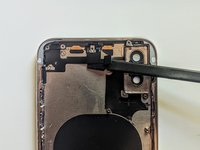
Usa la punta de un spudger o una uña para hacer palanca en el conector de la batería y levantarlo de su zócalo en la placa lógica.
-
Dobla el conector para separarlo de la placa lógica para prevenir que entre accidentalmente en contacto con el zócalo y que proporcione alimentación al teléfono durante la reparación.
cosa può succedere se non si disconnette la scheda logica'?
note: be careful not to crush or puncture your battery at this step!! I gave mine a minor dent, which I hope wont be a problem.. but something to keep in mind for fxlks in the future!
Thanks, already did it)
-
-
-
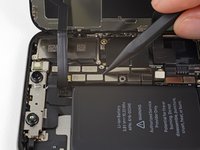
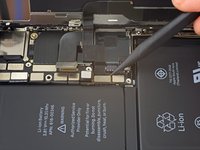
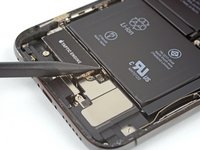
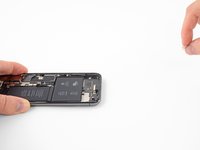
Usa la punta de un spudger o una uña para desconectar el conector de cable de panel OLED.
Snap ‘em in like little Legos.
-
-
-
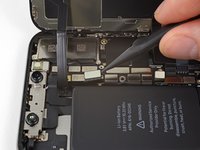
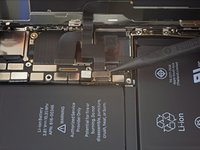
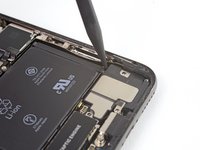
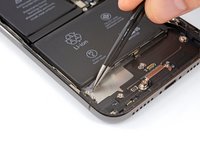
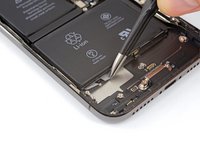
Usa la punta de un spudger para levantar el conector del cable de digitalizador de su zócalo.
This was probably the hardest part other than trying to get the screen off with the crappy suction cups. I re-installed the bracket only the find out that the touch screen would not respond to touch. Had to remove the five screws, remove the bracket and reseat the recessed screen connector. Reseating the bracket took another 10+ minutes. I carefully used the angled forceps to grab the cable and align the connector being careful not to damage the cable.
Once you have the connector seated, I would reconnect the battery, power on the phone, and check the touch screen response before re-installing the bracket (step 13).
Yeah, this was probably the trickiest part of the reassembly. The power connector cable kept getting in the way so I moved it carefully but fully out of the way. Then it was a matter of fiddling around with it a bit and being careful not to force it on.
I was positive that I had messed something up, I had powered up the phone to test three different times and everything seemed find except there was no touch at all. On my fourth attempt, I carefully examined everything for dust and debris (blowing gently), and I did notice that a corner of the connector (more like part of the ribbon) was bent slightly, and I straightened it. I don't know if it was the ribbon or some tiny debris, but after reseating a fourth time, it worked.
Very important part of the tutorial. Be careful and patience! In my case the screen and camera didn't respond after assemble, so I tried again to reconnect the connector like tutorial said and it worked well. Now my iPhone feel like a new one 💪🏼
-
-
-
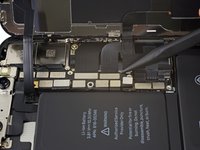
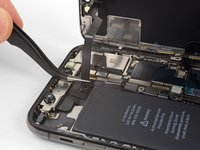
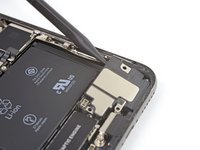
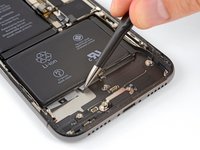
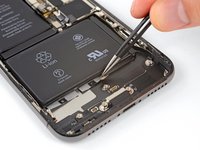
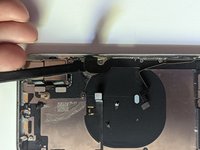
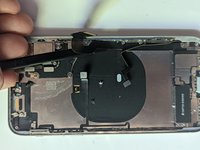
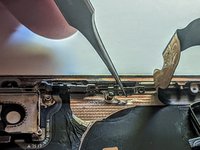
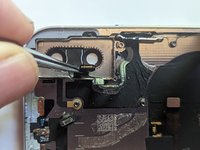
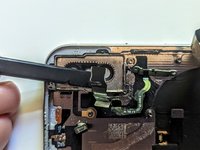
Con cuidado levanta el cable hasta que el adhesivo se separe.
It is part of the face id part so yes. This is the ear piece too so if the ribbon tears there is a chance the ear piece will stop working as well.
Be super careful handling this ribbon particularly. I did a battery install and, when I was done, I had a phone with a new battery and no Face ID. That’s a $300 Apple repair, and no 3rd party shop will touch it. I believe the ribbon lays vertically (i.e., perpendicular to the “floor” of the phone, against the side edge of the battery. During the re-install, I must have forced the ribbon into position after seating the connector, causing fatal flexing of the ribbon. (Don’t know this for sure, but I see another comment saying that this cable is part of Face ID.) Anyway, bottom line: BE CAREFUL REMOVING AND REINSTALLING THIS RIBBON!
My flex cable was more than lightly adhered in place. I needed to use a guitar pic or similar to help encourage adhesive to separate. I wouldn’t pull too hard like shown in pictures unless you had just the right grip on the ribbon cable so as to avoid damaging flex cable. See note above (5/31/20)
Bizarre — it turns out my whole front panel sensor assembly came entire off of the front screen and is stuck to the logic board.
I also found the glue quite recluctant to release so I applied a second or two of heat using the wife's hair dryer which softened it and the cable lifted much easier then. Be careful not to apply too much heat though which could then impact other internal components.
Cho ít cồn 90° vào để mềm keo dễ tháo
my iphone x doesn't have a front panel sensor? in fact, it looks completely different than the picture???
@kennethmcleod, most likely you've separated the screen frame from the screen itself. We see this most commonly when people neglect to remove the pentalobe screws next to the charging port. Usually the cure is to take out those screws, then repeat the screen removal process on the frame that's still attached to the phone.
You don't need to disconnect the front sensor to change the screen. Just leave it connected and remove from the screen side.
I have damaged the front panel sensor assembly flex cable. Does it carry multiple channels of info or is it just one solid piece that can be soldered back together? If not, will the phone still work except Face ID?
-
-
-
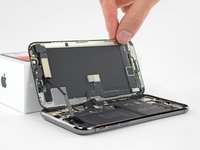
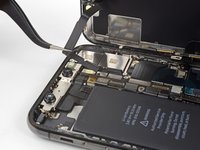
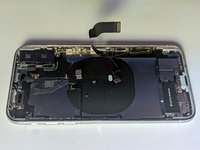
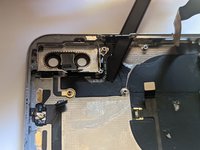
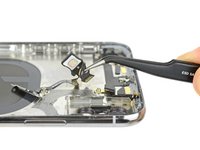
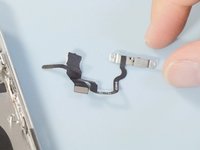
Remueve el ensamblaje de la pantalla.
I tried this and broke the cable can it still repair
CAUTION:
Removing the Taptic Engine or Speaker in next step is optional and the guide continues as this was per se needed.
Unnecessary work and also If you remove the speaker you lose the adhesive gasket and this is not included in the scope of delivery of the "Battery replacement" offering.
So do not remove and avoid losing waterproofing.
Just to confirm the face id is not affected when replacing the earpiece assembly? Am I correct
Sorry for the late response, but you are NOT correct. Replacing the earpiece speaker assembly will result in the loss of Face ID functionality. That's the whole assembly, including the speaker, dot projector and flood illuminator. If you unsolder the speaker from the assembly, that can be replaced by itself without losing Face ID, but any other part will cause it to quit working.
-
-
-
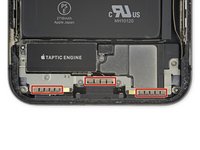
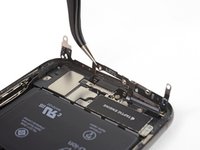
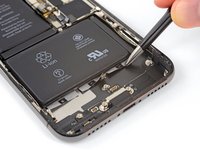
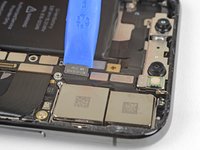
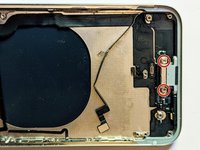
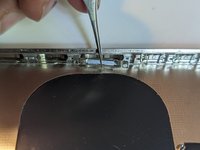
Remueve los siete tornillos que ajustan el soporte debajo del Motor Táptico y el altavoz:
-
Dos tornillos de 1.9 mm Y000
-
Un tornillo de 1.2 mm Y000
-
Un tornillo de 1.6 mm Y000
-
Un tornillo de 2.4 mm Phillips
-
Un tornillo de 1.7 mm Phillips
-
Un tornillo de 1.5 mm Phillips
For battery replacement:
It is not necessary to remove Taptic Engine and speaker to replace a battery. Go straight to the step #33
Additional video: https://youtu.be/2GfBOlJEW10
I wish I seen this before I did all that! Thank you for that information. Next time I do something like this. I'm gonna pay more attention to the comments.
Removing the Taptic Engine and speaker greatly improves your chances of getting the battery adhesive strips out intact. If those break, you’ll have a much tougher time.
Boy, I tried to skip removing these items but was unable to get the glue strips out with them in place, not much to grab and tabs were kind of stuck to a seam in the battery, and hard to tell the difference between the seam and the strip tabs. For me I had to remove these items to get this done.
I stopped removing things after getting the display side off. There were 3 screws stripped on the speaker cover which wouldn't come out so I punted. Just pried the battery out with a smudger tool and some patience, starting at the top and working towards the bottom. New battery is in and working fine.
Thanks for not removing the following steps. this made me break the connector for the bottom speakers >:(
The screws color and quantities in list don’t match the schematic ! I wish i had a magnetic screw mat before starting, because not only i removed the Taptic Engine and speaker unnecessarily, but i also lost a screw ?
Does anyone know the purpose of this bracket "with grounding pads"? What would be the possible side effects if it was damaged or not connected properly during reassembly?
Hello, in my case the grounding pads are damaged. I've had problems since EMC. When I try to charge wirelessly, the iphone starts wild button presses (Gosting).
Does anyone know, where I can get new grounding pads (with or without bracket)?Sure would like to know WHY the warning "Be careful not to touch the three rows of grounding pads..." What would or could happen if I did touch them??
Removing the battery strips is a major PITA, just skip this step and everything onwards, remove the one strip on the top part of the battery (according to step 33) and for the bottom part of the battery, pry it off with a plastic spudger.
Yes, this is not the elegant solution, but the quickest and easiest one. This method is better, as you don't want to keep the old battery anyway, so why bother. (You must not puncture the battery though! But as long as you're only working with a plastic tool and are careful, nothing can happen from my experience.)
Remove the adhesive from the top part of the battery, squirt some ipa into the bottom part and it will come off easily, then skip to 38.
-
-
-
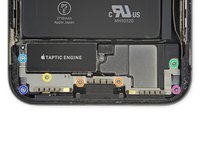
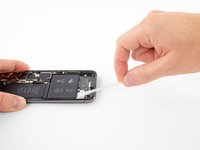
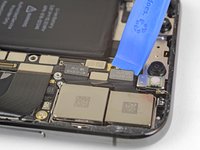
Levanta el soporte desde el borde más cercano a la batería. No intentes de removerlo completamente ya que está todavía conectado a través del cable flexible pequeño.
Does anyone know, where I can get new grounding pads (with or without bracket)?
-
-
-
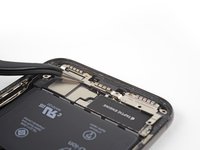
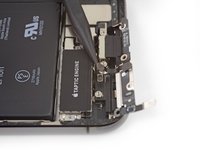
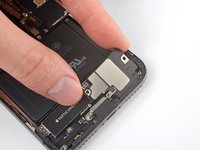
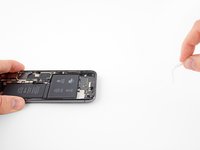
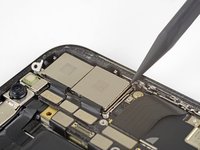
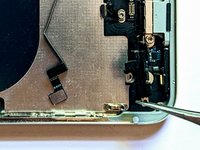
Remueve el tornillo dee 2.1 mm Y000 que sujeta la tapa del conector de altavoz.
L'unique vis non?
Effectivement ;-) Merci pour les bons yeux et la remarque !
-
-
-
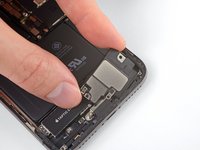
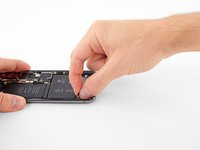
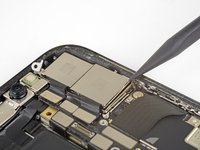
Usa la punta de un spudger para hacer palanca y desconectar el conector de altavoz.
As mentioned in a comment by timblake2112 (see step 29), this step is not necessary and can be skipped skipped. I would advise you to do so, as removing your speaker is guaranteed to ruin your gasket and rubber seal. This will result in loss of water resistancy of your iPhone and could potentially harm the sound quality of your speaker.
Try removing the Taptic Engine without removing the speaker. It might still be possible removing the battery adhesive strips and your speaker will stay in its original condition.
-
-
-
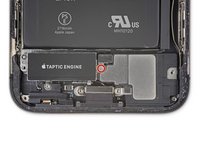
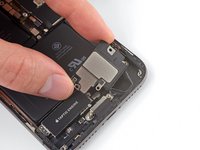
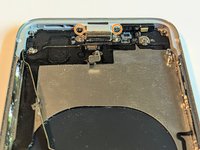
Sostén el altavoz por sus lados y muévelo de lado a lado, separando el adhesivo que lo sujeta al borde inferior del iPhone.
-
Tira del altavoz desde el borde inferior del iPhone hasta que la junta de adhesivo se separe.
As mentioned in a comment by timblake2112 (see step 29), this step is not necessary and can be skipped skipped. I would advise you to do so, as removing your speaker is guaranteed to ruin your gasket and rubber seal. This will result in loss of water resistancy of your iPhone and could potentially harm the sound quality of your speaker.
Try removing the Taptic Engine without removing the speaker. It might still be possible removing the battery adhesive strips and your speaker will stay in its original condition.
-
-
-
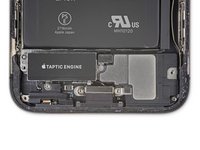
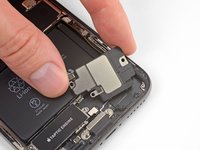
Remueve el altavoz.
You don’t need to remove the speaker and ruin its gasket. You can wiggle and slide the taptic engine out without removing the speaker. I’ve done this twice on rear shell replacement jobs.
Maybe I'm a bit daft, but where's the instruction just how to line up the speaker gasket when replacing? I only have one so I'd like to avoid wrecking it. And I completely cleaned off the old one in order to do a good job of things. Why no simple instruction from part supply link?
-
-
-
Usa pinzas para pelar y quitar toda la vieja junta del marco y del altavoz.
-
Usa una bayeta de microfibras y alcohol isopropílico para limpiar todo el residuo del adhesivo de la junta que queda en el marco y el altavoz.
-
Antes de instalar la junta del altavoz, averigua su correcta orientación en la parte de abajo del altavoz—el corte más grande de la junta debe ir alrededor de la malla de rejilla del altavoz.
-
Quita el revestimiento transparente más grande de la junta y usa unas pinzas para poner con cuidado la junta en su lugar en la parte de abajo del altavoz.
-
Usa tus dedos o un spudger para presionar firmemente la junta en su lugar para fijarla con el adhesivo.
-
Quita el revestimiento sobrante y pon el altavoz en su sitio, asegurándote de que el conector del altavoz no queda atrapado debajo.
-
-
-
-
Cada pieza de adhesivo tiene una lengüeta negra en el extremo que se encuentra ligeramente adherida al borde extremo de la batería.
-
-
-
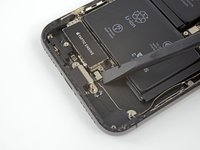
Separa la lengüeta del adhesivo de la primera batería del borde inferior de la batería.
hole breaks instantly on pulling. adhesive tab does not release from side of battery
just pry it off, why bother
-
-
-
Para aumentar las posibilidades de éxito:
-
No presiones la batería. Sujeta el iPhone firmemente de sus lados.
-
Mantén las tiras planas y sin arrugas mientras tiras.
-
Tira muy lentamente, dándole tiempo a la cinta para que se estira y separe. Lleva 15-30 segundos de estiramiento para remover cada tira.
-
Tira en ángulo bajo así la tira no se rompe a lo largo del borde inferior de la batería.
-
Si la tira se rompe por debajo de la batería y no se puede recuperar, dirígete a las otras tiras y luego continúa con los pasos adicionales que siguen.
-
-
-
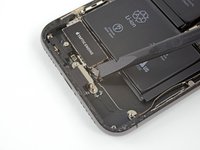
Toma una de las lengüetas externas adhesivas de la batería y tira lentamente alejándote de la batería hacia la parte inferior del iPhone.
-
Jala constantemente manteniendo tensión constante en la tira hasta que salga de entre la batería y la caja trasera.
-
-
-
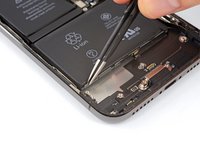
Despega y separa la lengüeta de la tira adhesiva final, en el borde superior de la celda de bateria superior.
surtout ne pas passer avec la spatule par le bas, vous risqueriez d arracher la nappe du volume et du nfc,
-
-
-
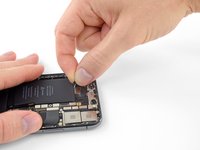
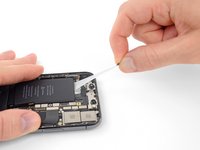
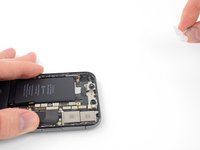
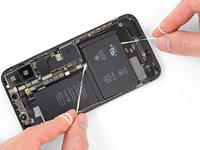
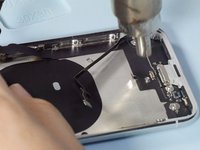
Si alguna de las tiras adhesivas se rompió y la batería sigue pegada a la caja trasera, prepara un iOpener o usa un secador de pelo para calentar la caja trasera directamente detrás de la batería.
-
Voltea el teléfono y pasa un hilo (como hilo dental o una cuerda de guitarra) por debajo de la batería.
-
Coloca los extremos del hilo alrededor de un paño (o usa guantes) para protegerte los dedos.
-
Tira del hilo de lado a lado como si estuviera serruchando algo por el largo de la batería para separar el adhesivo. Esto puede llevar algo de tiempo ya que el adhesivo tarde en deformarse pero con paciencia se liberará . No deformes o dañes la batería.
-
-
-
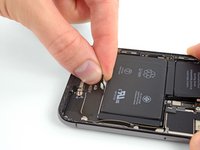
Toma la batería desde el borde inferior y remuévala del iPhone.
-
Antes de adherir la batería de repuesto, vuelve a conectar temporalmente el conector de la batería al zócalo de la placa lógica. Esto asegura que la batería está correctamente alineada en su hueco.
-
Adhiere la batería, desconéctala y continúa montando tu dispositivo.
When reinstalling the battery, the Taptic Engine does serve as a useful way to orient the battery, but it should also be noted that if you push right up against that as you install the battery (as I did) and don’t pay any attention to power connector (shown in step 14), there is a risk that the connector from the battery will not line exactly with the connector port on the board. Mine was only off a mm so I had to get a little creative to try to get it to stretch to reach and connect to the port on the board. Just keep that in mind as you place the battery (with adhesive) down.
-
-
-
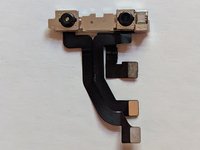
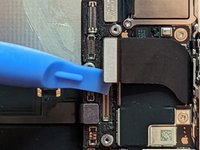
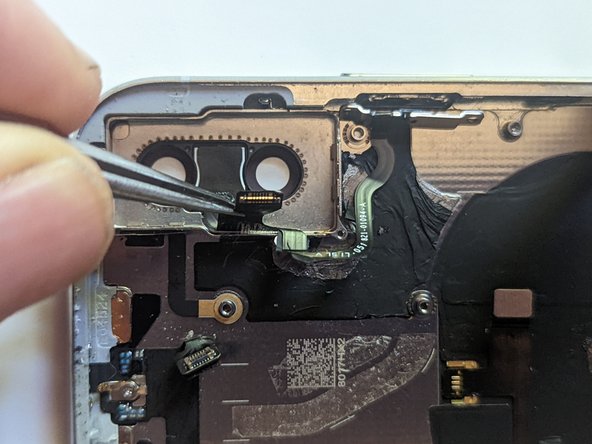
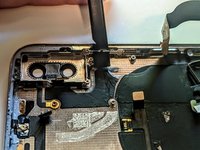
Con el extremo plano de un spudger, desconecta los tres cables del conjunto de la cámara frontal:
-
El proyector de puntos.
-
La cámara frontal.
-
La cámara infrarroja.
This thing is highly prone to damage. Treat it with baby hands! Mine stopped working after changing my buttons and I was super careful
-
-
-
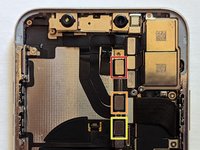
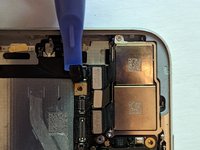
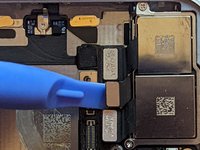
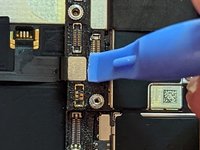
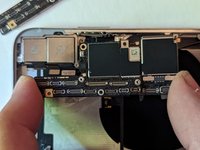
Desconecta los siguientes conectores de cable.
-
El conector de la Antena WiFi.
-
El conector de la Cámara Gran Angular.
-
El conector del Botón de Encendido/Flash/Micrófono.
-
El conector de la Cámara de Teleobjetivo.
-
El conector Dock Flex.
-
El conector del Botón de Carga Inalámbrica.
-
El conector de Antena Celular.
-
-
-
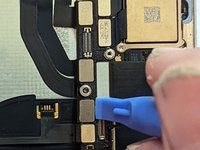
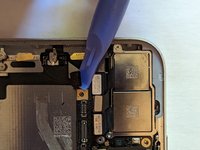
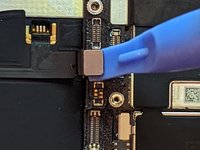
Desconecta el conector del cable de la Cámara Gran Angular.
-
-
-
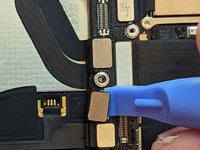
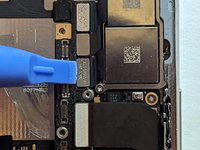
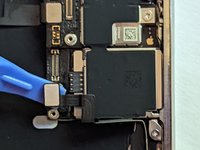
Desconecta el conector del cable del Botón de Encendido/Flash/Micrófono.
-
-
-
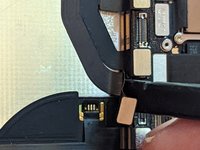
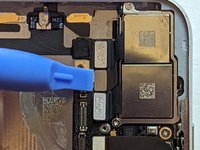
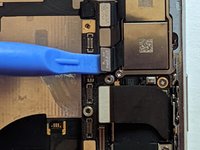
Desconecta el conector del cable de la Cámara de Teleobjetivo.
-
-
-
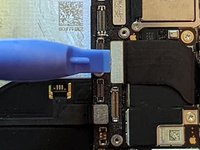
Desconecta el conector del cable Dock Flex.
-
Dobla el cable 90 grados hacia arriba para dejar espacio para retirar la placa lógica.
-
-
-
Desconecta el conector del cable Botón / Carga inalámbrica.
-
-
-
Desconecta el conector del cable de Antena Celular.
-
Dobla el cable y sácalo fuera de su lugar.
-
-
-
Retira los dos tornillos de montaje Phillips.
-
Un tornillo Phillips de 2,7 mm.
-
Un tornillo Phillips de 2,1 mm.
-
Retire el tornillo de conexión a tierra Phillips de 2,0 mm.
-
Retira el tornillo de puesta a tierra.
-
-
-
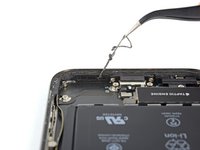
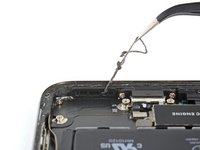
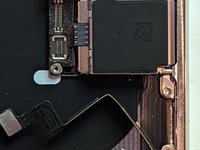
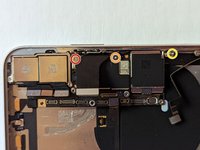
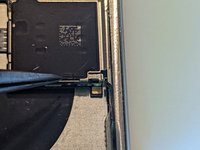
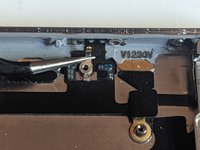
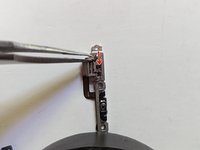
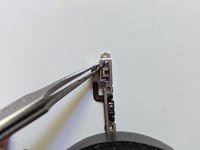
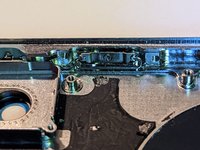
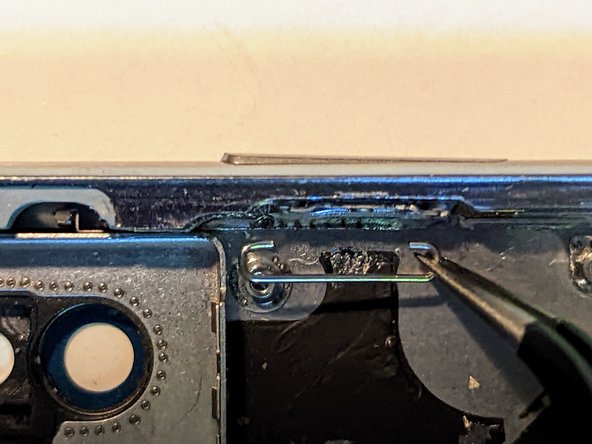
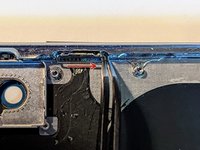
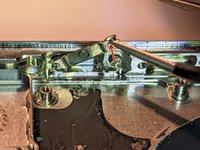
Cuando se expulsa la tarjeta SIM, un pasador se desliza fuera del marco y empuja la palanca de expulsión en el soporte de la tarjeta SIM. El pasador debe empujarse hacia atrás en el marco para que no bloquee la extracción de la placa lógica.
-
-
Herramienta utilizada en este paso:Tweezers$4.99
-
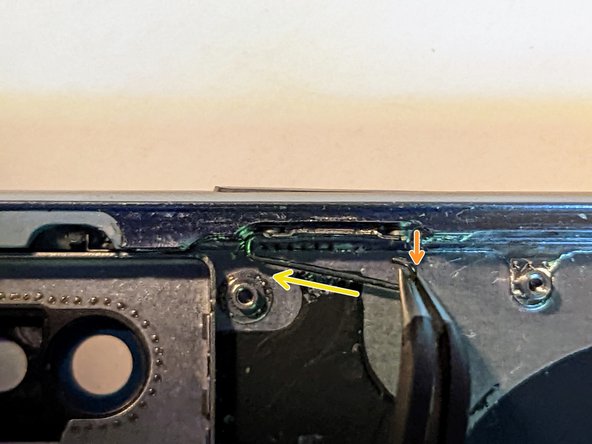
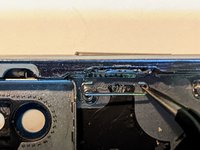
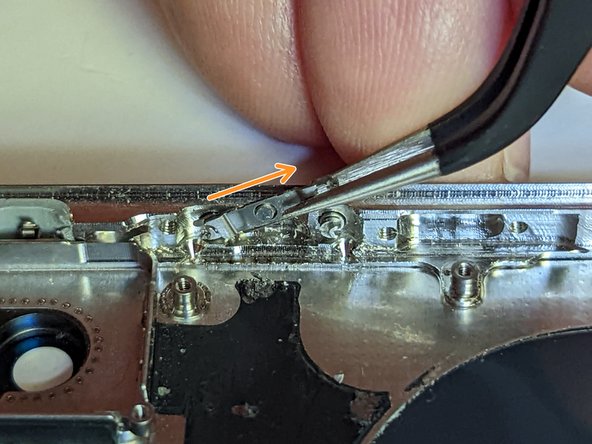
Usa un par de pinzas de punta fina para deslizar la palanca de expulsión de la tarjeta SIM hacia el costado de la carcasa.
-
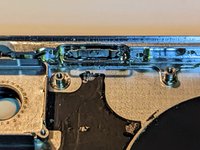
La palanca de expulsión debería verse así cuando hayas terminado. El pin ya no bloqueará la extracción de la placa lógica.
-
-
-
El conjunto de la placa lógica está montado en dos postes que atraviesan la placa inferior y están asegurados a la placa superior. Para quitarlo, debes levantarlo uniformemente hacia arriba para despejar los separadores.
-
-
-
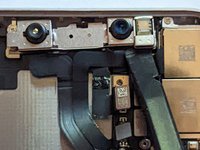
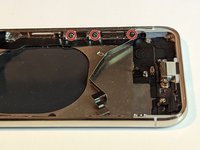
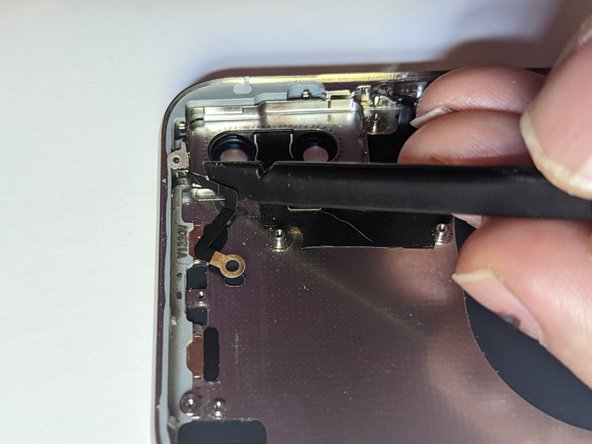
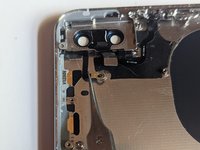
Retira los dos tornillos Phillips que sujetan el soporte de la cámara, de las siguientes longitudes:
-
Un tornillo de 2.3 mm.
-
Un tornillo de 2.0 mm
-
-
-
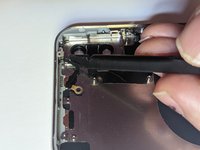
Usa una herramienta de apertura o una uña para desconectar los dos conectores de la cámara haciendo palanca hacia arriba desde sus enchufes.
-
-
-
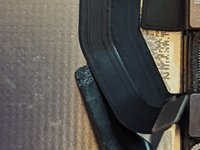
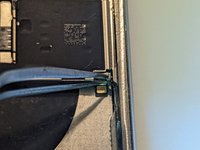
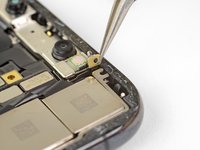
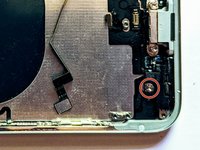
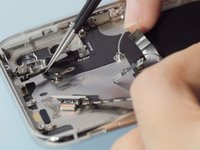
Retira el tornillo Y000 de 1,2 mm que sujeta el cable de la antena celular al retenedor de la pantalla.
-
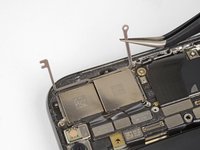
Dobla el cable de la antena lejos del costado de la caja para permitir el acceso a los tornillos que sujetan el retenedor al costado de la caja.
-
-
-
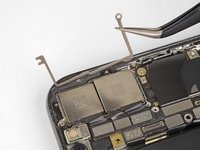
Retira los tres tornillos Phillips de 1,5 mm que sujetan el retenedor de la pantalla.
-
Retira el retenedor.
You don't need to do this step; you can slide the charge port out from underneath. It's not a tight fit.
-
-
-
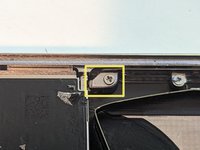
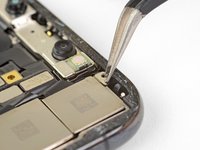
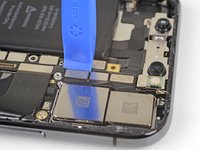
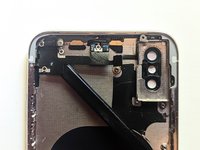
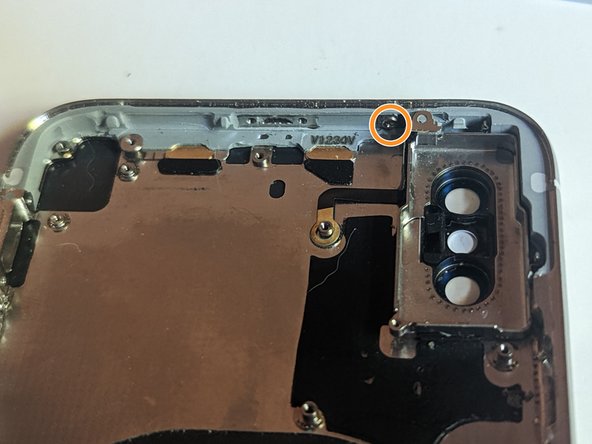
Retira el tornillo separador de 2,3 mm que sujeta el respiradero barométrico.
-
Retira el respiradero barométrico.
-
-
-
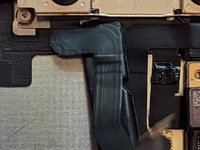
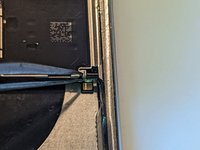
Para debilitar el adhesivo que sostiene el cable flex a la carcasa, caliéntalo con una pistola de aire caliente o secadora de cabello, o calienta la parte de atrás de la carcasa con un Iopener.
-
-
-
Despega el extremo del conector de la base para despejar el acceso al botón de encendido y al retenedor de la pantalla.
-
Dobla el conector de base hacia arriba y fuera del camino.
-
-
-
Retira el tornillo Phillips de 2,0 mm restante que sujeta el botón de encendido.
-
-
-
Retira el tornillo Phillips de 1,4 mm que sujeta la lengüeta de puesta a tierra.
-
Retira la pestaña de conexión a tierra.
-
-
Herramienta utilizada en este paso:Tweezers$4.99
-
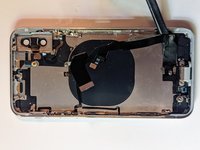
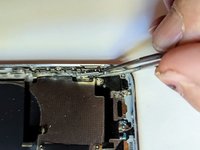
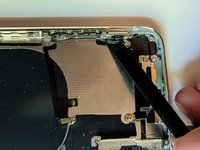
Despega el cable del botón.
-
Sujeta el cable con pinzas mientras levantas y deslizas el spudger entre el cable y la caja.
You may need to remove two screws for the thermistor retainer they have not been removed earlier
-
-
-
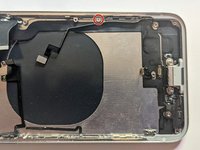
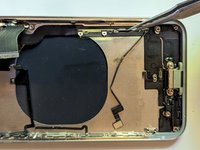
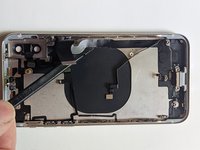
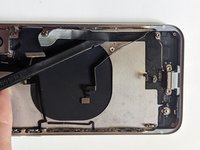
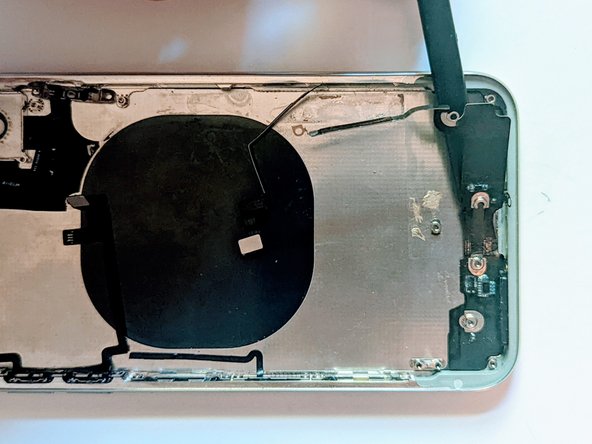
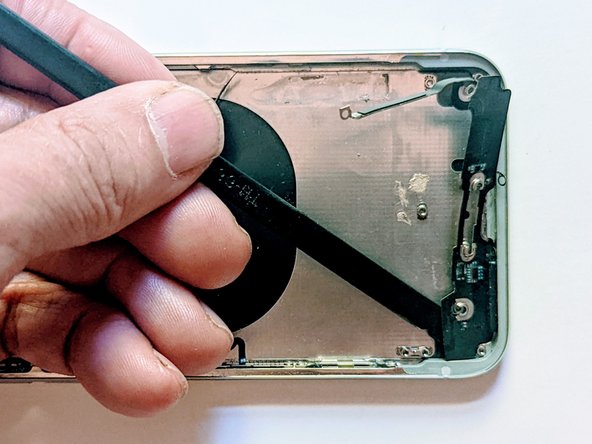
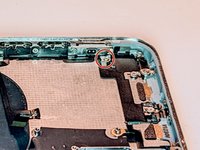
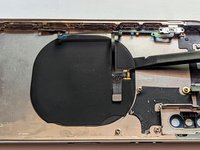
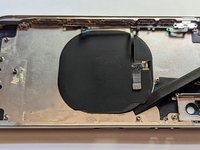
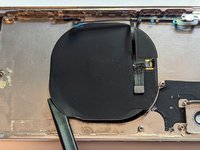
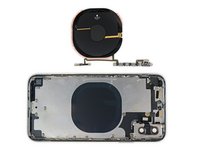
Retira la bobina de carga inalámbrica.
-
-
-
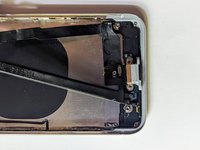
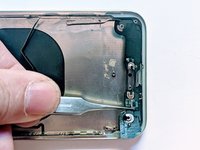
Retira el tornillo Phillips de 1,4 mm que sujeta la primera lengüeta de puesta a tierra.
-
Retira la pestaña de conexión a tierra.
This is already step 87. It has to come out before the 1.7mm Phillips on the right side of the silent button.
Hi Sandy (@sandlow).
Yes, you are correct that this step is repeated for the rear case replacement guide. This is an artifact of the way guides are put together using existing guides. There are ways around steps being duplicated, but they either involve editing someone else's guide (which I tried to do but my changes were rejected), or duplicating their entire guide just to edit one step out thus losing out if any changes are made to the original.
Ultimately I chose to leave the duplicated step in. I will see about adding a caution at the beginning that some duplicated steps may be encountered.
But thank you for your input; iFixit is ultimately a community effort and yours is appreciated!
Regards,
Jerry -
-
-
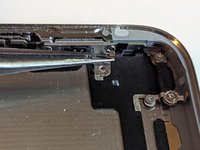
Quita los cuatro tornillos Phillips de 1,5 mm.
The standoff screw is a smaller screw so three are the same size and there's one smaller one that goes in the standoff
I have a problem with the NFC feature. Does changing the Wi-Fi antenna lead to the NFC feature working again?? Please reply... Thank you for your efforts..
-
-
-
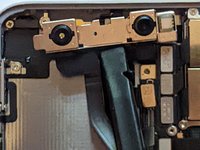
Retira el tornillo Phillips de 2,3 mm que sujeta la antena al marco de la cámara trasera.
-
Retira el tornillo Phillips de 1,5 mm que sujeta la antena a la caja.
This step has a duplicate screw from step 66. When reassembling the phone by following the steps in reverse, it messes it all up because in order to put this 2.3mm screw in, you have to put in the cameras and the bar that holds them down, but then when you get to step 86 the flash can't go in because the camera went in too soon. So I think if we simply remove the 2.3mm screw removal from this step then disassembly and reassembly should work out okay.
-
-
-
Retira los cuatro tornillos Phillips de 1,5 mm que sujetan los dos clips de retención de la pantalla del lado izquierdo.
-
Retira los dos retenedores.
-
-
Herramienta utilizada en este paso:Tweezers$4.99
-
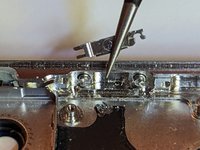
Gira el interruptor a la izquierda.
-
Sujeta el brazo superior del interruptor con pinzas puntiagudas y deslízalo hacia abajo para liberar el retenedor.
-
Levanta el extremo y deslízalo hacia afuera desde el otro lado.
-
-
-
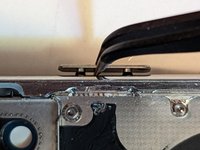
Voltea el clip de resorte hacia arriba 90 grados.
-
-
-
Sujeta un extremo del clip de resorte con un par de pinzas.
-
Tira con firmeza del extremo del clip hasta que se libere del botón.
-
Saca ligeramente el clip del botón.
-
Desliza el clip hacia atrás en la dirección opuesta para liberar el otro extremo.
-
Retira el clip de resorte.
-
Repite para los botones de subir y bajar el volumen.
-
-
-
Haz palanca en el lado derecho del retenedor unos 20 grados.
-
Tira del retenedor directamente hacia afuera del botón.
-
Enjuaga y repite.
-
-
-
Si no puedes agarrar el botón desde el exterior de la caja, empuja los pines desde el interior.
-
Retira el botón.
-
Repite para los botones restantes.
Hello, this is a great guide. I'm trying to replace the entire frame/housing of my Iphone X. This frame already includes the buttons... they supposed to be clickable after reassembly but I'm having trouble getting them to work again. I would appreciate if someone could point me in the right direction, thank you!
-
-
-
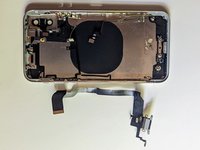
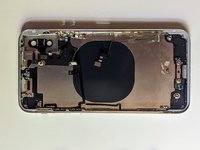
LA carcasa ha sido despojada por completo de todas las partes. Ahora puedes reemplazarlas en un nueva carcasa.
I have some feedback on this process, because as I went through it some of the screws it turns out had already been removed by that step, or the pictures did not make sense because for instance the logic board had already been removed. I will try to figure out how to offer edits to the steps. Thanks for putting this together! What an intense repair, and it's my first ever one attempted. We shall see if I am able to put it all back together. Speaking of putting it back together, is it supposed to just be a given that re-assembly is just "all these steps, but in reverse"?
Hi Sandy,
I do understand that some of the steps end up not quite 100% accurate, but that's due to the way this guide is combined from existing guides. It ends up being a tradeoff; I could have chosen to copy previous content into my own guide and eliminate those discontinuities you saw, but then you end up where if a previous guide gets updated then my guide doesn't automatically get those same changes. I chose to put up with some issues in order to have my guide automatically incorporate any revisions made to guides it depends on.
But yes, the reassembly process is indeed a case of following all the steps through in reverse.
I agree regarding the difficulty of this repair; it is the hardest one possible that doesn't involve microsoldering or board level repairs. My daughter in law broke her phone and actually bent the frame meaning it wasn't possible to do a glass repair so I had to replace the frame and figured others could benefit from my misfortune.
-


Para volver a armar tu dispositivo, sigue estas instrucciones en orden inverso.
Para volver a armar tu dispositivo, sigue estas instrucciones en orden inverso.
Cancelar: No complete esta guía.
11 personas más completaron esta guía.
Un agradecimiento especial a estos traductores:
100%

¡ Francisco Javier Saiz Esteban nos está ayudando a reparar el mundo! ¿Quieres contribuir?
Empezar a traducir ›

Equipo

Un comentario
I was able to get through the guide in both directions, but there are a few ways that the steps are pictured or worded that made reassembly confusing. I am still new to this as this is my first repair (I can't believe I started with such a challenging one!) so I am not sure what I am allowed to edit for the pictures and guide step text, so for now I have started by just leaving some comments on what did not make sense to me.