
Remplazo del panel izquierdo de la Xbox 360 S

Introducción
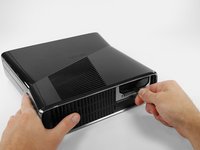
Ir al paso 1Haz que tu Xbox 360 S luzca como nueva remplazando los paneles exteriores.
Qué necesitas


-
-
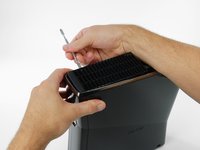
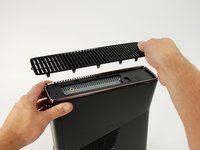
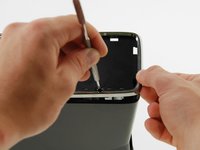
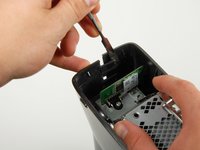
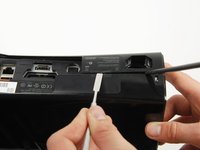
Empuja hacia la izquierda el pestillo que sostiene la cubierta del disco duro
-
Tira la cubierta del disco duro hacia afuera de la consola
-
-
-
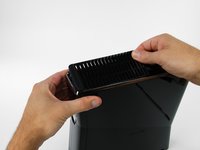
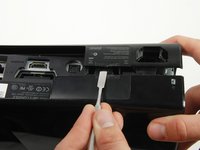
Agarra firmemente la etiqueta de tela que dice la capacidad del disco duro( Ej: 250 GB), unida al disco duro
-
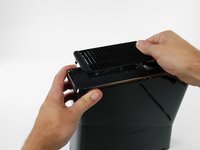
Tira el disco duro hacia afuera de la consola
If i buy a new xbox 360 and replace the hardrive inside with my own, will i have my account and saves? or will i have to recover my account and start over?
You will still have your saves and account if you replace your hard drive in the new xbox
hola tengo un disco de laptop y quiero ponerle 100 juegos como puedo hacer la xbox me reconose el disco y todo lo configuro pero cuando conecto a mi pc para pasar los juejosel emulador no me deja
-
-
-
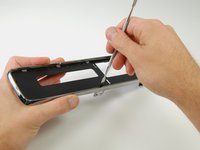
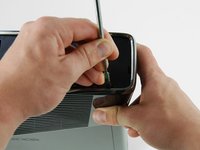
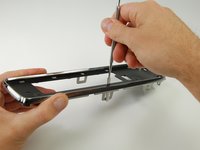
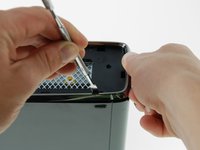
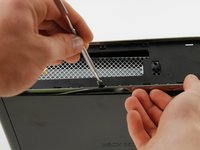
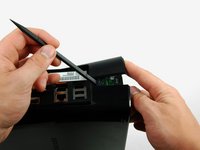
Inserta un spudger metálico a través de la abertura cerca la esquina inferior izquierda del bisel inferior
-
Rota el spudger hacia afuera del dispositivo mientras levantas el bisel inferior hacia arriba (valga la redundancia) con tu otra mano
These are pretty awkward to remove, but once you understand how they work its easy enough. The goal here is to slot the spudger THROUGH the gap of the silver tabs (visible in previous steps image, circled) and then pry. Put pressure against the wall of the Xbox case and push downwards, once you feel the spudger slot in, then apply force away from the Xbox and pull up a little with your free hand.
-
-
-
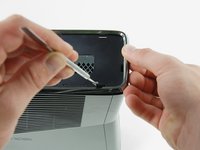
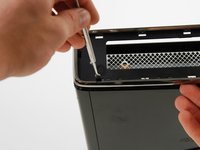
Inserta un spudger metálico a través de la abertura izquierda en medio del bisel inferior, y entre el borde inferior del clip y la carcasa izquierda
-
Jala hacia arriba el bisel inferior y rota el spudger hacia afuera de la consola simultáneamente para liberar el clip
-
Libera el clip al frente del borde izquierdo del bisel inferior del mismo modo
-
-
-
-
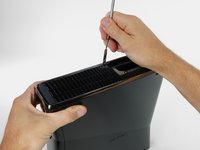
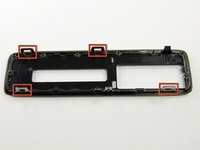
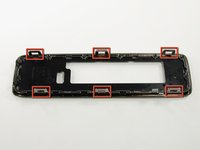
En los siguientes pasos, removerás la ventila superior, asegurada al panel superior por los trece clips mostrados a continuación
The motherboard and the disc drive's PCB (circuit board) are paired. If the drive's PCB is fine, which it most likely is, then all you need to do is swap out the PCB on the new drive with your old one before installing it. No motherboard replacement required.
Only in the unlikely case that the drive's PCB is fried will you require a full drive and motherboard replacement.
-
-
-
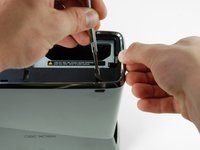
Orienta la consola de modo que las palabras "XBOX 360" de los lados miren hacia la derecha y estén orientadas hacia arriba, y la placa frontal mire hacia la izquierda
-
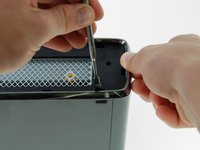
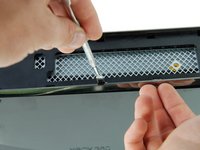
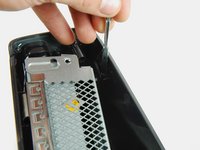
Inserta un spudger metálico entre la ventila superior y el bisel superior cerca de la parte trasera de la Xbox
-
Rota el spudger hacia afuera de la consola, haciendo palanca hacia arriba en el borde de la ventila hasta que se liberen los clips de plástico
This step is and the others following are to rough and not needed, simply put smth in between the lamellar and push it up with littlebit pressure thats better for the plastic parts.
-
-
-
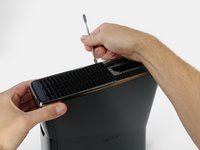
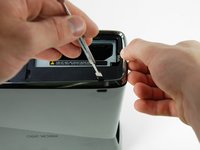
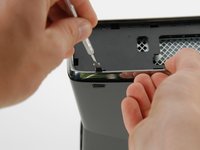
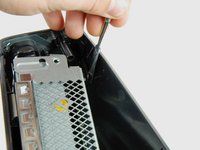
Inserta un spudger metálico entre la ventila y el bisel superior a lo largo del lado izquierdo de la consola
-
Del mismo modo descrito arriba, empieza a hacer palanca hacia afuera del bisel superior en el lado izquierdo de la ventila superior
-
Continúa haciendo palanca a lo largo del lado izquierdo del dispositivo, liberando todos los clips de ese lado
-
-
-
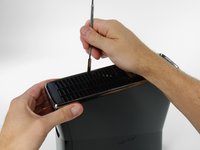
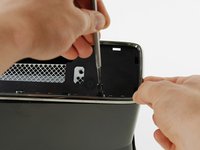
Inserta un spudger metálico a través de la ranura en el borde izquierdo del borde superior ubicada más al frente y entre el borde inferior del clip y la carcasa izquierda como se muestra arriba
-
Simultáneamente rota el spudger metálico hacia afuera de la consola tira hacia arriba en el bisel superior para liberar el clip
So I got the fan filter thing off, but the black edge plate thing isn't coming off. All I did was warp my flathead screwdriver and scratch the console.
-
-
-
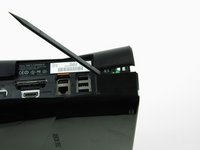
Rota la consola de modo que la parte trasera de la Xbox 360 S mire hacia la derecha, y la carcasa derecha mire hacia ti
-
Inserta un spudger metálico a través de la ranura del borde derecho del bisel superior ubicada más hacia atrás, y entre el borde inferior del clip y la carcasa derecha
-
Rota el spudger hacia afuera de la consola mientras levantas el bisel superior con tus dedos para liberar el clip
-
-
-
-
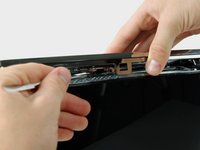
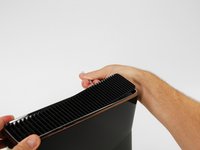
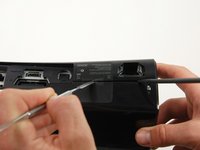
Localiza los dos clips que conectan el panel izquierdo y el derecho junto al borde de la parte de arriba de la consola, detrás de la carta del Wi-Fi.
-
Mientras empujas el panel izquierdo y el derecho lejos de cada uno con una mano, saca los clips del panel con una espátula de metal.
-
-
-
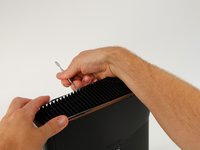
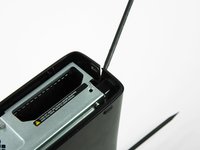
Inserta el borde plano de un spudger de metal entre las cajas izquierda y derecha donde solía estar la etiqueta de garantía.
-
Haz palanca en la caja izquierda hacia arriba para formar un espacio entre las dos cajas y desliza el spudger hacia la caja izquierda.
-
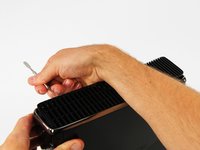
Gira el spudger hacia arriba para liberar el último clip.
if you make a hole right here like the link`s picture you can boot the lock
As the user above me said, please avoid doing it like shown in the guide. It just didn’t work on my Xbox (unless your goal is to destroy the plastic case). Instead, pick some small needle like object (the spudger was too short for this, I used the SIM bit of my iFixit driver kit) and find the right spot on the big sticker which is on the left in the pictures shown in the guide. That spot is just between the text and the column of logos (Dolby Digital, etc.) (https://team-xecuter.com/slim/slim_secre..., picture not mine). Poke it (don’t be too gentle, you have to apply some force) and you will hear the clip release.
Both the above links are dead, i used this YouTube video which shows you the process of getting the hidden clip
I was able to open it by pushing on the sticker to unclamp the clip while another person helped me pull open the case.
Here is a Video that shows the small hole behind the sticker, ist in german but ist good to see how to open that hidden clip easiely.
None of the above options by the other commenters worked for me, but I found a video that points out there's a little hole right in the middle of the "SEE PRINTED MANUAL" and "UL" on the sticker under the Xbox 360 warranty sticker that I stuck a sewing needle into and it unlatches the latch: https://youtu.be/7mC8ckDvKqc?si=CVyCszpF...
-
-
-
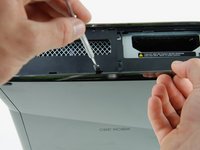
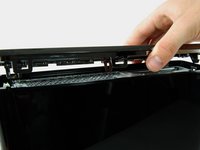
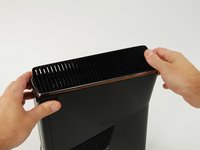
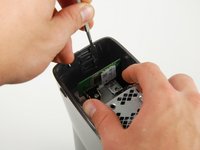
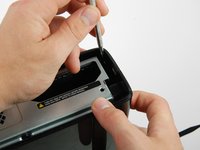
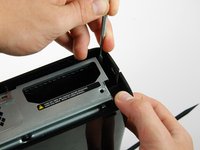
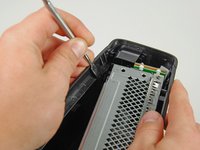
Voltea la consola de modo que la parte inferior quede hacia arriba.
-
Suelta un clip en la esquina frontal izquierda del borde inferior que sujeta la carcasa izquierda a la placa frontal.
-
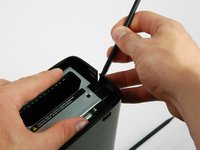
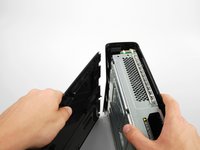
Gira la carcasa izquierda lejos del dispositivo para liberar los dos últimos clips internos.
-
Retira la carcasa izquierda.
-


Para re-armar tu dispositivo, siga estas instrucciones in el orden inverso.
Para re-armar tu dispositivo, siga estas instrucciones in el orden inverso.
Cancelar: No complete esta guía.
28 personas más completaron esta guía.
Un agradecimiento especial a estos traductores:
100%


Estos traductores nos están ayudando a reparar el mundo! ¿Quieres contribuir?
Empezar a traducir ›

2 comentarios
Prying the top and bottom case apart with a metal spudger?, you'll ruin your xbox 360 slim case....your already voiding your warrenty, why not open it the right way??, their's is a pin-hole located at the back where the sticker is, just stick a pin into it and it will release that clip thats holding it together!
if you are going to do something like open your xbox360, do it right the first time.......
ATTENTION: The metal spudger is absolutely wrong for that second tab, you will never reach it. Instead, place your thumb over where the security sticker is on the top half of the case and apply pressure, the tab will snap out of place with the right amount of gradual force. This drove me nuts for an hour and I found the solution elsewhere.