
Desemsamble de la cámara HTC RE
Introducción
Ir al paso 1Cómo abrir una cámara HTC RE para poder comprobar algunos fallos básicos o secar el interior. Esta cámara no está diseñada para ser desmontada, por lo que parece, así que se necesita un poco de fuerza bruta aquí y allá.
Muchas de estas cámaras se estropean, creo que principalmente debido a la entrada de agua.
Si actúa con rapidez, puede que sea capaz de salvar la suya utilizando técnicas estándar, como alcohol y agua desmineralizada.
Tenga en cuenta que esto no pretende ser un manual de reparación.
Necesitará:
- Varias herramientas puntiagudas afiladas, como spudgers (muy) pequeños destornilladores planos, destornillador Phillips Ph00 pequeño, algunas agujas muy finas (como herramientas dobladas), un soporte para tornillo de montaje de la cámara.
Para hacerlo bien, se necesita un destornillador Phillips muy largo, del tamaño Ph00.
Está dispuesto a romper cosas.
Tengo algunos juegos de viejas herramientas de dentista que funcionan muy bien para muchos trabajos. La próxima vez, pídele a tu dentista sus herramientas viejas (esterilizadas, por favor, ya que están muy afiladas y es fácil cortarse). Echa un vistazo a las últimas fotos.
Lo siento, iFixit, no hay oportunidades de venta aquí.
Qué necesitas
Herramientas

-
-
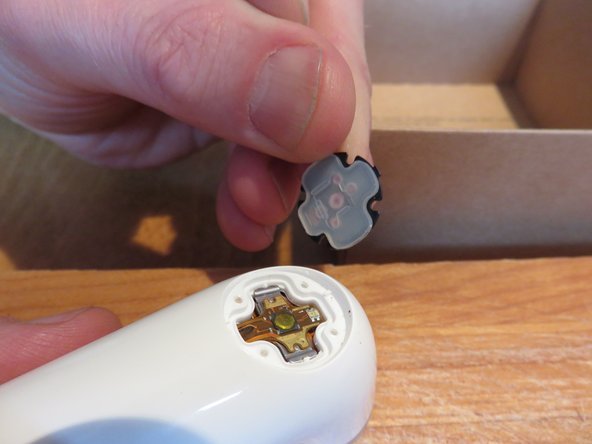
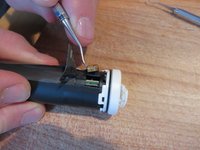
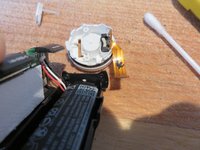
El botón tiene una pequeña punta en el centro que tiene un hueco, y dos puntas en forma de gancho, que se liberan cuando se gira en sentido contrario a las agujas del reloj.
-
Para liberarlo, tenga cuidado de evitar el anillo adicional que se ve alrededor del botón. Forma parte del conjunto de sellado.
-
Levante el botón con cuidado con un destornillador plano muy fino, o herramientas de dentista, y haga palanca mientras gira en sentido antihorario. Este debería ser el resultado.
-
-
-
Retire los 4 tornillos que sujetan el conjunto de sellado.
-
Ahora verá el conjunto del botón de encendido y apagado.
-
-
-
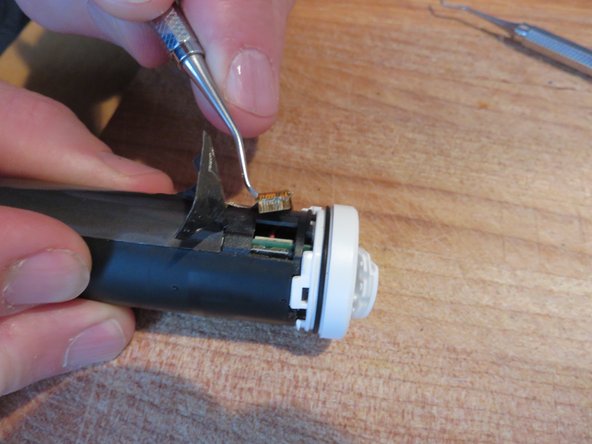
Aquí hay un primer plano de la placa de soporte del interruptor y el conector principal del cabezal de la cámara al cuerpo de la cámara.
-
Está pegado a una cruz metálica, y necesita ser retirado con cuidado para permitir que el cuerpo con cable se deslice hacia fuera.
-
-
-
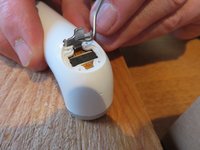
Si levanta el interruptor, podrá ver debajo la placa metálica de sujeción y el conector para el cabezal de la cámara.
-
Retire con cuidado la placa metálica sin dañar el cable y el botón del interruptor.
-
El cuerpo largo sostiene la batería y la electrónica y bloquea el cabezal de la cámara en su lugar. Así que al sacar el conjunto principal, este cable plano y el interruptor debe mantenerse libre para evitar daños.
-
-
-
Levante el conector con cuidado, trate de usar una herramienta no metálica para evitar daños.
-
Usted puede ver la placa de metal está todavía en aquí, pero más fácil de quitar primero.
-
Primera vez para mí, por lo que la secuencia de los detalles puede estar un poco fuera.
-
-
-
-
Coloca un tripié de cámara estándar en la parte inferior de la cámara, para que tengas algo de lo que tirar.
-
-
-
Esta es otra foto que hemos abierto. Puede ver los pequeños pestillos que mantienen el conjunto principal en su sitio.
-
-
-
Cuatro manos derechas son mejores que cuatro izquierdas, a menos que haya zurdos involucrados. Gracias por las dos manos, bro.
-
También intentamos empujar todo el conjunto hacia abajo. Parece que hay algo de movimiento, pero luego se atasca y no se puede sacar al mismo tiempo.
-
Me harté y rompí los dos pestillos con mis herramientas de dentista. Es una especie de vuelta que es tan difícil de alcanzar. Una vez más, tenga cuidado con la conexión, pero la alineación es aproximadamente la parte inferior del conector de la cabeza de la cámara.
-
No creo que puedas hacerlo con un destornillador.
-
O mejor, el tercio inferior de la parte horizontal de la cruz. Hum, ¿está claro?
-
El pestillo está justo tocando el cuerpo en el lateral de la forma de cruz.
-
-
-
Una vez que los dos pestillos se rompieron, empezó a verse de forma constante cómo la parte inferior se meneaba y se movía al tirarse.
-
La ayuda cuidadosa de un spudger ancho, dando vueltas y vueltas, puede ayudar.
-
-
-
¡Y está fuera!
-
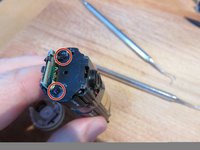
Observe los pestillos rotos.
-
Y el mal sellado alrededor del altavoz (¿o es el micrófono?). ¿Ha entrado agua por ahí?
-
-
-
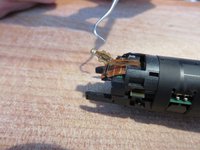
Retira con cuidado la cinta adhesiva y el conector de alimentación.
-
Ten cuidado con la cinta de toma de tierra que se ve en la foto.
-
La mía estaba llena de corrosión de cobre verde. Lo limpié lo mejor que pude y lo volví a insertar. Sigue muy muerto, sin luz de carga, con o sin tarjeta SD, nada.
-
El segundo conector parece ser para los sensores que lo encienden cuando lo sujetas. No lo toqué.
-
-
-
Hora de ponerse brusco.
-
Vuelva a colocar el conector para preparar el proceso de liberación y extracción de la tapa inferior.
-
Si lo haces como se indica más abajo, romperás cosas...
-
Utiliza fuerza y desengancha los tres obvios. Eso parece difícil...
-
La chatarra ya tiene la tapa inferior que falta, así que es difícil ver dónde está el problema.
-
-
-
La forma correcta sería:
-
Encuentra unos destornilladores Phillips de punta larga. Un lado tiene un canal evidente para aflojar uno de los dos tornillos.
-
Tal vez puedas llegar a ellos cuando hayas apretado un poco la carcasa para abrirla, pero no es fácil.
-
-
-
Retire con cuidado un poco más de cinta adhesiva. Observe también la malla de toma de tierra que conecta con el cable de alimentación.
-
Abra los clips del soporte de plástico y el cuerpo principal se plegará.
-
Otra vista de la tapa inferior y el canal para llegar a los dos tornillos clave.
-
Tras limpiar algunos daños causados por el agua, puede verse la corrosión en demasiados lugares.
-
-
-
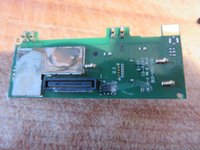
El tablero superior está sujeto con un solo tornillo Phillips.
-
Todo está dañado. Hay agua seca y corrosión.
-
-
-
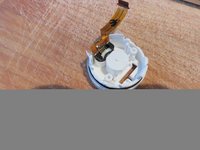
El cabezal de la cámara solo podrá salir una vez que haya sacado el conjunto principal. El anillo de la lente tiene una conexión bajonet, sello y pegamento. Para liberarlo, gírelo en sentido antihorario. Con 1 mm es suficiente.
-
Es bastante difícil conseguir cualquier tipo de agarre. Déjalo en su sitio si puedes.
Thanks al lot !
I want also disassemble because i want to connect a bigger acu from outside so the camera can run 12 hour especially when i am underway; or you have a better idea to overcom this problem?
Thanks Paul
Hi Paul, i would suggest using batterij bank and usb Cable to charge internal battery.
Bigger batterij wired in may overload charge circuit etc.
Mike B -
Where can buy replacement battery ??
-


El HTC Re claramente no está construido para ser reparado, y no veo repuestos en Internet para él.
Si usted tiene dos, y desea construir en uno.
Para volver a montar el dispositivo, siga estas instrucciones en orden inverso. Pon un pequeño punto de pegamento para poner la cruz de metal en el interruptor después de que el cuerpo principal se ha insertado y el interruptor sobresale de la abertura.
Pon un poco más de pegamento, por ejemplo termofusible, en la tapa inferior, ya que los pestillos rotos harán posible que el aparato se desarme.
Cancelar: No complete esta guía.
31 personas más completaron esta guía.
Un agradecimiento especial a estos traductores:
100%
¡ Luis Hernandez nos está ayudando a reparar el mundo! ¿Quieres contribuir?
Empezar a traducir ›
23 comentarios
Hi Daggosett,
Bad dog!
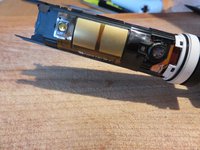
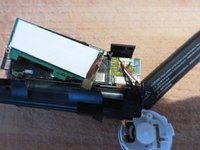
In step 15 and 17 you can see where the battery sits and shape (17, right side), sitting all along the main body of the camera.
If I recall correctly, it sits at the side of the little pinhole - mic, but not 100% sure.
Not much you can do if the dog got a mouthful of the Lithium battery anyway. I would not imagine he would like to ingest any of it.
Hope you both recover.
Mike
Great post. Water ingress caused my lens to permanently fog up. Have you had any success taking the lens assembly apart? I think I'll give it a go.
Hi John,
No, did not try taking lens apart. See my comments in the huide on the lens.
Perhaps you can try to evaporate it and or absorb.
Like using the rice and warm place trick. (Hairdryer?)
If it is real water droplets - and has salts inside, that will leave residue.
If it is condensed water from another spot...it may work
You could try those 4 screws also I explain to leave alone...
Depends where the water sits.....
Good luck
Mike
Mike B -
my htc re camera is working.
but problem is , its not charging, even after reset .
please help me to rectify this problem
Mine too, it produces weird soft sounds while operated but doesn’t work and doesn’t charge. I guess it’s due to water inside, I ordered another one.
First, perhaps the obvious, try changing the cable / charger.
Second common problem with these connections is some muck gets into the connector, or some corrosion. Have a good look with magnifying glass and good light into the bottom of the connector.
Look for corrosion, plucks of cotton and dust. Clean with toothpick.
Opening it up, all I can think of is wiring.
Another option is your battery is completely shot.
Good luck.
Mike
A minha câmera trabalha com dificuldades de focagem e com imagem a tremer e muito ruído.
hey sir, i try to take a video with my re camera, but there is no sound in the video, how can I fix the mic?
Kabul,
I don't remember exactly where the mic sits...
It could be the mic, it could be many other things, like the sound processing.
PErhaps try this: Locate the mic, and put a sensitive voltmeter over it. Then, yell at your camera. If you see something, it should be ok, and the problem is....hard to find and fix (other than possible light corrosion somewhere).
If the mic is giving null, then I suspect the mic is dead. Try soldering another one to the connection... Not so easy to put something back together then...
Good luck.
Mike
mic location. Great tutorial! thanks! https://http2.mlstatic.com/action-cam-ht...
Amyn, you can see the card slot on picture of Step 15.
So you need to strip it quite a bit to get to this level. Note those hard to get at screws…
Assuming there is some dirt inside, can you not cleanout with a toothpick or somthing? Make sure you don’t leave any part behind.
the rubber toothpicks can be good for cleaning out dirt too…
Good luck.
Mike
Hey hi everyone unfortunaly mine die so, I'm selling parts of my camera. Lens block, USB and SD block, inner AND outter plastics or other if you want. If u interesed please message me 4ldo.mg@gmail.com
Hi, my HTC RE Camera won’t charge up even after trying to reset it. It seems like that battery is gone case or so. How to replace the battery and where can I get the replacement part? Thanks!
Hi Eric.
first, does it work with battery bank attached? That may be an indication it is only the battery.
Anyway, check for markings on the old battery. Else, just look for the same form factor and connectors. Very likely NimH will be same voltage and approx same capacity. If you find battery details, feel free to add them to this guide.
good luck.
mike
Mike B -
Many thanks for the details. In the end the Vive (hmd and controllers) can be opened and repaired but it is important to know the required steps. So this will help.
Many thanks for the details. In the end the Vive (hmd and controllers) can be opened and repaired but it is important to know the required steps. So this will help.
Thanks for the guide, it helped me to take apart my camera. I hope you can update it to show that the 2 bottom cap screws are actually the last ones you should remove once you take the unit out of the body, and open the two halves up. I didn’t want to pull and break them and it turned out well. Now I need a replacement battery as mine doesn’t hold a charge any more. I found it on Aliexpress for about $10 and $70 for shipping, so it is a no-go. Do you know of any tutorials on replacing batteries with different ones? It is a 3.8V 800mAh battery and I’m sure I could find an equivalent cell phone battery, I just don’t know what to look for because the charge cycle has to be compatible with the camera.
Try farnell in one for a battery. https://www.farnell.com
I lost the bottom “screw” that holds the lanyard on. Does anyone know where I can buy another one? Or have one they’re willing to sell? Thanks.