
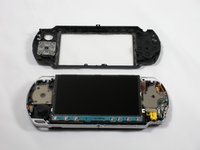
Sustitución de la unidad UMD de PSP 2000

Introducción
Ir al paso 1¿Tiene problemas para leer discos? Esta guía es para ti.
Qué necesitas


-
-
Pon el PSP con la pantalla hacia abajo, que la parte del UMD se encuentre apuntando hacia arriba,
-
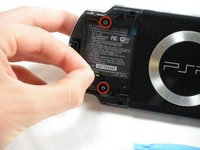
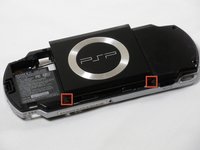
Localiza la puerta de la bateria y abrela.
-
Remueve la bateria desde adentro hacia afuera.
-
-
-
Localiza el sticker debajo donde deberia ir la bateria que dice: "En: Warranty Void if Seal Damaged."
-
Remueve el sticker usando herramientas para abrir dispositivos.
-
-
-
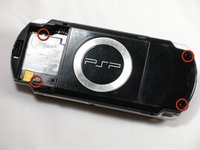
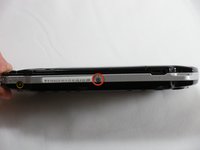
Remueve los siguientes tornillos que se encuentran en el contorno de PSP
-
Dos tornillos de 4mm Philips
-
Un tornillo 5mm Philips
Beware that some models of PSP 2000 (mine is a limited edition Crisis Core FF7 silver version, so I suppose it is related to it being a japanese PSP) have 2 minute TORX screws (T1? T2?) instead of the 2x 4mm Phillips pointed in orange around the USB port.
-
-
-
-
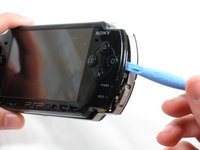
Remueve la barra de inicio haciendo palanca gentilmente en los lados izquierdo y derecho de está con herramientas de apertura. Levanta la barra fuera del dispositivo.
Theres a latch you have to pry on the other side of the console through the small hole in order to remove home menu bar
-
-
-
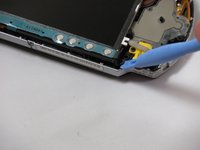
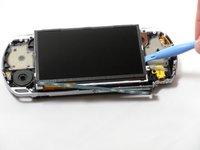
Con la barra de inicio fuera de lugar, gentilmente haz palanca en el display usando herramientas de apertura.
-
Levanta las pestañas negras del conector del cable plano usando herramientas de apertura. Jala las cintas hacia abajo del PSP para desconectarlas.
-
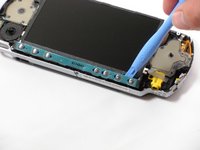
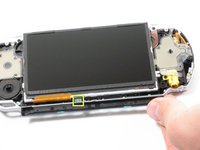
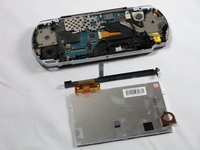
Gentilmente levanta el display.
There are 2 ribbons connected to the screen. Both of them have to be disconnected in order to remove the screen.
Do not lift the black tab on the thin cable. That's attached to the logic board.
-
-
-
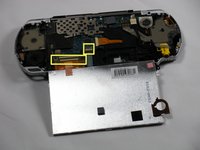
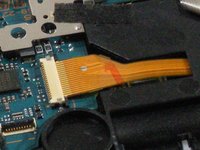
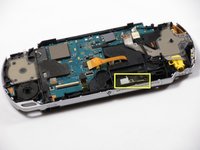
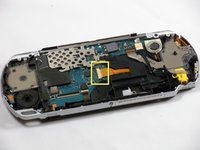
Desconecte con cuidado el cable plano de la unidad UMD de la placa lógica. Utilice las herramientas de apertura de la PSP para empujar horizontalmente las lengüetas negras del conector y liberar el cable.
-
En este punto es útil pegar las partes metálicas sueltas con un poco de cinta adhesiva para que no se caigan mientras tienes la PSP al revés.
There is a 2nd ribbon for the UMD drive that has to be disconnected sitting directly between the screen and home bar ribbons. Just lift the black tab to release it like you did for the screen and home bar ribbons.
-
-
-
Coloque la PSP de modo que el dispositivo UMD mire hacia arriba.
-
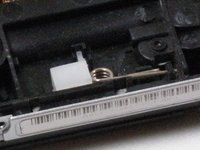
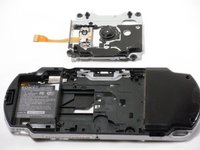
Con la unidad UMD abierta, ubique el soporte de expulsión de UMD de aluminio. Pellizca la parte superior de los brazos hacia adentro para separarlos de la puerta del UMD.
-
El soporte de expulsión del UMD ahora se puede extraer fácilmente.
-
Haga palanca suavemente en el lado izquierdo de la puerta del UMD para retirarla.
On the front, bottom right-hand side, next to where you remove the spring on the previous step, there is the hinge for the UMD door. You can use a plastic pry tool and move it to the left while pushing back to release the door without breaking off the plastic knobs.
Thank you for that information. I surely would have broken the knobs had you not pointed this out. Although, it took a fair bit more force to push the hinge over enough than I expected.
"Gently pry on the left side of the UMD door to remove it." This doesn't really help.
It doesn't describe where to pry it or what direction to pry it in. Might as well just say "just fix it," because this is a complete gamble on whether or not you break the hinge. If you already have knowledge on which direction is best to pop it out, why wouldn't you specify it?
The correct way to do this step is as follows:
With the PSP rear facing you, torque/bend the plastic frame slightly around the left hinge of the door by using your hands to bend the frame to the left of the pin slightly while pushing the door to the right. This will bend the plastic pin away from the door and let you get the door hinge off. The eject bracket is then trivial to remove.
It is NOT desirable or necessary to remove the UMD eject bracket first. That makes no sense as the UMD door is clearly designed to go on AFTER the bracket arms have been inserted into it.
Bending things almost never is "the correct way".
This YT video shows a method that works somewhat smooth: https://www.youtube.com/watch?v=p8ZmOK5q...
-
-
-
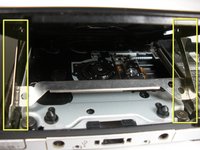
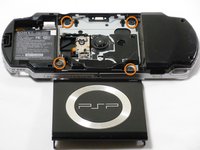
Con la puerta UMD fuera, localice y retire los cuatro tornillos Phillips de 4 mm que sujetan la unidad UMD en su lugar.
As the comment in Step 8 says, there are TWO ribbon cables from the UMD drive to disconnect, not just one. Very important!
-


Para volver a montar el dispositivo, siga estas instrucciones en orden inverso.
Para volver a montar el dispositivo, siga estas instrucciones en orden inverso.
Cancelar: No complete esta guía.
34 personas más completaron esta guía.
Un agradecimiento especial a estos traductores:
100%


Estos traductores nos están ayudando a reparar el mundo! ¿Quieres contribuir?
Empezar a traducir ›

Equipo

Cal Poly, Team 6-3, Maness Fall 2009 Miembro de Cal Poly, Team 6-3, Maness Fall 2009
CPSU-MANESS-F09S6G3
5 Miembros
37 Guías creadas
4 comentarios
I've used this guide multiple times and it is simply the best out there. You should simply title it "PSP disassembly" as I have used it just to take the 2000 apart and not just replace the UMD drive.
This guide was very helpful in replacing the UND drive in my 2000. Unfortunately, it turns out that the UMD drive was not causing the issue it is having.
Lots of guessing in this guide, better not use it and look up a YT video.
will this be coming back in stock??