
Sustitución de la Botonera del Bose SoundLink Mini II
Introducción
Ir al paso 1¿Los botones de audio no funcionan? Esta guía te ayudará a reemplazar la placa de botones del Bose SoundLink Mini II. Para reemplazar estas piezas, asegúrate de tener las herramientas necesarias y las piezas de repuesto. Ten cuidado cuando trabajes con una batería cargada mientras retiras las placas de circuito.
Nota: este procedimiento requiere quitar y volver a instalar la batería, lo que requiere el uso de una [guía|750|soldador] y/o mucho desmontaje cuidadoso.


-
-
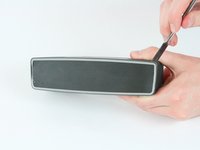
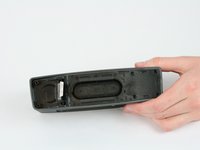
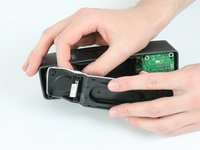
Delicadamente remueve la base de caucho (plastico) del altavoz, tirando de los bordes.
Das Fehlerbild das ich beobachtet habe, war ein kontinuierliches rotes blinken der Power LED. Der Akku wurde nicht mehr geladen. Empfehlungen das Gerät in der ship mode zu versetzen um dann zu laden waren erfolglos. Nach dem Akku tauschen das gleiche verhalten. Die SW war auf dem aktuellen Stand.
Die Lösung war am Ende eine komplette neu Installationen der SW.
Dazu auf die böse sw Update Seite gehen und dann die Tasten "Page Up" und dann "Page down" drücken. Dan wird die Option angeboten, die gleiche SW nochmals zu installieren. Danach war alles funktionsfähig.
-
-
-
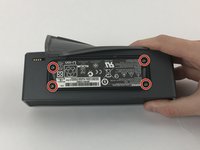
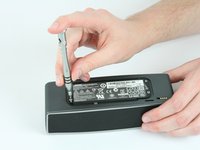
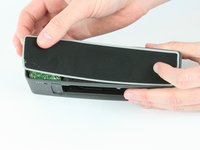
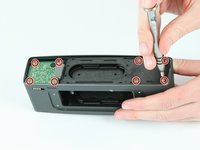
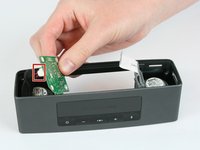
Remueve los cuatro tornillos Torx T9 de 6 mm. ubicados en las esquinas de la batería.
Not sure what’s going on here but T9 is the wrong size—too big—for the screws on my SoundLink Mini II. Maybe T8? Perhaps my model is more recent and they’ve changed sizes? I bought the screwdriver from IFIXIT following these instructions, so I’m a *bit* annoyed…
That’s really frustrating. I’ve seen this before, where manufacturers swap screws and other components without changing the model number. I have a 64 bit driver set from iFixit, but I don’t recall which bit I used for this. The screws in my one are different lengths to the ones in the original instructions.
-
-
-
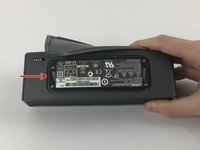
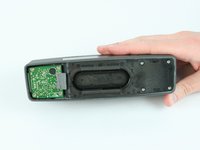
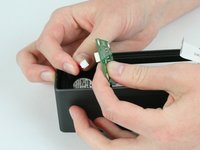
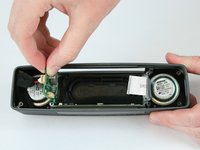
Con cuidado, levanta la batería desde el punto mas cercano a los cuatro contactos dorados, pero no trates de quitarla completamente aun.
-
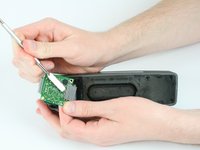
Con mucho cuidado, desuelda los cuatro cables de la placa madre, para poder retirar completamente la batería.Hay muy poco espacio para el soldador y podrías dañar la carcasa o la placa; se recomienda que saques la placa antes.
-
Para obtener ayuda con la soldadura, ver la guía de soladuras.
cuanto tiempo dura la bateria original ?
Yeah this guide is just like the original Bose Mini which looked like that model had a way to replace the batter easily. I purchased a battery off Amazon thinking it was the same. This is not the same. The Bose Mini II has a battery hard-wired directly to the board. Might be too late but read this guide’s comments first to get the low down. The guide is very misleading. The BOSE SOUNDLINK MINI II **DOES NOT HAVE A REPLACEABLE BATTERY**
yess, got the same problem. Purchased an substitute which had as Replacement No. the original Bose-No. on its description. Bose’s accu has 4 strings, the replacement has 5 strings (where to put the fifth then?!).
Original we had to CUT OFF, because it is firmly soldered and glued with foam! No chance to replace it!! Nearly 60.- Swiss Francs as we say “for the foxes”.
DO NOT buy a replacement battery until you understand that the battery is HARD WIRED to the circuit board and is NOT designed to be replaceable. If you are not an electronics specialist, the only option is to send to Bose for battery replacement.
Even if you are an electronics specialist, finding a replacement battery may not be possible.
I am very glad I took the time to review everything and all the comments before I started this procedure on my Soundlink Mini 2.
I have to say, the author of this procedure is a pathetic jerk for posting this and not distinguishing the between the 1 and 2 versions. It is also highly suspect that there is no clear picture of the top of the unit, which would indicate which version is being used due to the fact that the 2 has no mute button.
Hey du hole Frucht, die Bose Soundlink 1 hat keine Kabel an der Batterie, nur die Soundlink Mini 2 hat Kabel die auf die Platine gelötet werden muss!
Ihr Affen habt doch keine Ahnung!
Und den Bose Schriftzug muss der Autor nicht zeigen, wegen der Rechtlichen Lage in Deutschland!
r.janda -
It’s disappointing, for sure. But to call the author, who’s been kind enough to post this without getting anything in return, a pathetic jerk is waaay over the top! Come on. If anyone deserves abuse, then it’s Bose for producing a speaker with a battery that’s totally and easily replaceable except they decided to solder it onto the circuit board for some unfathomable reason. Argh!
I suspect that the soldering the battery directly to the power board is a way to enhance revenue because most people will either send it in to be replaced or throw it away and buy another speaker. Of course Bose hopes that the replacement will be another Bose, but that is not likely for anyone who is frustrated by the idea that Bose would not make the battery easily replaceable.
Absolutely. Great I checked up first. I will not buy any other rechageable battery operated Bose product. It is clear customer abuse. The same should go to companies like Samsung which produces cellular phones with practically embedded impossible to replace without risking breaking the cristal. Customer protection in this country unfortunately has gone away with lobby. (Legalization Of Bureaucratic BriberY) Same with Apple and then Microsoft when they do updates and then no longer support an OS that could be still useful for the needs of certain people or businesses
………..just bought a replacement battery based upon ifixit’s original post. This is neither a 5 minute two wire push fit job NOR one for an amateur to attempt. I now have a box of BOSE bits and spare unsuable battery.
Thanks pal.
Beware of internet advice
……..just bought (£30) a replacement battery based up ifixit’s orginal post that it was a)simple and b)took 5 minutes only to discover that a) there are four wires involved hard solderied to a pcb. Spent an hour undoing torc screws to dismantel the whole thing. It is not possible.
I now have abox of BOSE bits and a brand new unuseable battery. And no speaker.
Shame on both BOSE and ifixit - the latter for being so misleading .
I’m pretty disappointed with ifixit on this one! I feel bad giving you guys a bad review but this one is just bad! It’s Missing steps, it’s labelled as easy when it certainly shouldn’t be. iPhone battery’s are easy. This requires awkward desoldering/soldering. In a tight spot. There’s not even a mention of that in this guide? Maybe someone could rewrite this so others don’t go and purchase a battery thinking it’s easy!
The instructions are not complete, and I needed extra information to replace the battery on my soundlink mini 2. I successfully completed the battery replacement using instructions I found by searching for SLminiII_SM.pdf. That document describes the steps Bose technicians take. With that, it took about 30 minutes to replace the battery. I removed the board the battery is soldered to, which made it an easy soldering job (four through-hole wires, no SMT). I carefully saved and replaced the foam tape because the last thing you want in a speaker is buzzing sounds due to the wiring rubbing against the speaker. If you’ve already bought the parts, and have access to a soldering iron. I’d recommend searching for the instructions I used.
I was not able to find that document. Do you have any tips for finding it and I was wondering if you bought your replacement battery from ifixit or if you have any recommendations for where you bought yours.
The instructions are at https://riverparkinc.com/wp-content/uplo... . I bought this battery from Amazon: https://www.amazon.com/gp/product/B08FHX... (not an affiliate link). The speaker is working fine and charging, a few months later.
Thank you very much
daniel -
I tried to follow these instructions. I cannot find where to download the 'Polycomm' software necessary to reset the hardwire between chip and battery. I've trawled all over the internet and Bose's own websites. Could some one please advise?
I would like to measure the voltage of the battery before replacing it, does anyone know which one of the 4 wires is power or ground?
You don't need the Polycomm software, you just need to reinstall the Firmware even if it's up-to-date. Got to https://btu.bose.com/ and plug the speaker in and update. It may say it's up to date, but if you type A, D, V, Up Arrow & Down Arrow it lets you into advance mode and you can force the firmware to be reinstalled
Kudos James!
You held the secret to finishing this up! Pressing A, D, V, Up Arrow & Down Arrow in sequence after getting the updater going at https://btu.bose.com/ , then updating the firmware got the job done. Before doing this my power light just blinked red when trying to charge and the speaker The physical replacement was no big deal. I bought a replacement battery from amazon or ebay, I don't remember where, and instead of de-soldering the battery from the power supply board, because I suck a soldering, I cut off the old battery real short and spliced the new battery into the wires still hanging from the power supply. Lots of whining about the hardwired battery but I think I understand the decision Bose made in doing it. This little speaker booms, and the last thing they wanted was a loose battery connector rattling around. The fact that they aren't suing me for fixing it, even thought it takes a little thought and effort to do so, at least keeps them above John Deere, Tesla, etc., in my eyes.
TMS -
So, is there anything I can do when even the Bose Updater doesnˋt recognize my Mini 2? Have the Updater installed, cable plugged in but nothing happens. Except for the red blinking.
Hi James, TMS, My battery has just stopped charging. I have a Bose which has stopped charging. I came across a youtube video suggesting it could be that the battery has gone into "Battery Protection Mode" I followed the suggestions provided in the video but without results. Before the video ends the guy suggests a firmware up-date. Is it obvious what A, D, V, Up Arrow & Down Arrow in sequence means when up-dating? Don't suppose there's a youtube video showing this procedure is there?!
-
-
-
-
Manual de instrucciones para técnicos de Bose: https://riverparkinc.com/wp-content/uplo...
-
-
-
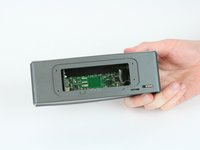
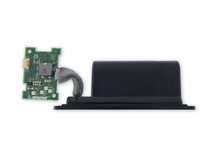
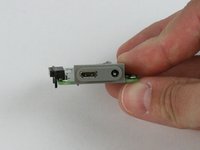
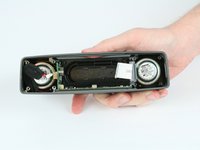
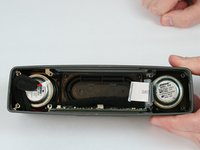
Con la batería extraída, el tablero de botones ahora será visible.
-


Para volver a armar tu dispositivo, sigue estas instrucciones en orden inverso.
Para volver a armar tu dispositivo, sigue estas instrucciones en orden inverso.
Cancelar: No complete esta guía.
5 personas más completaron esta guía.
Un agradecimiento especial a estos traductores:
100%

¡ Francisco Javier Saiz Esteban nos está ayudando a reparar el mundo! ¿Quieres contribuir?
Empezar a traducir ›
Equipo

USF Tampa, Team 5-2, Passmore Spring 2017 Miembro de USF Tampa, Team 5-2, Passmore Spring 2017
USFT-PASSMORE-S17S5G2
Miembros de 4
19 Guías creadas
5 comentarios
Hi…is it possible to get a replacement board?
Hi,
What you refer to as the ‘side board’ under step 10… do you know where I can buy one of these from?
Thanks
Steve.
If the blinking red battery is the reason to change the battery, first try reinstalling the latest firmware via Bose.
When the site tells you that you already have the latest version, just press A, then D, then V, then the up arrow and last the down arrow. The option to reinstall the latest firmware will appear. Just reinstall it and that might fix your battery. It did for me and saved me a new battery.
Harm Jan Berendsen - Contestar