
Reemplazo de batería del Huawei Honor 8
Introducción
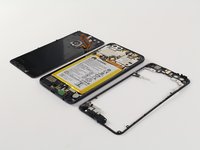
Ir al paso 1Esta guía detalla cómo remover la batería del Huawei Honor 8.


-
-
Utilizando una pistola de calor o secador de pelo, aplica calor aproximadamente tres pulgadas por arriba del panel de vidrio para calentar el adhesivo alrededor del borde exterior del teléfono.
-
-
-
Utilizando la herramienta de apertura de plástico, levanta con cuidado una esquina del panel trasero de vidrio.
-
Despacio, desliza la herramienta de apertura de plástico alrededor de la parte externa del panel de vidrio para romper el adhesivo.
-
Con cuidado levanta el panel trasero una vez que todo el adhesivo ha sido removido.
-
-
-
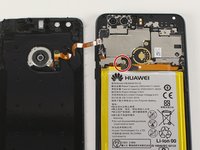
Utilizando un destornillador Phillips PH00, remueve el tornillo plateado Phillips de 3.5 mm marcado con un círculo rojo.
-
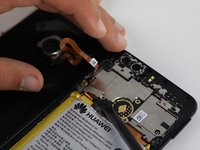
Utilizando un spudger, con cuidado levanta la lengüeta de metal pequeña que era sujetado por el tornillo.
-
Con cuidado levanta el cable plano naranja en el panel trasero.
-
-
-
Con un destornillador Phillips PH00, retira los ocho tornillos de plata Phillips de 3.5 mm marcados con un círculo rojo.
-
Con un destornillador Phillips PH00, retira los seis tornillos Phillips negros de 4.0 mm marcados con un círculo naranja.
-
Con un destornillador Phillips PH00, retira el tornillo Phillips de plata de 3.0 mm marcado con un círculo amarillo.
-
Con la punta del destornillador Phillips PH00, rasca suavemente las pegatinas blancas delineadas en círculos verdes para exponer los tornillos ocultos.
-
Con un destornillador Phillips PH00, retira los dos tornillos Phillips negros de 4.0 mm marcados con un círculo verde
On my phone, the white sticker was in the bottom right corner, rather than the middle right side. However, the screw types were all the same as listed in the step above, so proceeding to remove the sticker and screws worked fine.
one of my green screws and orange screws were reversed from image, but all worked out fine, as well.
Lacking a useful magnetic pad, I made a pad of (sticky side up) masking tape to hold screws which I could mark up and it worked quite well.
-
-
-
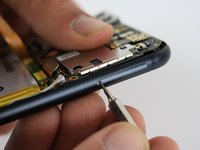
Sostén el teléfono de modo que las cámaras estén en la parte superior, ubica el pequeño orificio en el borde superior derecho del dispositivo.
-
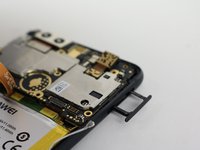
Con la herramienta Sim Eject de 0.8 mm, empuja hacia abajo el orificio pequeño para liberar la bandeja de la tarjeta Sim.
-
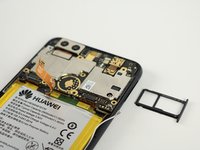
Tira suavemente de la bandeja de la tarjeta SIM y déjala a un lado.
complete the ejection with screen facing up
Wenn man tatsächlich nur die Hauptkamera tauschen will, sind die Schritte 6 - 13 meines Erachtens überflüssig. Sobald der innere Rahmen abgenommen ist, kann man die Kamera von der Hauptplatine lösen (= Schritt 14).
-
-
-
-
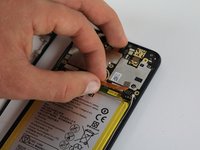
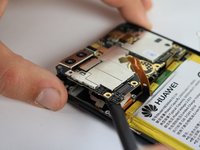
Usa un spudger para separar suavemente el pequeño cable de antena en el lado derecho de la placa madre.
Bei mir ist es so wie bei Ferdinand (Anschluss hat sich vom Board gelöst, dennoch scheint noch alles intakt zu sein. ). Ich würde behaupten, dass es extrem wahrscheinlich ist den Anschluss beim entfernen dieses Kabels abzureißen, deshalb würde ich empfehlen, den Schritt entweder auszulassen oder das Kabel am anderen Ende zu entfernen (dort sieht der Anschluss stabiler aus). Wenn man den Schritt überspringt, muss man natürlich noch vorsichtiger bei der Entfernung des Akkus sein.
-
-
-
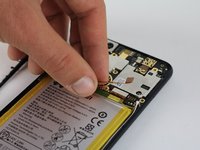
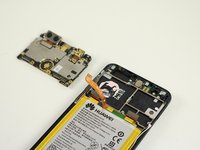
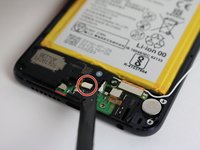
Utilizando un spudger, levanta la pequeña conexión entre el altavoz y el cuerpo del teléfono cerca del botón inferior del dispositivo encerrado en un círculo en rojo.
-
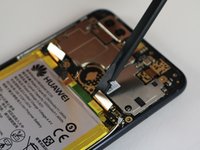
Con cuidado levanta una esquina del altavoz utilizando un spudger.
-
Levanta el altavoz y sácalo del cuerpo del teléfono.
-
-
-
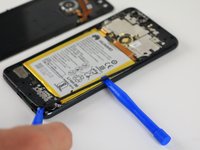
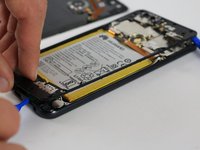
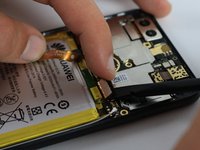
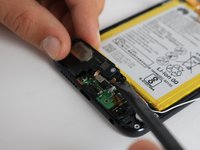
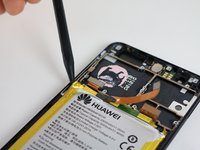
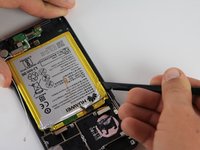
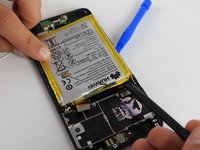
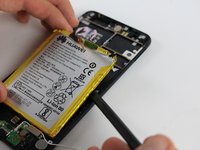
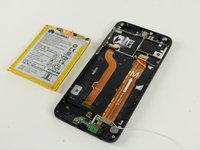
Una vez que todo el adhesivo ha sido removido de la batería, usa el spudger y las herramientas de apertura de plástico para levantar con cuidado la batería del marco.
This is not easy. You will deform the old battery - don’t worry. Use the iOpener and guitar picks, and microwave the iOpener at least a second time half way through. I am massaging the cramps out of my fingers, but I got it.
-


Para volver a ensamblar tu dispositivo, sigue estas instrucciones en orden inverso.
Para volver a ensamblar tu dispositivo, sigue estas instrucciones en orden inverso.
Cancelar: No complete esta guía.
42 personas más completaron esta guía.
Un agradecimiento especial a estos traductores:
100%

¡ Mariana Roca nos está ayudando a reparar el mundo! ¿Quieres contribuir?
Empezar a traducir ›
Equipo

Cal Poly, Team S18-G2, Forte Fall 2017 Miembro de Cal Poly, Team S18-G2, Forte Fall 2017
CPSU-FORTE-F17S18G2
Miembros de 4
24 Guías creadas
24 comentarios
Where are the battery installation and reassembly instructions?
Just go back in reverse order, Einstein
I replaced the battery on my Huawei Honor 8 and after power up it doesn’t see the SIM card. There’s no way to install the sim card tray backwards or put the SIM card in wrong. Any ideas?
Never mind. I figured it out. The metal SIM card cage got distorted and the tray was sliding in behind it, not into it. I gently bent the cage back into shape and all is well.
Re-using the existing adhesive worked OK, but not perfect. There’s a little gap near the volume buttons where the back separates from the inner lining. I’m using a phone case, so I don’t mind - it’s good enough that the back won’t come off while the phone is in the case.
I applied some of the adhesive strips that came with my battery kit (purchased here). Then I put the cover back on, applied some pressure and heated it up one last time in hopes that it helped the adhesive stick better.
Luke G -
Now my phone won’t even charge? Battery is in correctly and is at 60%. When I plug it in the charger connects for less than a second and then the connection disappears. Happens every time I disconnect and reconnect. Any ideas?
Im in the same boat
Done in 75 minutes, for 9€. Thanks!
the backing sticks out all stupid though
I’m sorry but at least in my case it was absolutely impossible to pry the battery away gently. There was such an amount of glue that I almost gave up. The battery bent like !&&* and two spudgers broke. i didn’t use any heat. And I think it would be important to actually show te reassembly because at least I don’t have any idea how much and what sort of glue should be used at any given point. I used B-7000 because that was my best guess.
Tried to change my battery. Made it to the battery without serious injury. Cut the LCD cord. Q-Q
90% of this was just trying to pry the case off and the battery off. The glue is very tough. For the case, at the beginning I would suggest using a heat gun/hair dryer for a single corner first for a few minutes until you can pry it open a bit and wedge something in there. Then heat up the sides for 30 seconds as you run along the sides with plastic to break apart the glue. I also made really good use of the suction cup tool for this part. For the battery, I ended up using a plastic card to wedge underneath and break the glue at the very end because my little wedgers that look like guitar picks that came in the basics kit were too short.
198/5000
To detach the battery, I recommend proceeding with the tool on the perimeter of the battery and do not insert it underneath. I broke the flat cable by inserting the tool under the battery, (over half)
Thanks for the tutorial, but it seems to me that it’s a bit of a hassle for nothing. Steps 9 - 16 were totally unnecessary (you can already detach battery and stick new one in without having to detach motherboard ?) and you could probably skip the unscrewing of step 4 (17 screws) by just unscrewing the one that is holding battery connection down, lifting it up gently with the spudger while swapping batteries.
I used a new battery on my honor 8. Is 68% and now the phone not charging. Who is the problem
Schade dass die abstehende Lasche / Kupferfläche am Displaykabel nicht erwähnt wurde, sie ist bei mir leider beim heraushebeln des Akkus abgerissen - mein Handy ist jetzt Schrott. Danke!
Nicht unbedingt. Man kann ja auch den Bildschirm tauschen. Kostet 40€
There is no sound on incoming calls. Possible causes & can it be fixed?
hi during replacement of battery on my honer 8 mobil i managed to brek one of the to cables the one on the left side on the screen .I am wondering if its possible to order this par or the hole screen .part nr ?
Regards
Rai
When I reverse the order to close the back side, would it hold with the old adhesive? if not, how do I keep it from falling?
yaniv feinberg - Contestar