
Reemplazo de batería de Anki Cozmo

Introducción
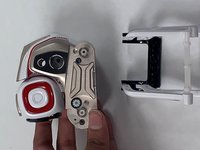
Ir al paso 1Si tu robot Anki Cozmo sigue apagándose o la pantalla no se enciende, sigue esta guía. Esta guía tiene como objetivo ayudar a los usuarios a reemplazar la batería de un robot Anki Cozmo para que pueda volver a la vida. La batería, ubicada dentro de la base de Cozmo, le permite sobrevivir. Sin una batería que funcione, nada más funcionará. Antes de comenzar, asegúrate de apagar su robot Anki Cozmo y desconectarlo de la aplicación Anki Cozmo.
ADVERTENCIA: cuando utilices las manos para retirar cualquier componente, ten cuidado de no cortarte ni rasgarte la uña.
Qué necesitas


-
-
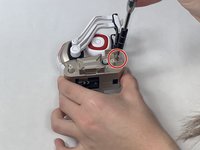
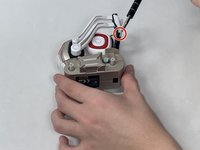
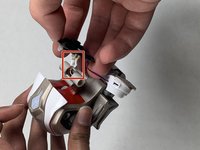
Retira las dos bandas de rodadura de goma negras de las ruedas usando las manos para quitarlas.
-
-
-
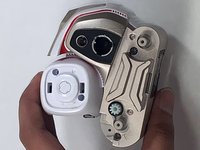
Retira el tapacubos blanco de cada una de las cuatro ruedas usando el spudger de metal para quitarlas.
Note: The hubcaps are the same color of your Cozmo. My Cozmo is black to gray, but the one from the creator shows a white Cozmo.
-
-
-
-
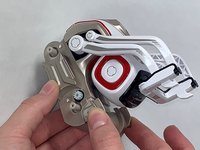
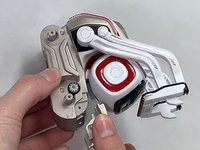
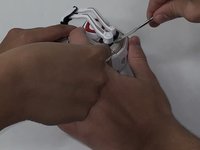
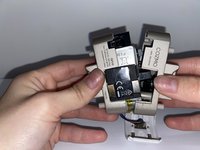
Saca los dos brazos blancos del lado derecho del cuerpo y los dos brazos blancos del lado izquierdo del cuerpo usando dos spudgers de metal.
-
Saca los brazos cavando las puntas de cada spudger entre el brazo y el cuerpo y empujándolos hacia afuera del cuerpo.
Steps 9 and 10 contain errors that will lead to broken parts of the robot.
The upper arms (thin) must be pry off on both sides with metal spudgers. Then remove the white axis that connects them (what is called a spring here).
And then you need to manually rotate the lower arms to the upper position (while slightly pulling them) until the latches are aligned with the corresponding slots in the case and the arms separate from the body. No force required.
If you remove them with metal spudgers, you will leave marks on the case and break one or more of the latches.
YES this is the good method to avoid broken arm :
The upper arms (thin) must be pry off on both sides with metal spudgers. Then remove the white axis that connects them (what is called a spring here).
And then you need to manually rotate the lower arms to the upper position (while slightly pulling them) until the latches are aligned with the corresponding slots in the case and the arms separate from the body. No force required.
Madcat -
-
-
-
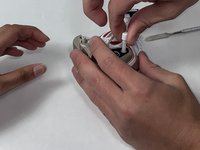
Retira el resorte blanco largo que está sujeto al brazo corto derecho desde el centro del cuerpo usando las manos y los dedos para sacarlo.
Steps 9 and 10 contain errors that will lead to broken parts of the robot.
The upper arms (thin) must be pry off on both sides with metal spudgers. Then remove the white axis that connects them (what is called a spring here).
And then you need to manually rotate the lower arms to the upper position (while slightly pulling them) until the latches are aligned with the corresponding slots in the case and the arms separate from the body. No force required.
If you remove them with metal spudgers, you will leave marks on the case and break one or more of the latches.
-
-
-
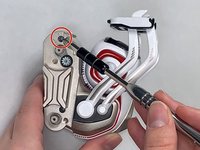
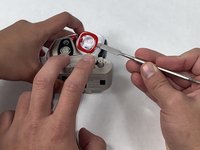
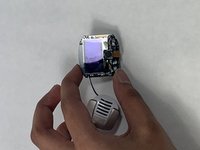
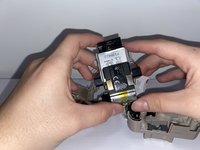
Retira los dos tornillos de 5,5 mm de la moldura roja que estaba detrás de la cabeza blanca con un destornillador JIS n.º 1.
-
-
-
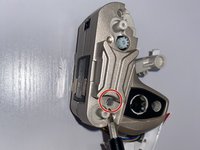
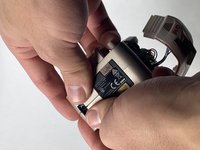
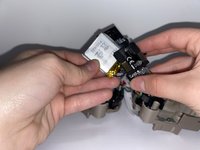
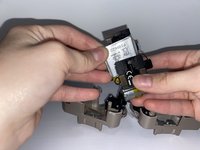
Desenchufa y retira la batería plateada de la parte inferior del panel de carga usando las manos y los dedos para sacarla.
-


Para volver a ensamblar tu dispositivo, sigue estas instrucciones en orden inverso.
Para volver a ensamblar tu dispositivo, sigue estas instrucciones en orden inverso.
Cancelar: No complete esta guía.
15 personas más completaron esta guía.
Un agradecimiento especial a estos traductores:
100%

¡ Francisco Javier Saiz Esteban nos está ayudando a reparar el mundo! ¿Quieres contribuir?
Empezar a traducir ›

Equipo

UMass Dartmouth, Team 4-8, Gulbrandsen Fall 2021 Miembro de UMass Dartmouth, Team 4-8, Gulbrandsen Fall 2021
UMASSD-GULBRANDSEN-F21S4G8
Miembros de 3
7 Guías creadas
14 comentarios
Step 9 should be operated while the arm is at his maximum height.
Yes, excellent tip!
ticom3 -
Step 9 is the hardest from far ! And you'll easily get hurt by your tools. Moreover, reassembling cozmo will certainly deteriorate it. You should operate the big part of the arm (the lower) while the arm is at his maximum height. To do so, disassemble the white part of the fork by prying it down. Then remove the 2 screws of the upper arms, and remove these arms. Eventually, the big arm is easy to remove (or to reassemble).
Is it necessary to disconnect the screen? I am having trouble getting the little white connector pulled off and am wondering if I can just leave it connected
Its possible to carefully allow it to hang also.
This guide doesn't even mention soldering. Is it possible to replace the battery without soldering?
no its not posseboul
sorry for the bad english
I’m pretty sure I messed mine up. It turns on and everything is good after the battery replacement. But, now when I put it on the charger, the charger and the robot continuously flash and I don’t think it is charging. I may have messed something up on the soldering. Anyone have these symptoms after replacing the battery?
By the way, these instructions for disassembling and reassembling with the notes are spot on.
If battery is soldered on correctly should the Cozmo be able to power on before being reassembled?
I cut the cables of the old battery and attached a 620mah Battery Type 503040, 3,7Volt, Bye soldering. The 503040 is almost to big to fit in. You have to compress/bend the contacts one the Battery to fit but worked well.