Introducción
Cambie todo el conjunto de pantalla, incluido el inversor, las antenas del aeropuerto, las bisagras y la carcasa.
Qué necesitas
-
-
Utiliza una moneda o un spudger para girar el tornillo de bloqueo de la batería 90 grados en el sentido de las agujas del reloj.
 Pregunta a FixBot
-
-
-
Desatornilla los tres tornillos Phillips espaciados uniformemente a lo largo de la pared posterior del compartimento de la batería.
-
-
-
Sujeta el extremo derecho de la tapa de la memoria en forma de L y, a continuación, tira de ella hacia ti para que salga por la abertura del compartimento de las pilas.
-
Levanta la tapa de la memoria y sácala del ordenador.
-
-
-
Retira los 3 tornillos siguientes:
-
Un Phillips#00 de 11 mm en el centro de la caja inferior. (Cabeza: 5 mm de diámetro x 0,75 mm de grosor)
-
Dos Phillips #00 de 14,5 mm (cabeza: 5 mm de diámetro x 0,75 mm de grosor)
-
-
-
Retira los siguientes 3 tornillos de la pared posterior del compartimento de la batería:
-
Un Phillips #0 de 3 mm. (Cabeza: 2,75 mm. dia.)
-
Dos Phillips #0 de 4 mm a cada lado. (Cabeza: 2,75 mm dia.)
-
-
-
Retira los dos tornillos Phillips de cada lado de la pared derecha del compartimento de la batería (no los más cercanos al conector de la batería).
-
Dos Phillips #000 de 6,25 mm. (Cabeza: 4 mm. diá. x 0,5 mm de grosor)
-
-
-
Retira los cuatro tornillos Phillips indicados de la pared frontal del compartimento de la batería. Cuando trabajes desde la izquierda, retira los tornillos 2º, 4º, 7º y 9º.
-
Cuatro Phillips #000 de 3,25 mm. (Cabeza: 4 mm. dia. x 4 mm grosor)
-
-
-
Retira los siguientes 4 tornillos de la parte posterior del ordenador:
-
Dos Phillips #00 de 11 mm, con mango (2,2 mm de diámetro x 2 mm de longitud) (Cabeza: 3,2 mm de diámetro x 0,5 mm de grosor)
-
Dos Phillips #00 de 7,25 mm, con mango (2 mm de diámetro x 3,75 mm de longitud) (cabeza: 3,2 mm de diámetro x 0,5 mm de grosor)
-
-
-
Retira los dos tornillos Phillips del lado de la unidad óptica (derecha) del ordenador:
-
Dos Phillips #00 de 5,2 mm, con vástago (2,3 mm de diámetro x 3,25 mm de longitud) (Cabeza: 3,2 mm de diámetro x 0,5 mm de grosor)
-
-
Herramienta utilizada en este paso:Plastic Cards$2.99
-
Utiliza una herramienta de apertura de plástico, un crédito de plástico caducado o una tarjeta de grosor similar para hacer palanca en la carcasa superior, comenzando en la esquina superior izquierda y trabajando alrededor de la parte frontal del ordenador.
-
-
-
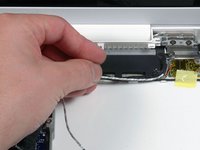
Mientras sujetas la carcasa superior, tira hacia arriba de la lengüeta negra del extremo del conector del cable plano plateado para separarlo de la toma del conector en la placa lógica.
-
-
-
-
Sujeta la lengüeta de plástico blanca unida al disco duro y tire de ella hacia la izquierda, extrayendo el disco duro del ordenador.
-
-
-
Retira los dos tornillos Phillips del lateral de la unidad óptica.
-
Dos Phillips #000 de 3,25 mm (cabeza: 4 mm. de diámetro x 0,3 mm de grosor)
-
-
-
Desconecta el conector naranja del cable plano de la unidad óptica de la placa lógica haciendo palanca con el dedo o con un spudger.
-
-
-
Desconecta el enchufe del cable de datos de la pantalla recién descubierto de la placa lógica tirando de él hacia arriba con su lengüeta negra.
-
-
-
Desconecta el enchufe del cable del disco duro recién descubierto de la placa lógica tirando de él hacia arriba con su lengüeta negra.
-
-
-
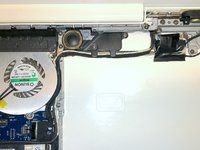
Despega la cinta de aluminio situada entre el ventilador y la unidad óptica. Levanta la cinta de aluminio del lado del ventilador, dejándola pegada a la unidad óptica.
-
Durante el montaje, asegúrate de pasar los cables por debajo de la cinta antes de volver a colocarla.
-
-
-
Tira hacia arriba del cable de datos de la pantalla desde el borde de la unidad óptica para revelar un tornillo Phillips plateado.
-
-
-
Retira el tornillo Phillips #00 de 2 mm que sujeta la esquina posterior de la unidad óptica.
-
Es posible que el cable Bluetooth con cubierta plateada esté tapando el tornillo. Si es así, empújalo con cuidado hacia un lado. Es posible que tengas que quitar el tornillo que sujeta las orejetas de blindaje de tierra para los dos cables cercanos antes de que pueda mover el cable Bluetooth a un lado lo suficiente.
-
Este tornillo es de 7 mm en los modelos anteriores, y puede ser de 4,2 mm en los modelos Santa Rosa/Penryn y 2009.
-
-
-
Levanta la placa de la antena Bluetooth del borde frontal de la unidad óptica.
-
-
-
Desenchufa el cable del disco duro de debajo de los clips situados en el lado cercano de la unidad óptica.
-
-
-
Levanta el lado de la unidad óptica más cercano a usted y, a continuación, desliza la unidad hacia usted, hacia arriba y fuera del ordenador.
-
En primer lugar, desliza su lado más cercano a la parte posterior del Macbook por debajo del borde del marco posterior a la izquierda de la bisagra, mientras desliza también la pestaña de montaje de la unidad óptica en su esquina superior izquierda por debajo de los cables en esta ubicación.
-
Baja la unidad parcialmente hasta el alojamiento inferior. Manten el cable del disco duro alejado de la bahía de la unidad óptica.
-
Antes de colocar la unidad por completo en su sitio, utiliza un destornillador para empujar hacia delante (hacia la parte delantera de la unidad) el orificio del tornillo de la lengüeta de montaje de la unidad.
-
Empuja hacia adelante el deslizador, que se extiende a lo largo del lado más alejado de la unidad, para insertar el extremo de este deslizador en un pequeño canal del marco de la carcasa inferior. Esto ayuda a mantener la unidad en su lugar.
-
-
-
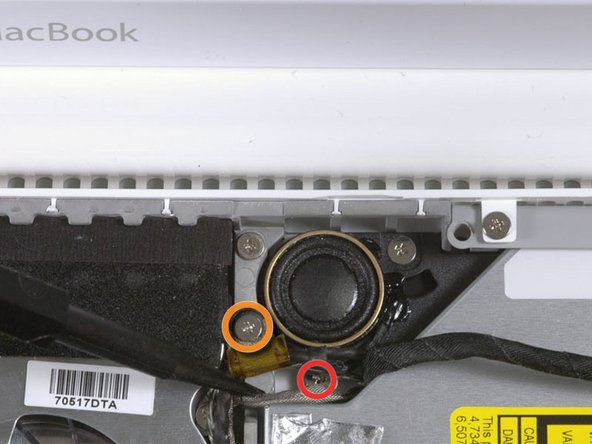
Para los modelos originales de Macbook Core Duo y Core 2 Duo, retire estos 3 tornillos:
-
Dos Phillips de 3 mm cerca del altavoz derecho.
-
Un conector Phillips de 6 mm enroscado a través de un orificio en un dedo de plástico encima del subwoofer.
-
Para los modelos Santa Rosa/Penryn y 2009, que no tienen canal C:
-
Retire solo el tornillo Phillips de 3 mm del altavoz derecho y omita el paso 26.
-
-
-
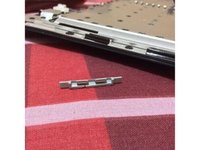
Con un spudger, levante con cuidado la ranura de plástico blanca y deslice el canal C de metal hacia la derecha y lejos de la pantalla.
-
-
-
Usa un spudger para desconectar con cuidado el cable del micrófono de la placa lógica. Trabaja de lado a lado y mueve lentamente el conector hacia atrás y hacia afuera de su zócalo.
-
-
-
Levante el cable del altavoz negro derecho con una mano y retire el cable del micrófono del clip metálico plateado que está justo encima de la ranura RAM derecha.
-
-
-
Si no quitó el tornillo de retención de la terminal de tierra en el paso 20, retírelo ahora. Es un tornillo Phillips de 7 mm (puede ser de 4 mm o 3 mm en los modelos Santa Rosa/Penryn y de 2009) que fija las terminales de tierra del cable del altavoz derecho y del micrófono al marco metálico.
-
-
-
Desconecte el cable del micrófono y el cable de datos de la pantalla negra de las pestañas ubicadas en la parte inferior del subwoofer.
-
-
-
Retire el tornillo Phillips de 3 mm que fija la toma de tierra del cable de datos de la pantalla, ubicado justo encima de la placa Bluetooth. Este tornillo también podría fijar una toma de tierra del cable del altavoz.
-
-
-
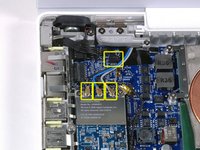
Desconecte los cables de antena de la tarjeta Airport:
-
Si tienes un modelo original de MacBook Core Duo o Core 2 Duo, mira la primera imagen, que muestra que hay tres cables de antena.
-
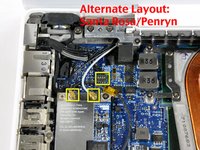
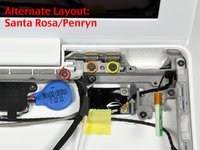
Si tienes una MacBook Core 2 Duo Santa Rosa/Penryn o modelo de 2009, solo hay dos cables de antena y el conector del cable inversor negro está en otra ubicación. Es posible que haya una pieza cuadrada de espuma sobre el conector de la placa del inversor.
-
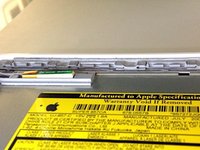
Desconecte el cable del inversor de su zócalo insertando una herramienta de punta fina entre el extremo derecho o izquierdo del enchufe y el zócalo, y haciendo palanca suavemente verticalmente.
-
NO levante el zócalo; debe tirar solo del enchufe, verticalmente, para extraerlo del zócalo. No tire en la dirección de los cables, ya que podría arrancar el zócalo de la placa lógica.
-
-
-
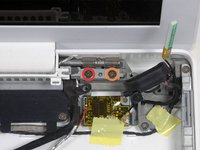
Para los modelos originales de Macbook Core Duo y Core 2 Duo, vea la primera imagen y retire los siguientes 2 tornillos del soporte de la bisagra derecha:
-
Un Phillips de 6 mm en el lado izquierdo del soporte de la bisagra.
-
Un Phillips de 10 mm en el lado derecho del soporte de la bisagra.
-
Para los modelos Santa Rosa/Penryn y 2009, vea la segunda imagen y retire los siguientes 3 tornillos del soporte de la bisagra derecha:
-
Un Phillips de 3 mm de diámetro más pequeño en el extremo izquierdo.
-
Un destornillador Phillips de cabeza 5,2 mm más grande y 4,2 mm en el medio.
-
Un destornillador Phillips con cabeza de 4,2 mm y diámetro 10 mm más grande desde el extremo derecho.
-
Antes de retirar el soporte de la bisagra derecha, compruebe con cuidado cómo encajan sus piezas, incluida la pequeña pieza de plástico blanca. Conocer cómo encajan las piezas del soporte facilitará el reensamblaje. Levante el soporte de la bisagra derecha con la pequeña pieza de plástico blanca para extraerlo de la computadora.
-
-
-
Sujete la pantalla con una mano mientras quita los siguientes 3 tornillos del soporte de la bisagra izquierda:
-
Un destornillador Phillips de 7,2 mm de diámetro más pequeño desde el lado derecho.
-
Un Phillips de 5,2 mm más de diámetro desde el medio.
-
Un destornillador Phillips de 10 mm de diámetro más grande desde el lado izquierdo.
-
Levante el soporte de la bisagra izquierda con la pieza de plástico blanca para sacarlo de la computadora.
-
Compruebe que los cables que salen del extremo derecho de la bisagra izquierda no queden atrapados debajo de otros cables.
-
-
-
Sujete el conjunto de pantalla por ambos lados y levántelo para sacarlo de la computadora, teniendo cuidado de que los cables conectados a la pantalla no se enganchen en las piezas de la carcasa inferior.
-


Para volver a ensamblar el dispositivo, siga estas instrucciones en orden inverso.
Cancelar: No complete esta guía.
199 personas más completaron esta guía.
Un agradecimiento especial a estos traductores:
100%

¡ Angel nos está ayudando a reparar el mundo! ¿Quieres contribuir?
Empezar a traducir ›

2Guía Comentarios
As it turns out, I have a Sanata Rosa/Penryn model and I didn't even know.
hi
can you help me
do you know model number of lcd panel in macbook core 2 duo 1.83(MA699LL/A probably)
i want to make external display,for this i need to buy CONTROLLER BOARD
i just dont want open plastic that surround lcdpanel
thanks