Saltar al contenido principal
Lenovo Tab S8 Battery Replacement

Lenovo Tab S8 Battery Replacement

Temi Adegoke

Temi Adegoke y 8 otros contribuidores

Última actualización: March 4, 2024

30 minuto
Fácil

Introducción

Ir al paso 1

Use this guide to replace your worn out or dead Lenovo Tab S8 Battery.

If your phone's battery no longer holds charge for as long as you would like or does not function properly, your battery is likely faulty and may need replacement. There are no special skills involved in the replacement of the battery.

Before using this guide, make sure to review the troubleshooting page to ensure that the battery doesn't have any other issues.

Make sure to power off your tablet completely and disconnect from any external power source before beginning the process.

Qué necesitas

Herramientas

Ver más…

  1. Lenovo Tab S8 Battery Replacement, Battery: paso 1, imagen 1 de 2 Lenovo Tab S8 Battery Replacement, Battery: paso 1, imagen 2 de 2
    • Make sure the device is powered off.

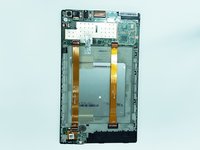
    • Gently insert a spudger into one of the bottom corners between the screen and body case.

    • Slide the spudger along the inside of the crack in order to pry the case open.

    • Be careful of the small volume and power buttons when prying the case with the spudger. They are connected with small pieces of plastic that break easily.

  2. Lenovo Tab S8 Battery Replacement: paso 2, imagen 1 de 3 Lenovo Tab S8 Battery Replacement: paso 2, imagen 2 de 3 Lenovo Tab S8 Battery Replacement: paso 2, imagen 3 de 3
    • After removing the cover, remove the M1.6 x 2 mm screw from the battery cable with the JIS J000 screwdriver.

    • Using screwdriver bits that do not fit in the screw head might strip the screw and render it unusable.

    • Remove the tape by gently scraping the edges up with the spudger.

  3. Lenovo Tab S8 Battery Replacement: paso 3, imagen 1 de 3 Lenovo Tab S8 Battery Replacement: paso 3, imagen 2 de 3 Lenovo Tab S8 Battery Replacement: paso 3, imagen 3 de 3
    Herramienta utilizada en este paso:
    Plastic Cards
    $2.99
    • Before removing the battery, be sure to disconnect the ribbon cables underneath it. The cables might stick to the battery during removal and cause damage.

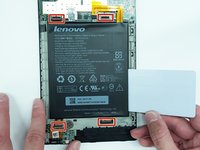
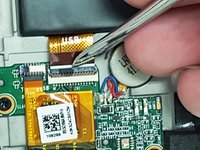
    • Gently lift the flaps on the four ZIF connectors to disconnect the cables.

    • Use the plastic card to gently pry the battery from the device.

    • There may be glue holding the battery to the device. Use the spudger to detach any glue while the battery is partially raised by the card.

Conclusión

To reassemble your device, follow these instructions in reverse order.

15 personas más completaron esta guía.

Temi Adegoke

Miembro Desde 08/26/15

417 Reputación

1 Guía escrita

Equipo

USF Tampa, Team 3-6, Eyestone Fall 2015 Miembro de USF Tampa, Team 3-6, Eyestone Fall 2015

USFT-EYESTONE-F15S3G6

3 Miembros

11 Guías creadas

Un comentario

Agregar Comentario

Ver Estadísticas:

Ultimas 24 horas: 4

Ultimos 7 días: 22

Ultimos 30 días: 56

Todo El Tiempo: 14,314