
Desmontaje de Xbox One Power Brick (Day One Edition)
Introducción
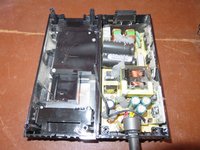
Ir al paso 1Desmonté mi Power Brick para poder para limpiarla. La configuración de energía para mi Xbox se había dejado en "Instant On" desde el día del lanzamiento hasta principios de este año. Con tu sistema en Instant On, el ventilador funciona continuamente usando .16Amps / 19Watts. Al poner tu consola en su modo de ahorro de energía solo consume 0.03Amps / 4Watts. La cantidad de suciedad dentro de tu consola dependerá de varios factores, como el modo de energía en el que mantienes tu sistema configurado. Si el ventilador no está funcionando, obviamente no está atrayendo más polvo/suciedad de lo que lo haría si estuviera encendido. El último paso tiene imágenes que muestran cuán sucios pueden estar sus dispositivos electrónicos con el tiempo y la importancia de limpiarlos para mantenerlos funcionales.
Qué necesitas


-
-
A diferencia del X360 Power Brick, estas botas de goma no requieren herramientas para levantarlas. Simplemente coloca las uñas debajo y tira suavemente hacia arriba.
-
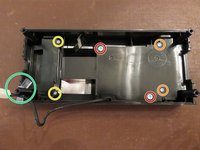
Quita los 4 tornillos con tu destornillador de bits de seguridad T10.
-
-
-
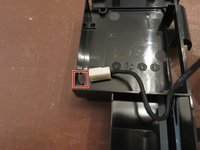
Usando el extremo de la punta de su spudger de plástico, o sus dedos, tira suavemente de la lengüeta que sostiene el cable de alimentación del ventilador en su lugar.
-
Tira suavemente del cable hacia arriba y lejos de la placa de circuito.
-
Si miras dentro del cuadro amarillo, en la esquina superior izquierda, notarás un color gris en la parte superior de un condensador. Es una sustancia pegajosa. Cuando abrí la fuente de alimentación por primera vez, el cable de alimentación del ventilador se presionó contra ella y se atascó. Tira suavemente del cable hacia arriba
The grey sticky stuff is called thermal grease. It is used to protect components from sources of heat.
-
-
-
Usa un destornillador Phillips para quitar los dos tornillos más grandes.
-
Los dos tornillos más pequeños (naranja) fueron un poco complicados. Están atornillados muy fuerte. Comencé con una cabeza Phillips # 0 y se dañó un poco el tornillo. Pero no se destruyó. Recomiendo usar una cabeza Phillips # 1 en estos. También utilicé una pequeña empuñadura de goma para agarrar mejor mi destornillador. Lo hizo mucho más fácil.
-
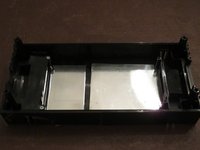
Una vez que se quitan los tornillos, levanta el marco de plástico del lado izquierdo y retíralo de la parte superior del bloque de alimentación y voltéalo.
-
A diferencia de la X360 Power Brick, el difusor de luz no necesita ser retirado de la fuente de alimentación. Si deseas quitarlo de todos modos, simplemente agárralo con los dedos y sácalo.
-
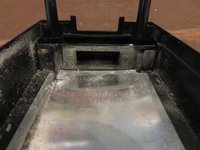
Estos tornillos no sirven para nada. No había nada debajo. A menos que tengas una versión diferente a la mía, no es necesario quitar estos tornillos.
-
-
-
-
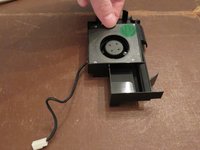
Levanta el ventilador desde el lado más alejado del cable.
-
Tira del cable a través del agujero en el marco y coloca el ventilador a un lado.
-
-
-
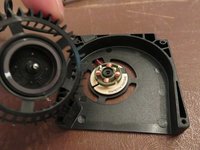
Quita los 4 tornillos usando un destornillador Philips #0 y quita la parte superior de carcasa del ventilador
-
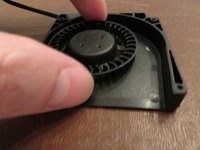
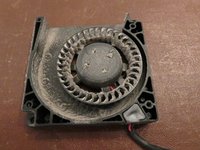
Agarra suavemente el ventilador y levántalo.
-
-
-
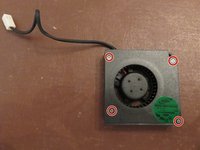
Aquí está la pegatina de información del ventilador en caso de que alguien la necesite como referencia.
-
-
-
Poco menos de 3 años desde el día en que se compró (22 de noviembre de 2013) y ahora (12 de agosto de 2016) esta es la cantidad de suciedad que acumuló mi Power Brick. Recientemente me estoy metiendo en reparaciones electrónicas, por eso esto no sucedió antes.
-
Después de 1 año, la garantía de tu Xbox / PS quedará anulada a menos que compres una garantía extendida. ¡Limpia tus consolas antes de que la suciedad y el polvo las destruyan!
Very nice description and guide! This was not even the issue I was having but still read this guide to the end just because of how well written it was. Good job sir!
My eldest son gave me his original Xbox one as a surprise yet actually very welcome 51st birthday present.. I found this guide refreshingly like ye olden days awesome and very helpful with non of the long-winded dagnabbit crazy time wasting data collecting bs.. oh and I will confirm I am not a robot or a grumpy old fart but tend to fail identifying photos as I think my glasses were made by the relatives of the original British Leyland Quality Control Team and Management.. cheers from Stuad70.. Buckinghamshire, Engerland
-


Cancelar: No complete esta guía.
91 personas más completaron esta guía.
Un agradecimiento especial a estos traductores:
100%

¡ Angel nos está ayudando a reparar el mundo! ¿Quieres contribuir?
Empezar a traducir ›
45 comentarios
Would this help with the orange light I am getting from the Xbox one power Brick?
Me too having the same question please help!!
kingasd -
Hi! I’ve had many people come to me and ask the same question, if your Xbox One makes a sound when you try to activate it, but there is no light on the Xbox and the power brick is holding a solid orange light, it is most likely the end of your power bricks life. Unfortunately, Microsoft and any other gaming store/supplier stock these anymore, so your last resort would be eBay. 2nd option is if your Xbox doesn’t turn on or make a sound, and your power brick turns white, it’s the console. Long story short, in your situation I would say you might need to invest in a new power brick.
It is your power brick have too get a new one or change the compasitors there's 3 of them I just had too do it
What specifically is the problem angelorestrepo and kingasd? The orange light is an indicator that your system is in energy saving mode. What happens when you power up the unit?
http://support.xbox.com/en-US/xbox-one/c...
Mind you at this point I have no idea what's really going on with either of your systems but it's possible this may be a really simple fix. Check this link and try these simple solutions if you haven't already.
So i have a power brick that isnt getting any power at all... what do i go about replacing in the brick to restore my power supply??
It's hard to say without poking around with a multimeter. Possibly one or several capacitors died. The benefit is you know it's localized to the psu so take it apart and take a look around. If you see anything noticeably damaged then you can pinpoint it
Those stupid first screws are borderline inpossible to get out
My “rubber boots” did not come out easily AT ALL, in fact I’m pretty sure they made a deal with the devil to seal those little suckers in there forever…. I had to nearly destroy the pads to get them out….
The rubber pads in mine were so tight, I had to tear them off and push a screwdriver into the middle and then they came out. Since the PS sits on the floor it’s no big deal. One could always attach felt pads if needed. The Torx 10 needs to be a security version that has a hole in the middle of it to fit far enough into the head. Remember, these are not consumer serviceable items and they try to keep the uninformed out. The fan clean out fixed mine.
This guide was great for getting mine apart as it blew the other day while i was on the xbox
Thanks Maty87! Always happy to hear my guides are helping others!!!
i also have noticed the pcb is different in mine would you like the photos updated I can get new photos
No, don’t change the photos. It’s labeled Day One Edition for a reason. If you change the pics it might confuse people. You should make a guide adding the new additions.
My Xbox One runs just fine without any USB devices connected to it. Once I connect an external HDD or Kinect it the power brick just turns Orange :( remove all USB devices and Voila its alive again.. could it be the Power brick is just time for replacement or a quick clean could resolve the issue?
It sounds like your causing a short within the system when you plug in a USB powered device which would explain why it shuts down after plugin. If this is in fact the case I don’t believe cleaning the brick would be beneficial. Start with the simple stuff first. Blow out the USB ports on the console and devices you wish to plug in. If this doesn’t resolve it then I’d recommend opening the system, paying particular close attention to the USB ports. If a wire or solder contact has gotten loose then solder will need to be applied. It’s quite possible there’s something wrong with the systems USB port itself and simply needs to be replaced.
My Xbox one will be fine for a while, then shuts off out of nowhere. The power brick will have no lights at all once it shuts off and will not restart until I unplug it and plug it back in.
Its time to buy a replacement brick my dude. I'm in the same boat. Bought a xb1 for $40 doesn't turn one at all. Took apart the brick. A capacitor is swollen. Not getting enough power to turn it on.
If you unplug and replug does it turn on immediately? This almost sounds like a overheating issue.
@ That guy Heist In your case your brick sounds like it just needs a replaced capacitor. This is an easy task even if you don’t have much solder experience. If left in place it may eventually burst and leak fluid on the board which can corrode the PCB. Check for markings on the side of the swollen cap so you know what to replace it with. If your cap has already began to leak take a Q-tip and a little vinegar to the leakage. This will neutralize the acidity. Often an entire device is replaced when only a .25 cent part is all that’s required to return to normal function. Hopefully this helps.
I just wanted to say thank you for your time and effort, this is the most concise and well formatted instructions on XB1 PSU I've found, even if it did point out my ID-10-T error from only checking one foot pad, it helped immensely. My brother’s XB1 PSU’s fan sounds like somebody trying to herd cats. I looked it over for the “proper” opening method, using my experience in comparable fastener locations, but the one skid foot that I removed had the cover plug under it, so i assumed they were elsewhere. I looked for the retention methods a long while without finding them, and didn't want to aggressively separate it, and break it. I admitted defeat, and was happy to find clearly labeled pictures, but extremely grateful that you listed the bits needed, saving the time of test fitting a handful of loose bits.
You also mentioned that it's a security bit to inform people there's a difference, instead of suggesting to knock out the screw’s center pin with a drill/hammer like alot of instructions out there. For the desperate that can't readily access/buy a security bit, take a same sized/type standard bit and drill a 1/16 inch indentation about 1/8 inch deep into the center of the fitting end, it's once only, and if you make an error the only cost is the cheap bit, not the item you wish repaired, and any similar fasteners are taken care of in the future. I've had many people bring me items, from drones to cars, for costly damage repair from their failed attempts to remove that security pin.
1) The red circle screws tend to strip when using a regular philips bit. Instead, try a torq #6 bit (sometimes mistakenly called a torque bit). It, as well as the security Torx 10 bit needed in step 1, are included in many security bit sets. Mine was part of the 33 part set from Harbor Freight.
2) If the supply is really dirty, you may want to remove the yellow circle screws in step 3 to be able to more thoroughly clean the area beneath. I have done this mainly when there was a contaminant (think smoke residue, spilled beverage, or insect infestations) and I wanted to wash all the plastic parts well.
Great guide. I did however need pliers to get the rubber pads out, they were really in there.
My brick died, MS doesn’t seem to offer repair/replacement anymore, and even the top rated 3rd party bricks have reviews stating they’re too loud or that they melt (!). Too risky.
But opening this thing up saw just 4 bad capacitors. Fix was just $2.70 in parts.
Replaced capacitors as some were bulging but it did not seem to take care of my issue. Power brick lights up orange when connected to wall, as soon as I connect to the console the light triggers off.
If I connect the console, and then power brick and connect to the wall last then the light flashes orange on the PSU.
Anyone have any tips?
If plugging in the system trips the power supply, there's no white/orange light, this could be a sign of damage on the motherboard itself and not the psu. I had a similar issue, with a known working psu, and connecting to my system would trip my supply too. Mine had a short to ground, believed to be on the main chip itself, which is why it kills the supply. Ultimately I had to buy a replacement paired motherboard/bluray pcb on ebay.
My first suggestion would be to test the mosfets on your power rail.
We have 2 Xbox one consoles both power bricks work with one of them but the other the main console switches off straight away
Power problems with the xbox one often stem from mosfet issues. It could be something else however.
This link may help your situation
Is there any way to get it open without the torx screwdriver
To unscrew a Torx screw without a screwdriver, lightly melt the end of a plastic toothbrush and press it into the top of the screw.
Angel -
Many thanks for the guide. I’d been running the “Instant On” for 5 or 6 months and I think that was enough to put my dust collection over the top. When I opened up the brick it looked about like the pics you posted. Cleaned it out really well and so far, so good. For some reason I had a little trouble sealing the case back up evenly. One of the corners on the cord side just didn’t want to sit flush for me. Took me awhile but I got it eventually. Thanks again for the guide.
Thanks for the awesome comment! I'm glad my guide helped you get your PSU clean and back in the game
Hello, I need to see a picture of the bottom of this PCB. I am repairing one of these units and would like a bottom PCB reference image.
FYI if your power brick has an orange light but when you plug an Xbox console in with it it goes off then the issue may be capacitors C201, C202, and C203. They will be the cluster of 3 caps(green in my case) with values 2200uF 16v.
If the tops of the caps look bulged up it is very likely they have gone bad.
The only reason I am looking for a bottom PCB reference is because I may have touched solder between two pads that may or may not belong together while I was desoldering the aforementioned capacitors. I'd just like to be sure before I test it, lest I end up having to replace more components as a result of my own mistake.
Thanks!
Nathan
Edit: I'm remembering now that there is a metal shield on the bottom soldered into place that I had to remove first. Likely this is why I have been unable to find a picture of the bottom anywhere
I followed your excellent guide and on reassembly, the fan doesn’t cut in now.
I cleaned it using compressed air.
I disassembled it again and while on the bench measured the power at the pins for the fan at 0.3 V.
Fan requires 12V DC. Tested fan with generic 12V power adapter. Tested good.
Reassembled and still no fan sound and brick is getting quite hot. While on bench, LED was lighting orange.
I cannot find any reason the fan will not run
Hey Robby,
I’m sorry to hear the fan isn’t working when plugged into the Xbox one psu! A voltage reading of .3v would indicate a shorted or dead component somewhere before the fan input. If I were in your shoes I’d follow the traces from the fan plug and test every component possible in diode mode along the way. Unfortunately this may require full disassembly by removing the metal shielding on the bottom of the supply which I failed to add to this guide. If you have a microscope or hand magnifier check to make sure no connections are bridged. If you preformed any solder work double check everything you did. I’m sorry I don’t have a definitive answer but I really hope you get it figured out!
I made a video for full disassembly and reassembly that can be used alongside this guide. I used iFixit tools too. Happy fixing all!
Ok. So we've gone thru the steps and now the pet Brick lights up orange for a second then goes out and still no power. HELP???
My sons Xbox one won’t power on it turns on and right back off and he has one of his new games in it what could be wrong with it and is there a way to get the game out or fix it and the lights on the power box is red and when u unplug it it stays red even with no power I had went and replaced the hole power supply box and it wasn’t it but I really need his gta game out just got it and can’t afford to buy him another one right now I already had to get him a new x box one system
I am on my third power brick. None of them have stopped working but the cooling fan on all of them would start to buzz and whine while running. Is it possible to lubricate the fan?
Don't bother trying to find a replacement PSU from Microsoft or even an off-brand PSU.
Instead, connect the XBox One cable to a PC PSU and you're good to go and will never have a failing PSU again.
How that is done exactly, you can find detailed instructions on the internet, but it's pretty straight forward, since the cable colours are the same. On the PSU you need to bridge the green to a black cable at this lengthy connector to have the 12 volts right away when you plug it into the wall socket. (This is the power-on button on your PC.)
Since the PSU has its own main switch, I don't need stand-by power. Just remember to turn the PSU off after shutting down the XBox because the console will still get 12 volts all the time. (That possibly consumes energy unnecessarily.)
If the always running fan of the PC PSU bothers you, buy a better PSU by well-known brands that are quiet and you won't hear it anymore. AND they're still less expensive than MS's PSU's.
Hello there - having a similar issue with the orange light -
-when not connected to the xbox but connected to the power outlet, it's a solid amber/orange
-when I connect it to the xbox and hit power, it is first orange, then flashes white and shuts off completely
-I replaced the 4 capacitors, two with 2200 uF and two with 1000 uf, but none of them seemed bulged to begin with.
However, the issue persists,
Not sure where to look next.
What exactly does the internal cabling look like on under the shielding on the output side?
how to fix orange light of hell ..or was it yellow but when I changed white and start xbox immediately power of etx
Falls das nicht gelingt mit den Finger-Nägel: Einfach Holzschraube oben vorsichtig eindrehen, Gummifuss löst sich ab bzw. kann an der Schraube herausgezogen werden. Das “Loch” der Schraube sieht man nachher so gut wie nicht mehr.
Flagsoft - Contestar
TIP : If you have problems remove the rubbers: Just use a wood screw and gently screw it in the center until the rubber lifts up !
Flagsoft - Contestar
My t10 isn't working nothing is its just scrapping away at the screws
Angel Freeny - Contestar
Is it a T10 or T10 security bit? Security bit has a hole in the middle
Navy Vet 2015 -
Thank you so much for posting the tool needed for the screws on the bottom !!
kklovesmusic - Contestar
I'm here to serve :) glad you got it
Navy Vet 2015 -
I don’t have any screws, it’s just a piece of plastic that I can turn with tweezers
canadian_birdman - Contestar
Thanks for the suggestion about using a wood screw —worked like a charm. Just wish I had seen this before I tore one of the feet up trying to get it out.
errolsayre - Contestar
Well, All my boots tore apart with a gentle pull. So whgat do you do when you have a rubber circle with a square bit of plastic stuck there now?
Adam Slater - Contestar
Hi I’ve been researching this a bit online and many people are saying it’s extremely dangerous, however I need to at least try to fix my power supply as I have no other way to watch tv or play games. If I have a limited knowledge of electrical components would you still suggest undertaking this repair?
Jake - Contestar
The wood screw suggestion needs adding to the instructions - awesome suggestion!
Josh Beckett - Contestar
Amendment: The wood screw suggestion does not work for all models (I have just broken a couple of rubber boots removing them) - this was because they had a hard plastic center that prevented me screwing in a wood screw to aid removal and forcing me to try and pull them out by hand.
Josh Beckett - Contestar
When you peel off the rubber underneath theres like plastic holders above the screws. You have to take the holders off with a pair of needle-nose pliers, then you have the Torx TR10 screws underneath. And yeah it was hard to get the rubber off, I used the spudgers fine tip to remove the rubber.
Americo DeLuca - Contestar
CONSEIL: Si vous avez des problèmes, retirez les caoutchoucs: utilisez simplement une vis à bois et vissez-la doucement au centre jusqu'à ce que le caoutchouc se soulève!
moi_alexis01 - Contestar
I found that poking my T10 screwdriver through the center of the rubber feet and gently prying gets them off pretty easy. I'm guessing it's like tamper proofing for the warranty.
Mario Vega - Contestar
I got a safety pin and it worked
Christian - Contestar
I just broke my pads so commenting here for anyone that is looking for actual instructions on the easiest and safest ways to remove these pads.
1. First off, I just want to note that these pads are not all rubber. They are a rubber cap that is set into a plastic cylinder. If you try to pry them off by going under the rubber cap you will most likely just separate the rubber cap from the cylinder and there is no way those pieces will fit back together nicely. DO NOT PRY THEM OFF if you want to reuse them.
2. The best method of removal was suggested by Mario Vega. The pads are hollow in the center so you can take anything that is about 2mm in diameter and plunge it through the center of the rubber cap (I used a 1.5 flat head screwdriver)
3. From the center you can pry the pads up and the whole thing should come out, exposing the security screws underneath.
Noah - Contestar