
Desmontaje de DeLonghi Icon ECO
Introducción
Ir al paso 1Estos son los videos que me ayudaron durante los cuatro desmontajes que realicé por diversos motivos y que te recomiendo ver junto con las notas que escribí en esta guía en base a mi experiencia.
-
-
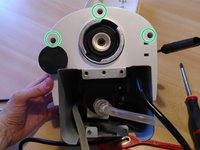
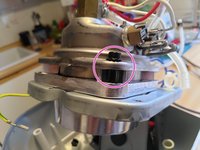
Antes de proceder al desmontaje, retira el filtro de café (círculo verde) y el mando de vapor (círculo azul): tira hacia arriba con (mucha) fuerza.
-
Desenchufa la máquina y colócala sobre una superficie con varios trapos: el agua contenida en las tuberías se perderá durante el desmontaje.
-
-
-
[vista trasera] Una vez retirado el depósito de agua transparente se pueden desenroscar los dos tornillos de la base (círculo verde) y los dos tornillos de la parte superior (círculo rojo) lo que permitirá retirar la tapa metálica superior posteriormente.
-
[vista inferior] Desatornilla los cuatro tornillos hexagonales (círculo azul) y los dos tornillos Phillips (círculo verde) de la base.
-
Una vez retirada la base negra, se pueden retirar los tubos de plástico que llevan el agua desde nuestro depósito hasta la caldera. Tira de los tubos con firmeza (círculos azules)
-
-
-
-
Una vez retirada la base puedes comenzar a quitar la tapa. Desde la parte inferior, desatornilla los tres tornillos (círculo verde).
-
Retira el filtro de agua metálico (círculo naranja)
-
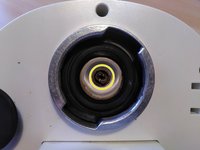
Retira la válvula que deja fluir el agua desde el tanque interno con un destornillador plano (círculo amarillo); esta operación también se puede realizar sin desmontar la base en caso de que sea necesario reemplazar la pieza individual.
-
-
-
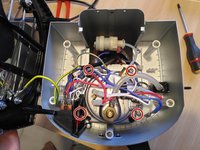
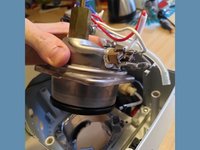
Retira parcialmente la cubierta y retira el cable amarillo/verde (tierra) de la cubierta (círculo verde) simplemente tirando de él.
-
Desenrosca el tornillo (círculo morado) para retirar y liberar el módulo con los tres botones (encendido, café, vapor)
-
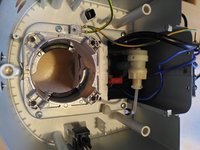
Retira los clips metálicos (círculo amarillo) para liberar el tubo rígido que lleva el agua desde el depósito externo hasta la caldera.
-
Afloja los clips metálicos (círculo azul) que sujetan el tubo blando que conecta la caldera (abajo) a la salida de vapor (derecha). Deslízalos sobre el tubo blando y retira el tubo.
-
-
-
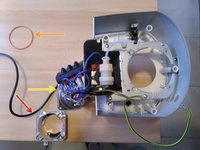
Retira los tornillos Phillips (círculos rojos - Philips) que sujetan la caldera al cuerpo principal.
-
Una vez retirada la caldera, se puede abrir desenroscando los 4 tornillos hexagonales situados en las cuatro esquinas (círculo morado - Allen). Este paso es útil para eliminar la cal acumulada en la caldera.
-
-
-
Una vez desmontada la caldera se pueden sustituir las piezas necesarias: pieza inferior (flecha roja), funda (flecha naranja), pieza superior (flecha amarilla)
Vielen Dank für die Beschreibung.
Ich habe eine Frage zum Erhitzer: Ich möchte die Wasserzufuhr und die Dichtung im Erhitzer tauschen. Ich habe alle Schritte befolgt, bekomme den Behälter jedoch nicht geöffnet, um die Teile auszutauschen.
Kann es sein, dass er stark verkalkt ist, oder muss ich noch etwas lösen – obwohl ich eigentlich nichts mehr sehe, was ich noch lösen könnte?
Vielen Dank für die Unterstützung!
Thank you for the instructions.
I have a question about the heater: I want to replace the water supply and the gasket inside the heater. I have followed all the steps, but I can't open the container to replace the parts.
Could it be that it is heavily calcified, or is there something else I need to loosen – even though I don’t see anything left to unscrew?
Thank you for your support!
-


Para volver a ensamblar tu dispositivo, sigue estas instrucciones en orden inverso.
Para volver a ensamblar tu dispositivo, sigue estas instrucciones en orden inverso.
Cancelar: No complete esta guía.
11 personas más completaron esta guía.
Un agradecimiento especial a estos traductores:
100%

¡ Francisco Javier Saiz Esteban nos está ayudando a reparar el mundo! ¿Quieres contribuir?
Empezar a traducir ›
16 comentarios
Great, clear instructions and easy to follow. I've been looking to into this machine, and tons of scale in the boiler. works fine now! Cheers
Muss man vor dem zerlegen eig den (wenn vorhanden) Boiler oder Erhitzer entleeren, dass kein restwasser entweicht beim auf-den-Kopf-stellen? Wenn ja, wie geht das? Danke schon mal für den obigen, ausführlichen Bericht!
Hi, I think you can empty the boiler (the one depicted in step 6) before disassemblying the coffee machine. Just try to remove the water container (the one on the back of the machine) and try to "make a coffee". The machine should try to empty the residual water in the tubes, but probably some water will remain inside the boiler.
Either way you can open the boiler (step 6) on a sink so that the residual water won't wet your working space.
VooBee -
Guten Tag, wie bekommt man das Ventil aus der Maschine um es auszutauschen? Ich bekomme es einfach nicht hin. Muss dafür der Erhitzer ausgebaut werden?
Hello,
if you are referring to the valve in step 3 - yellow circle - you can remove it with a flat screwdriver but it's not necessary if you don't need to replace that specific valve.
VooBee -
leider greift der torx scglüssel nicht für die Bodenplattenschrauben. Hat jemand einen Tipp???
Hello,
if you are referring to the hexagonal screws in step 2: yes, they are the worst! I had to drill one of those to push it so that it broke the small plastic base on which it stood. Of course you can't do it to all the 4 screws or you will have a non stable base!
VooBee -
Passen Inbusschlüssel?
Do Allen keys fit?
VauWeh -
Hi, vielen Dank für die sehr gute Anleitung. Hat alles so Step by Step funktioniert. Ich habe den Assy Boiler (fully) ausgetauscht. Ich habe nur leider ein Problem und kann den Grund nicht finden: nach dem Zusammenbau läuft das Wasser nicht unten durch das Sieb in die Tasse, sondern das Wasser kommt irgendwo oben heraus. Habe die Maschine schon zweimal auseinander und wieder zusammen gebaut, immer wieder das gleiche Problem. Vielen Dank für einen Tipp, was ich ggf. falsch gemacht habe.
Hi. The only thing I can think of are those metal clips that tighten the water pipes (step 4, blue circle). Did you put them back on? Are they loose?
VooBee -
Thanks so much. It is so clear, I followed the steps and succeeded in doing a good job for my machine, but unfortunately, I did not succeed in getting the wires back in their proper location. Can anybody help? jak.jak45@yahoo.com
Hi, step 4 and 5 shows the right way the electrical wires are connected, but the only electrical wire I removed is the yellow/green one (ground).
Did you remove any other electrical wire?
VooBee -
Thank you so much for your tutorial. Very well organized and helpful. I was sble to replace the OPV and get my crema back. Belisimo!