Saltar al contenido principal
iRobot Roomba 690 Drive Wheels Replacement

iRobot Roomba 690 Drive Wheels Replacement

John Galvin

John Galvin y otro contribuidor

Última actualización: May 11, 2022

5 minuto
Fácil

Introducción

Ir al paso 1

This guide explains how to remove the modular drive wheels for the iRobot Roomba 690 so that they can be more easily cleaned or replaced. Over time hair or other debris may get caught in the wheels of your Roomba. This can lead to the wheels being limited or unable to perform. In some extreme circumstances, the wheel may not be functional for other reasons, requiring replacement. This task is not considered difficult, but it should be known that attempting to remove this component when the battery is still connected to the Roomba can be dangerous, and as such, this guide also explains how to remove the battery during the replacement process. Also, this task does not always need to be performed when debris are caught in the wheels, as it can often be done without disassembly.

Qué necesitas

Herramientas

  1. iRobot Roomba 690 Drive Wheels Replacement, Spinning Brush: paso 1, imagen 1 de 1
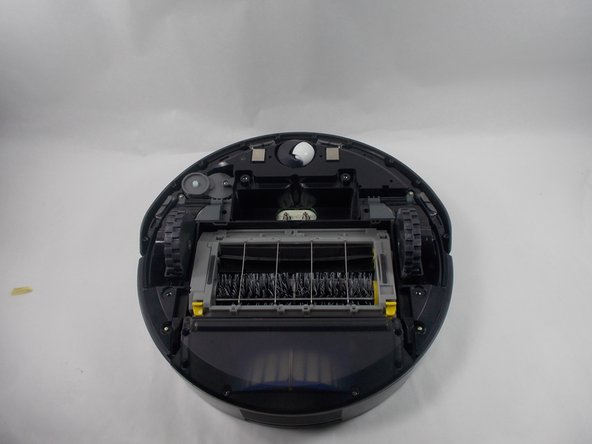
    • Place the Roomba upside down so that the wheels and brushes are facing upward.

  2. iRobot Roomba 690 Drive Wheels Replacement: paso 2, imagen 1 de 3 iRobot Roomba 690 Drive Wheels Replacement: paso 2, imagen 2 de 3 iRobot Roomba 690 Drive Wheels Replacement: paso 2, imagen 3 de 3
    • Loosen the captive screw in the spinning brush using a Phillips #0 screwdriver.

    • Remove the spinning brush from the vacuum.

  3. iRobot Roomba 690 Drive Wheels Replacement, Battery: paso 3, imagen 1 de 1
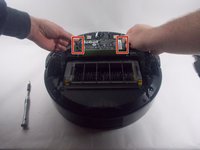
    • Remove the four 6.4 mm screws from the bottom of the Roomba using a Phillips #0 screwdriver.

    • They are labeled with triangular arrows next to them on the cover.

  4. iRobot Roomba 690 Drive Wheels Replacement: paso 4, imagen 1 de 1
    • Lift the bottom cover up from the rest of the Roomba.

  5. iRobot Roomba 690 Drive Wheels Replacement: paso 5, imagen 1 de 3 iRobot Roomba 690 Drive Wheels Replacement: paso 5, imagen 2 de 3 iRobot Roomba 690 Drive Wheels Replacement: paso 5, imagen 3 de 3
    • Lift out the battery by pulling up on the two flexible tabs that are attached to the left and right sides.

  6. iRobot Roomba 690 Drive Wheels Replacement, Drive Wheels: paso 6, imagen 1 de 2 iRobot Roomba 690 Drive Wheels Replacement, Drive Wheels: paso 6, imagen 2 de 2
    • Each drive wheel is labeled left and right.

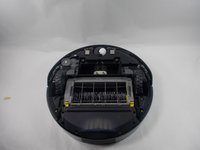
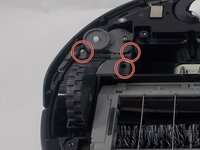
    • Remove three 12 mm screws from each drive wheel using a Phillips #0 screwdriver.

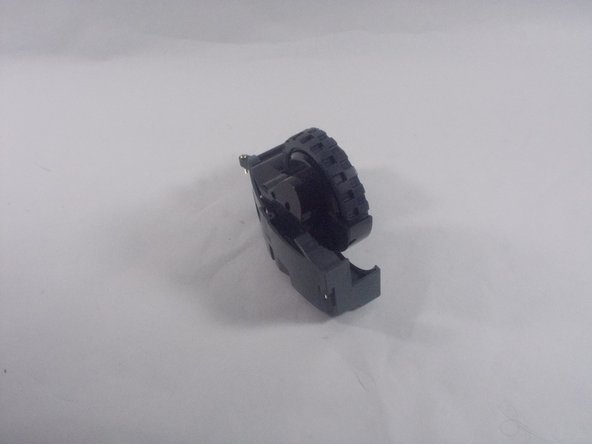
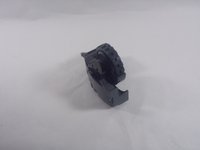
    • Remove the drive wheels from the vacuum.

Conclusión

To reassemble your device, follow these instructions in reverse order.

John Galvin

Miembro Desde 03/23/22

584 Reputación

5 Guías creadas

Equipo

UMass Dartmouth, Team 1-1, Botvin Spring 2022 Miembro de UMass Dartmouth, Team 1-1, Botvin Spring 2022

UMASSD-BOTVIN-S22S1G1

Miembros de 2

5 Guías creadas

0Guía Comentarios

Agregar Comentario

Ver Estadísticas:

Ultimas 24 horas: 1

Ultimos 7 días: 9

Ultimos 30 días: 29

Todo El Tiempo: 553