Saltar al contenido principal
iPod Touch 5th Generation Rear-Facing Camera Replacement

iPod Touch 5th Generation Rear-Facing Camera Replacement

Andrew Optimus Goldheart

Andrew Optimus Goldheart y 2 otros contribuidores

Última actualización: August 16, 2024

Sin estimación
Moderado
Sólo Prerrequisito
Esta guía solo debería usarse como prerrequisito para otras guías. Por tanto, estará incompleta.

Introducción

Ir al paso 1

Prerequisite for entire button ribbon cable, volume buttons, power button, and rear case.

Qué necesitas

Herramientas

  1. iPod Touch 5th Generation Rear-Facing Camera Replacement, Rear-Facing Camera: paso 1, imagen 1 de 3 iPod Touch 5th Generation Rear-Facing Camera Replacement, Rear-Facing Camera: paso 1, imagen 2 de 3 iPod Touch 5th Generation Rear-Facing Camera Replacement, Rear-Facing Camera: paso 1, imagen 3 de 3
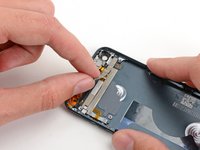
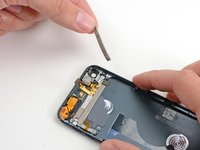
    • Insert the flat end of a spudger between the rear-facing camera and its frame.

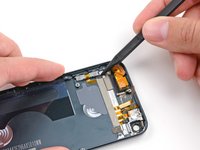
    • Gently twist the spudger to free the camera.

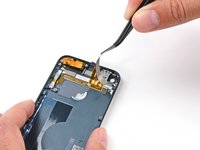
    • Lift the rear-facing camera up out of its socket, and remove it from the iPod Touch.

  2. iPod Touch 5th Generation Rear-Facing Camera Replacement: paso 2, imagen 1 de 3 iPod Touch 5th Generation Rear-Facing Camera Replacement: paso 2, imagen 2 de 3 iPod Touch 5th Generation Rear-Facing Camera Replacement: paso 2, imagen 3 de 3
    • Gently slide the flat end of a spudger underneath the piece of foam tape covering the button ribbon cable.

    • Run the spudger along the full length of the tape to disconnect it from the rear case.

  3. iPod Touch 5th Generation Rear-Facing Camera Replacement: paso 3, imagen 1 de 2 iPod Touch 5th Generation Rear-Facing Camera Replacement: paso 3, imagen 2 de 2
    • Peel and remove the foam tape from the rear case of the iPod.

  4. iPod Touch 5th Generation Rear-Facing Camera Replacement: paso 4, imagen 1 de 3 iPod Touch 5th Generation Rear-Facing Camera Replacement: paso 4, imagen 2 de 3 iPod Touch 5th Generation Rear-Facing Camera Replacement: paso 4, imagen 3 de 3
    Herramienta utilizada en este paso:
    Tweezers
    $4.99
    • Use the tip of a spudger to peel up the edge of the tape covering the button ribbon cable.

    • Use tweezers or your fingers to peel the tape up from the rear case, and remove it from the iPod.

Conclusión

To reassemble your device, follow these instructions in reverse order.

Equipo

iFixit Miembro de iFixit

Staff

118 Miembros

19,455 Guías creadas

0 comentarios

Agregar Comentario

Ver Estadísticas:

Ultimas 24 horas: 0

Ultimos 7 días: 4

Ultimos 30 días: 6

Todo El Tiempo: 105