Saltar al contenido principal
iPad 6 Wi-Fi Front Panel Assembly Replacement

iPad 6 Wi-Fi Front Panel Assembly Replacement

Sam Goldheart

Sam Goldheart y otro contribuidor

Última actualización: January 17, 2024

1 - 2 horas
Difícil
Sólo Prerrequisito
Esta guía solo debería usarse como prerrequisito para otras guías. Por tanto, estará incompleta.

Introducción

Ir al paso 1

This is a prerequisite only guide for the front panel replacement.

Qué necesitas

Herramientas

  1. iPad 6 Wi-Fi Front Panel Assembly Replacement, Front Panel Assembly: paso 1, imagen 1 de 2 iPad 6 Wi-Fi Front Panel Assembly Replacement, Front Panel Assembly: paso 1, imagen 2 de 2
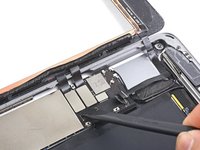
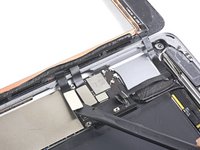
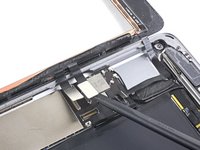
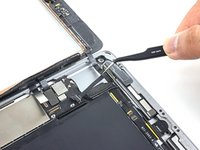
    • Remove any tape covering the home button ribbon cable connector.

  2. iPad 6 Wi-Fi Front Panel Assembly Replacement: paso 2, imagen 1 de 3 iPad 6 Wi-Fi Front Panel Assembly Replacement: paso 2, imagen 2 de 3 iPad 6 Wi-Fi Front Panel Assembly Replacement: paso 2, imagen 3 de 3
    • Use the flat end of a spudger to flip the tab on the home button ribbon cable ZIF connector upward.

    • Carefully pull the home button ribbon cable straight out of the ZIF connector.

  3. iPad 6 Wi-Fi Front Panel Assembly Replacement: paso 3, imagen 1 de 3 iPad 6 Wi-Fi Front Panel Assembly Replacement: paso 3, imagen 2 de 3 iPad 6 Wi-Fi Front Panel Assembly Replacement: paso 3, imagen 3 de 3
    • Use a the flat end of a spudger or a fingernail to carefully pop the two digitizer cable connectors straight up from their sockets.

    • To avoid damaging your iPad, pry only on the connectors themselves, not on the socket on the logic board.

    • During reassembly, make sure that these connectors are completely seated in their sockets, or you may encounter display issues.

  4. iPad 6 Wi-Fi Front Panel Assembly Replacement: paso 4, imagen 1 de 2 iPad 6 Wi-Fi Front Panel Assembly Replacement: paso 4, imagen 2 de 2
    • Carefully peel the home button ribbon cable up off of the adhesive holding it to the rear case.

  5. iPad 6 Wi-Fi Front Panel Assembly Replacement: paso 5, imagen 1 de 2 iPad 6 Wi-Fi Front Panel Assembly Replacement: paso 5, imagen 2 de 2
    Herramienta utilizada en este paso:
    Polyimide Tape
    $9.99
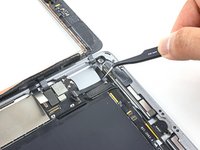
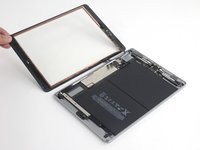
    • Remove the front panel assembly.

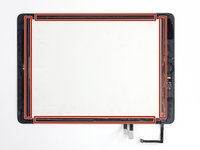
    • If you experience "ghost" or "phantom" touch input issues with your new display, this can be resolved by adding a layer of very thin insulating tape, such as Kapton (polyimide) tape, to the highlighted areas on the back of the panel. iFixit panels come with the proper insulation, and should not require the addition of any tape.

    • Without the proper insulation, these areas of the digitizer can ground out against other components, causing touch input malfunction.

    • The insulation is not visible to the naked eye, and is different from the foam dust barrier strips found on many iPads.

Conclusión

To reassemble your device, follow these instructions in reverse order.

Una persona más ha completado esta guía.

Sam Goldheart

Miembro Desde 10/18/12

471,777 Reputación

538 Guías creadas

Equipo

iFixit Miembro de iFixit

Staff

Miembros de 118

19,566 Guías creadas

0 comentarios

Agregar Comentario

Ver Estadísticas:

Ultimas 24 horas: 0

Ultimos 7 días: 6

Ultimos 30 días: 15

Todo El Tiempo: 170