Esta traducción podría no reflejar los cambios más recientes añadidos a la guía de referencia. Ayúdanos a actualizar la traducción o revisa la guía original.

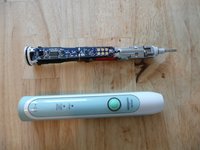
Reparación del actuador Philips Sonicare HX6711 HealthyWhite 710

Introducción
Ir al paso 1Un tornillo actuador flojo inutiliza el cepillo de dientes, ya que evita que el motor impulse el cepillo de dientes real que está conectado a la parte superior del dispositivo. Sin embargo, reparar esta fallo se puede lograr en solo unos pocos pasos.
Qué necesitas
Herramientas

-
-
Necesitarás dos destornilladores:
-
una cabeza plana de 6,5 mm y
-
un pequeño Phillips #1.
-
-
-
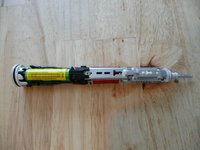
Cogeel destornillador de cabeza plana.
-
Insértalo en la ranura ubicada en la parte inferior del mango y gíralo en sentido contrario a las agujas del reloj para liberar la tapa inferior.
-
La segunda imagen muestra la cantidad de giros necesarios para aflojar la tapa inferior.
-
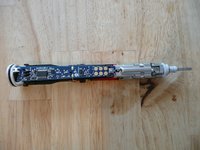
Sostén el mango boca abajo y empuja hacia abajo el eje para liberar los componentes internos del mango.
When i tried all i acheived was scratch away some plastic on the bottom hole. ANd i could not see anything that would require a counter-clockwise turn or any movement from the bottom side at all.
In the end i've just used something to push against the brush holding part and the whole thing came apart without damage.
Unfortunately I ended up stripping the bottom plastic screw hole trying to get it off as it didn't twist out. Can you post more details pics showing the starting position of the slot and the ending position when it's unlocked? How many degrees did you need to turn it before it came out?
Does anyone know how to open a Sonicare HX8912 or HX8910.First number is box part number and second is on bottom of brush.I took off the bottom but pushing hard on brush shaft end doesn't cause assembly to pop out.I don't want to break it pushing too hard,if there is some other way to pop out the innards.
It's been a few years, but for anyone that comes across this post, in answer to Jon Jensen's post, I discovered that there are two tabs that have to be released to allow the central shaft to be pushed out. The tabs are accessible from the bottom of the toothbrush after removing the bottom cover. They're hard to access and must be pressed inward. I discovered this AFTER breaking open my case and seeing why the shaft wouldn't come out. Hopefully this helps someone else.
-
-
-
-
Coge el destornillador Phillips pequeño.
-
Aprieta el tornillo pequeño que se encuentra cerca de la parte superior de las partes internas del dispositivo.
-
Por lo tanto, desenrosca el tornillo por completo y pon un poco de pegamento al final. Luego apriétalo de nuevo. Esto evita que el tornillo se suelte debido a las vibraciones.
Hallo,
eine wunderbare Reparaturanweisung !
Nur leider mußte ich die etwas modifizieren !
Also bei mir funktionierte die Vibration auch nicht mehr.
Jedoch hatte sich an meiner Zahnbürste nicht die Schraube am Kopf gelöst sondern….einige Zentimeter weiter die Fixierung der Spule !
Nachdem ich die Schraube der Spule ganz gelöst hatte (Lage der Schraube unmittelbar vor dem Schaltpanel) konnte ich die Spule etwas bach hinten verschieben.
Dann die Schraube angezogen und die Vibration war wieder vorhanden !
Vielkeicht hilft mein Kommentar dem einen oder anderen !
Vielen Dank für diese Beschreibung, hat mir unterm Strich geholfen
-


Para volver a armar tu dispositivo, sigue estas instrucciones en orden inverso. Asegúrate de no insertar las partes internas del dispositivo torcidas. Cierra el dispositivo utilizando el destornillador de cabeza plana y poniendo algo de presión sobre él. Finalmente, si las partes internas están en su alojamiento, cierra el dispositivo girando la tapa inferior en el sentido de las agujas del reloj.
Para volver a armar tu dispositivo, sigue estas instrucciones en orden inverso. Asegúrate de no insertar las partes internas del dispositivo torcidas. Cierra el dispositivo utilizando el destornillador de cabeza plana y poniendo algo de presión sobre él. Finalmente, si las partes internas están en su alojamiento, cierra el dispositivo girando la tapa inferior en el sentido de las agujas del reloj.
Cancelar: No complete esta guía.
13 personas más completaron esta guía.
Un agradecimiento especial a estos traductores:
88%

¡ Francisco Javier Saiz Esteban nos está ayudando a reparar el mundo! ¿Quieres contribuir?
Empezar a traducir ›

7 comentarios
thanks for that one - you rescued ours from a premature trip to the landfill :)
Excellent guide; a simple fix saves $$ and waste. Thanks!!
Thank you! It's realy help me!
Für den Wiederzusammenbau habe ich den Deckel vorsichtig von dem Innenteil abgehoben und dann zuerst das Innenteil in das Handstück eingeführt, bis die seitlichen Haltenasen einrasten. Anschließend habe ich den Deckel mit leichtem Druck in der richtigen Position wieder aufgedrückt. Fertig.
I opened a model (HX6530 which has an oval cross-section) that had a similar failure and found the same mechanism inside, but the metal casting - which holds the brush spike and which the screw fixes in place - had broken in half, so tightening the screw couldn’t fix the problem. This looks to me like a poorly designed casting - this one was a replacement under warranty. Both the original and the replacement failed after a little over a year of use with the same cast breakage.
Poor choice of materials or planned obsolescence?