
Reemplazo de la placa frontal de Nintendo Wii U

Introducción
Ir al paso 1Utilice esta guía para instalar una nueva placa frontal para Nintendo Wii U.
Qué necesitas


-
-
Con la parte inferior de la consola hacia arriba, retira los siguientes 6 tornillos ocultos debajo de las pegatinas cuadradas blancas:
-
Tres tornillos Phillips #000 de 5,1 mm
-
Dos tornillos Tri-wing Y0 de 6,1 mm
-
Un tornillo Tri-wing Y1 de 13,2 mm
-
-
-
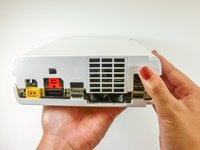
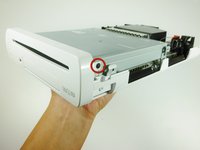
Gira la consola 180 grados de modo que las rejillas de escape queden orientadas hacia ti.
-
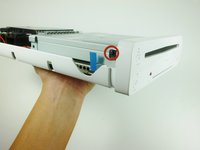
Retira los dos tornillos Phillips #00 de 7,1 mm.
Both screws are not “7.1mm” in length, only the one to the right is (center of the console’s side). The left one (towards the front of the console) is 5.1mm.
There’s a third screw to remove bottom-left corner of this picture. On step 9 it’s already been removed, and you need it to be removed in order to remove the metal casing in step 13.
-
-
-
-
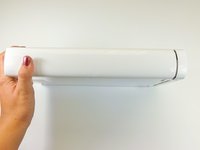
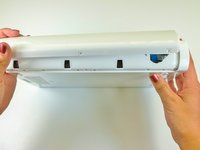
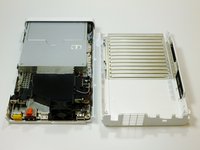
En la parte posterior de la consola, levanta y libera la cubierta superior principal.
The front portion of the side of the cover with the vents was kind of stuck on mine. There’s a little rubber piece in there that was the cause of this. But that same rubber piece also makes up the little handle-shaped nub that sticks out of the side there. (There’s also one at the back of the same side, but that one didn’t stick for me.) Lifting also using the little handle made it easy to remove the cover.
-
-
-
Gire el dispositivo de modo que la placa frontal quede hacia usted.
-
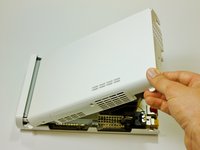
A cada lado de la consola, retire el tornillo Phillips n.º 0 de 3,5 mm que conecta la unidad de DVD a la placa frontal.
My screw won't come out, and I feel as if my screw was screwed in too tight when they made the wii u, or the 3.5 #0 is too big. I have tried other screws and I think the screw might be done for because the metal is coming off of the top and deforming the shape. I am very lost and if anyone could help me, that would be amazing.
Those #0 screws might be tight and they’re easy to strip. Put some force on the screwdriver to make sure you start unscrewing them and not stripping them.
One of the screws started to deform instead of unscrewing. I used a bigger Philips screwdriver (size 1), added a rubberband between it and the screw and used more force to avoid stripping it more and make sure it would start unscrewing. It worked hopefully ! But I wasn’t sure it would.
I stripped the right screw and fortunately managed to remove it by removing and twisting the bracket it was held on to.
-
-
-
Gire el dispositivo de modo que la placa frontal quede en el lado derecho y el cable plano sea visible.
-
El cable plano está conectado al sistema mediante un pestillo que se sujeta a la pestaña azul. Levante este pestillo para desbloquearlo.
-
Levante la pestaña azul para liberar el cable plano.
There is a step to do before to "lift up on the blue tab in order to release the ribbon cable". We must lift up the connector who maintain the ribbon cable. By default, his position his locked and in order to unlock it, must put it in his top position.
-


Para volver a ensamblar su dispositivo, siga estas instrucciones en orden inverso.
Para volver a ensamblar su dispositivo, siga estas instrucciones en orden inverso.
Cancelar: No complete esta guía.
11 personas más completaron esta guía.
Un agradecimiento especial a estos traductores:
100%

¡ Luis Cherubin nos está ayudando a reparar el mundo! ¿Quieres contribuir?
Empezar a traducir ›

Equipo

Cal Poly, Team 17-20, Forte Winter 2013 Miembro de Cal Poly, Team 17-20, Forte Winter 2013
CPSU-FORTE-W13S17G20
Miembros de 5
40 Guías creadas
4Guía Comentarios
Great guide. I was able to fix the front USB door on my Wii u! Thanks guys!
My ribbon seems to work but the little connection it plugs into on the circuit board in the console broke off. Not just the black clip but the whole little circuit. Seems like a clean break. Can I solder it back on? If I push it back on and hold the ribbon in the red light comes on and blinks. Occasionally I can get the white light to come on for like a second but I never hear fans spinning/more of the unit coming to life before it shuts itself off.
Thoughts on how to fix it?
My daughter shoved change into my disc slot of my Wii I. I thought I got out all pulling through the faceplate dvd slot but now when I put in a game disc it won’t catcalls accept it. It pulls in, sounds like it turns a little bit and then ejects the disc. Could change still be stuck in the reader or do I need to replace it now?
Bit sad that it doesn't show how to re-insert the little ribbon cable. The tiny black latch came off, and there's no way to refix the latch back to the connector.
Regards,
Adrie