Introducción
Las baterías están clasificadas para mantener 80% de su capacidad hasta 500 ciclos de cargas, que dura aproximadamente 18-24 meses para la mayoría de los usuarios. Luego, tu iPhone podría necesitar cargarse más frecuentemente y el iOS podría advertirte que el rendimiento resultará afectado ( es decir, tu teléfono funcionará más lento). Usa esta guía para reemplazar y restaurar tu iPhone a un rendimiento como nuevo.
Si tu batería está hinchada, toma precauciones apropiadas.
Nota: Después de reparar tu iPhone, puede que te muestre un aviso sobre la genuinidad de la batería (incluso si usas una pieza original de Apple). Si tu teléfono funciona normalmente, simplemente ignora este aviso.
Para un rendimiento óptimo luego de completar la guía, calibra tu batería nueva: Cárgala hasta 100%, y sigue cargándola durante al menos dos horas más. Luego, úsala hasta que se apague debido a batería baja. Finalmente, cárgala de forma ininterrumpida hasta el 100%.
Qué necesitas
Resumen del Video
-
-
Apaga tu iPhone antes de comenzar a desmontar.
-
Remueve los dos tornillos pentalobe de 6.9 mm en el borde inferior del iPhone.
-
-
-
Coloca tiras superpuestas de cinta de embalaje transparente sobre la pantalla del iPhone hasta cubrir toda la cara.
-
Si no puedes hacer que la ventosa se adhiera en los próximos pasos, dobla un trozo de cinta resistente (como cinta adhesiva) en un asa y levanta la pantalla con eso.
-
-
-
Tira de la manija azul hacia atrás para desbloquear los brazos del Anti-Clamp.
-
Desliza los brazos sobre el borde izquierdo o derecho de tu iPhone.
-
Coloca las ventosas cerca del borde inferior de la pantalla, una en el frente y otra en la parte posterior.
-
Aprieta las copas para aplicar succión en el área deseada.
-
-
-
Tira de la manija azul hacia adelante para bloquear los brazos.
-
Gira el mango en el sentido de las agujas del reloj 360 grados o hasta que las copas comiencen a estirarse.
-
Asegúrate de que las ventosas permanezcan alineadas entre sí. Si comienzan a salirse de la alineación, afloja ligeramente las ventosas y vuelve a alinear los brazos.
-
-
-
Calienta un iOpener y pásalo por los brazos del Anti-Clamp.
-
Dobla el iOpener de forma que quede sobre el borde inferior del iPhone.
-
Espera un minuto para que el adhesivo se despegue y se abra el hueco.
-
Inserta una púa de apertura en el hueco que hay debajo de la pantalla y el bisel de plástico, no en la propia pantalla.
-
Omite los siguientes tres pasos.
-
-
-
Usa un secador de pelo o pistola de calor, o prepara un iOpener y aplícalo en el borde inferior del iPhone durante un minuto para ablandar el adhesivo.
-
-
-
Tira de la ventosa con una presión firme y constante para crear un ligero hueco entre el panel frontal y la caja trasera.
-
Inserta una púa de apertura en el espacio debajo de la pantalla y el bisel de plástico, no en la pantalla en sí.
It seems like I need a third hand to do this. To hold the phone; hold the suction cup; and push the pick in the space.
-
-
-
Abre el iPhone moviendo la pantalla hacia arriba desde el lado izquierdo, como la contraportada de un libro.
-
Apoya la pantalla contra algo para mantenerla apoyada mientras trabajas en el teléfono.
-
-
-
Remueve los cuatro tornillos Y000 que sujetan el soporte de la cubierta de la placa lógica:
-
Dos tornillos de 1.1 mm
-
Un tornillo de 1.5 mm
-
Un tornillo de 3.7 mm
FYI: I used a tiny piece of scotch tape to hold those 1mm screws in place while aligning the magnetic screwdriver. Otherwise they are so tiny the magnetic bit pulls them right out the hole.
-
-
-
-
Usa un spudger o uña para levantar y desconectar el conector de ensamblaje del sensor del panel frontal.
In my phone the connector made poor contact with the socket resulting in no sound audible through the phone receiver/headset. There was an overhang of insulation close to the socket which I believe may have prevented a good connection. So if you have these kinds of audio problems you might see if this is the problem.
-
-
-
Usa un spudger o uña para levantar el conector de cable del digitalizador de su zócalo.
Reassembly: reconnecting the press connectors upon reassembly was so hard, even for the ones not seated in a recessed location !! It took me two days to get them reconnected. What helped me was to shine bright lights on all sides of the iPhone and then hold the iPhone vertically like a book and press it in that way. They are now all in, but the touchscreen functionality has disappeared :( so I will need to reconnect that one.
-
-
-
Con cuidado levanta el cable hasta que el adhesivo se separe.
Will replacing camera and sensors fix damaged face I'd
No, FaceID will be disabled because the original sensors are paired with the logic board.
-
-
-
Remueve el ensamblaje de pantalla.
Geez, I blazed right past that small line to replace the waterproof seal. Needs to be called out much larger.
-
-
-
Remueve los cinco tornillos que sujetan los dos soportes debajo del Motor Táptico y altavoz principal:
-
Un tornillo tri-point Y000 de 1.0 mm
-
Dos tornillos Phillips de 1.3 mm
-
Un tornillo Phillips de 1.7 mm
-
Un tornillo Phillips de 1.8 mm
Bonjour,
Plus pratique avec une Y000. Dans mon cas c’était impossible en Y00.
Bonne journée. :)
got stuck on the 1.8 mm screw and had to abort. The Phillips head provided “PH000” didn’t quite fit and stripped the screw.
I ended up skipping this step through 32. It’s not necessary to take the speaker and taptic thing off. I just used the thin black spudger flat edge and pried under the battery on the L-shaped edge and dislodged the adhesive and then did the same on the top edge. You will end up bending the old battery but that’s ok—just don’t poke it. keep poking the flat edge of the spudger in there kind of like a knife to break the adhesive. once you get at least two spots of the adhesive pulled, the rest comes up quite easily when you lift the whole battery.
I agree with R.J. The bracket screws are minute. They are much easier to remove than to put back. Avoid taking them out if you can.
-
-
-
Suavemente levanta para despegar y remover cada soporte, teniendo cuidado de no doblarlos.
-
Si es necesario, aplica un poco de calor con un pistola de calor para ablandar el adhesivo (No es recomendable colocar un iOpener en los soportes ya que podría doblar los contactos de muelle a lo largo de la parte superior)
-
-
-
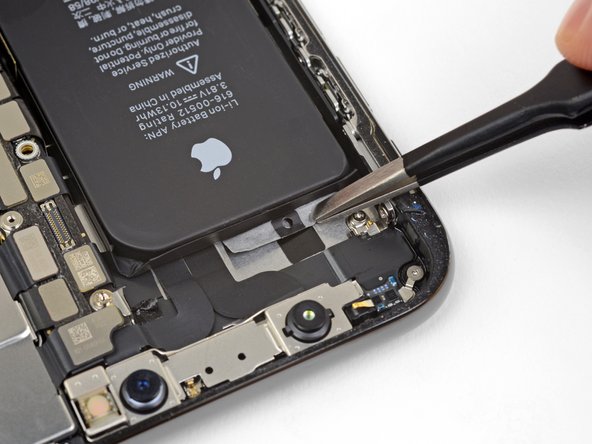
Remueve el altavoz.
I thought my speaker gasket was also missing, however looking back into the part box I found it tucked under the flap at the other (unopened) side of the box. Glad I took a second (and closer) look. IFIXIT needs to do a better job securing very small parts as it is very easy for these types of parts to get jostled during shipping and then could fall out or stuck in the box unnoticed. I've purchased iFixit products for more than 10 years and am super satisfied their quality in parts and provided instructions. Hopefully they'll make some adjustments to their shipping containers as I'd love to continue using them.
My speaker gasket was stuck to the inside of the box also. Unfortunately it has the back peal removed and has stuck itself to the cardboard box. I tried to remove it but it was firmly attached. Bummer. This is my first iFixIt. Please package it more carefully as the other person said.
I can't find mine in the part box. Is it possible it was excluded?
It might have fallen out. Search in the crevasses of the box. If you still cannot find it contact iFixit.
Update to last comment, I looked again at the listing for the battery with and without the "fix it kit". I ordered without, and apparently, the speaker gasket is part of the kit. Will need to order separately and take the phone apart again and replace the seal and battery adhesive again to install the gasket.
-
-
-
Usa un spudger para desconectar el cable flexible del Motor Táptico levantándolo directamente de su zócalo.
-
-
-
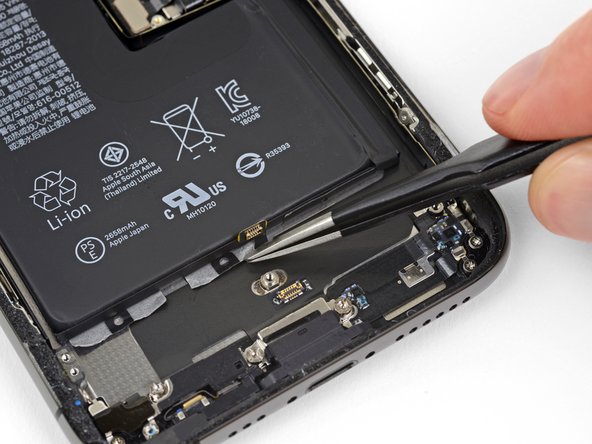
Cada pieza de adhesivo tiene una lengüeta negra en el extremo que está ligeramente adherida al borde lateral de la batería.
-
-
-
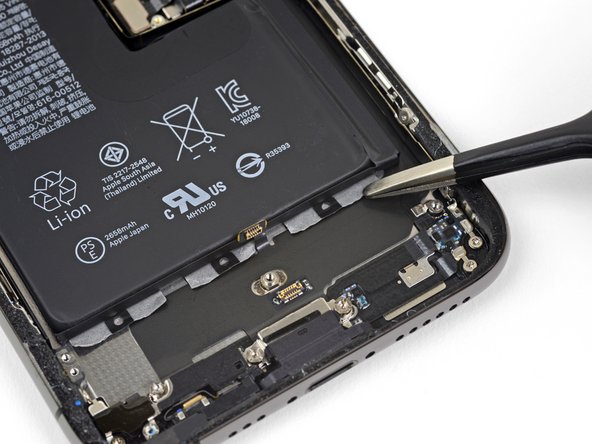
Repite el paso de arriba para separar las dos lengüetas restantes del borde inferior de la batería.
The tabs are stuck on with the same glue that is holding the battery down. It is fairly strong but will come off with some patience and consistent progress.
Despite the photo, I do NOT suggest using the tweezers for this but the black plastic spudger that comes with the kit. I say this after having the tweezers lose grip and slide across the bottom black ribbon attached to the case. If you must use the tweezers because of the strength of the glue, use a downward force into the case bottom, not an outward force. That way, you will not have the same happen to you…
Here is hoping the slight scratch did not damage anything vital…
-
-
-
Para aumentar tus posibilidades de éxito:
-
No presiones la batería. Sujeta el iPhone firmemente de sus laterales.
-
Mantén las tiras planas y sin arrugas mientras jalas.
-
Jala muy lentamente, dándole a la tira tiempo para estirarse y separarse. Lleva 15-30 segundos de estiramiento para remover cada tira.
-
Jala a un ángulo bajo para que la tira no se enganche a lo largo del borde inferior de la batería.
-
Si la tira se rompe por debajo de la batería y no la puedes recuperar, sigue con las otras tiras y luego continúa con los pasos adicionales abajo.
Pour cette étape, vous pouvez saisir les bandes adhésives avec une pince à bouts ronds (pour éviter de percer la batterie) et l’enrouler petit à petit.
-
-
-
Si algunas de las tiras de adhesivo se rompió y la batería sigue pegada a la carcasa trasera, remueve la añadiendo unas gotas de alcohol isopropilico (90% o mayor) debajo de la batería cerca de la tira atascada(s).
-
Alrededor de un minuto después, levanta gentilmente la batería.
-
-
-
Si alguna de las tiras adhesivas se rompió y la batería sigue pegada a la caja trasera, prepara un iOpener o usa un secador de pelo para calentar la caja trasera directamente detrás de la batería. Esto ayudará ablandar el adhesivo.
-
Voltea el teléfono y pasa un hilo (como hilo dental o una cuerda de guitarra) por debajo de la batería.
-
Tira del hilo de lado a lado como si estuviera serruchando algo por el largo de la batería para separar el adhesivo. Esto puede llevar algo de tiempo ya que el adhesivo tarde en deformarse pero con paciencia se liberará . No deformes o dañes la batería.
-
Comienza desde el borde superior o inferior de la batería y tira hacia el centro. No tires del hilo a través del tercio medio de la batería, ya que podrías dañar los cables planos la bobina de carga inalámbrica directamente debajo.
I didn't have any of the alcholol, so came in straight here. Can't over stress the need for patience, but once I put the phone on my microwaved sock of rice (that's how we roll) and started to gently saw away with the floss - it all came good.
-
-
-
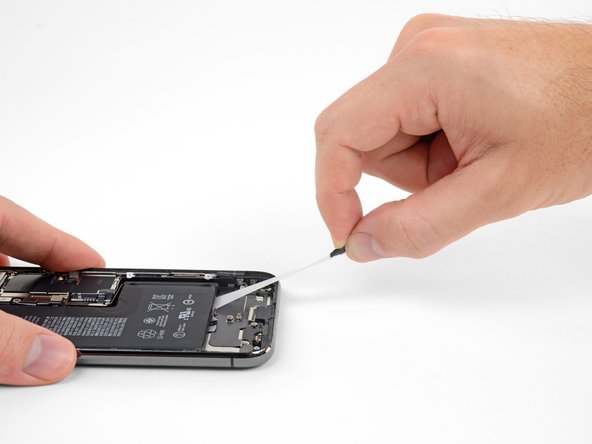
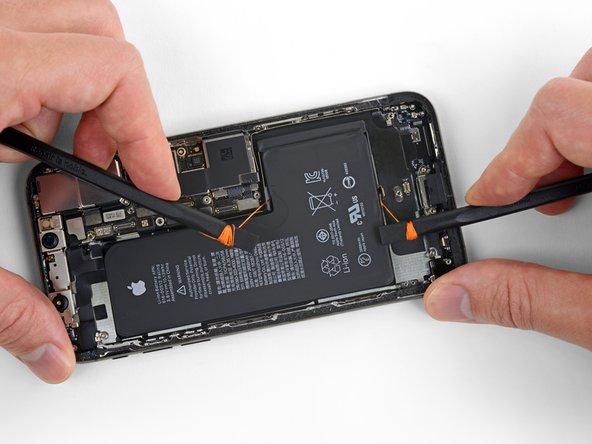
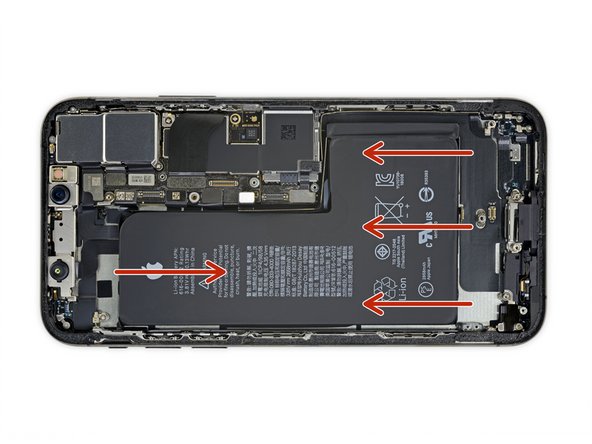
Sujeta la batería desde el borde inferior y quítala del iPhone.
-
Antes de adherir la batería de remplazo, reconecta temporalmente el conector de la batería al zocalo en la placa lógica. Esto asegura que la batería es alineada apropiadamente en su agujero.
-
Adhiere la batería, desconectala, y continua con el re-ensamble de tu dispositivo.
For those that plan to proceed with the hack that eliminates the “battery is not genuine” message and no battery health information (requires extra tools that most don’t have), be careful not to bend the original battery’s flex cable too much. I found out the hard way that the flex cable doesn’t really “flex” much and ended up snapping in half when trying to hook it up to a programmer. So much for trying to do the hack :(
How do I force restart and calibrate the battery at the same time?
-


Compara tu parte nueva de reemplazo con la parte original. Podrías tener que transferir los componentes restantes o remover los respaldos adhesivos de la nueva parte antes de instalarla.
Para volver a ensamblar tu dispositivo, sigue estos pasos en orden inverso.
Lleva tus residuos electrónicos a un centro de reciclaje certificado.
¿La reparación no salió como planificaste? Fíjate en nuestra comunidad de respuestas para ayuda en resolución de problemas.
Cancelar: No complete esta guía.
110 personas más completaron esta guía.
Un agradecimiento especial a estos traductores:
100%


Estos traductores nos están ayudando a reparar el mundo! ¿Quieres contribuir?
Empezar a traducir ›


17 comentarios
i don’t know what happened but now my iphone xs will only boot into recovery mode and there is nothing showing up on the display. i have double triple quadruple checked and dont know what my issue is. any feedback on the matter would be greatly appreciated.
My iPhone has been turned off completely for the past few weeks, I have tried to hard restart it but nothing seems to work. It has a black screen and isn’t responding to anything. Nothing has ever been wrong with the phone it just shut down one day and hasn’t restarted since. Do you have a suggestion to get my phone working again?
Anyone have an issue where the phone won’t charge after replacing the battery/
Yes, I cant figure out why. I wonder if because its not the original battery, it wont let the new one charge? Idk.
Nick Lo -
It is possible the you went to deep with the plectrum, knocking of a capacitor from the logic board. I think it’s best you take it to a really good repair shop where the owner has expert solder skills to replace it.
Good luck
I ended up skipping steps 20-32. The kit didn’t come with the right screwdriver top and I realized it’s not necessary to take the speaker and taptic thing off.
I just used the thin black spudger flat edge and pried under the battery on the L-shaped edge and dislodged the adhesive and then did the same on the top edge. You will end up bending the old battery but that’s ok—just don’t poke it. keep poking the flat edge of the spudger in there kind of like a knife to break the adhesive. once you get at least two spots of the adhesive pulled, the rest comes up quite easily when you lift the whole battery.
Hey, after changing the battery the volume and silent buttons stopped working. There is no apparent reason as why they would, what could it be and can it be fixed before I close the phone ??
you've likely damaged the volume flex cable that lies under the battery, it is very thin and easily damaged. unfortunately pull tabs rarely work as intended. alcohol is the best method for loosening adhesive.
I skipped removing the taptic engine and speaker because I knew I was going to break the adhesive strips when pulling as they break very easily. Just dripped some alcohol, waited 10 minutes and with a bit of force the battery came right off without even bending. Makes the process much quicker although that’s not the intended way of removal.
Ive got a metal protection plate of some sort in-between the screen and the battery around the inside perimeter of the phone. it is blocking access to most of the bottom screws. and does look like it pulls out. might be fixed at the bottom or sides.
anyone found one of these plates in their attempts? might have been placed by a repairer at some point
that is the display frame you have damaged it and you will need to replace the display because the display has its own frame and that frame holds it in place.
My phone's touch screen and camera were unresponsive after reassembly. I prised it all apart and checked all the connections 3 times unfortunately ruining the glue around the edge and then after Googling found a Forced Restart cleared the problem. Press and release volume up button then the volume down button then hold and keep holding the on off button on the right until the apple appeared. And hey presto it all worked!!! I'm well chuffed as I'm a 64 year old 'girl' with no experience of this sort of thing but am pretty competant with practical things - I thought 'how difficult can it be?' Not too difficult, except for removing the adhesive from behind the battery (should have read the detailed instructions properly) which I eventually did with some Isopropyl alcohol following the further instructions.
My top tip! I found putting all the screws on a bit of 'blue tac' kept them safe and in order.
Very tricky indeed but thankfully I managed to replace battery and screen and it worked 😊
After the change of battery the lower speaker has stopped to work. The battery it's ok and works fine but i have only speaker working right now.
I have tried to connect and disconnect it, with and without the battery connected but nothing. I don't thing that the speaker is dameged, but maybe the connector? What i can verify?
After replacing battery, I am getting ghost typing and activity on the touchscreen without touching it. And the phone is hot. What did I do wrong? Replaced a battery in my iPhone 6s prior to trying battery replacement on the XS, thought I would have equal success, not! Also noted the warning about the genuineness of the new battery, don't mind that but I also lost the health of the battery status; was that supposed to happen?
Friendly Suggestion: would have purchased the full fix kit had I know I would need to replace the adhesive gasket during reassembly. Having purchased many kits before, I have all the tools. When looking at the photo, it didn't seem to include anything other than the battery, so I just ordered the battery. Missed the tiny adhesive gasket! Might want to highlight items like that so when people order, they don't make a similar mistake.
Der Original Akku ist codiert. Egal, ob man einen zweiten Apple Original Akku oder einen neuen Fremdakku einbaut erscheint bereits in den Einstellungen eine "Wichtige Batterienachricht" mit einem roten Punkt. "Unbekanntes Bauteil" und die "Informationen zum Batteriezustand" sind nicht verfügbar. Diese Nachricht verbleibt immer und nervt auf Dauer immens.
Der Akku muss angelernt werden und dieses können von jetzt an nur authorisierte Apple Servicebetriebe und diesen ist es durch Apple verboten die notwendige Info weiterzugeben.
Dies ist nicht zu verwechseln mit der bereits bekannten Rekalibrierung seit iOS 14.5.
Seit dieser neuen Codierung kostet der Akkutausch bei Apple auch nicht mehr 75 € sondern aktuell 99 € (Stand Novmber 2023 in Deutschland).
Damit sind künftig alle nicht authorisierten Servicebetriebe raus - denn wer will schon dauernd diese Mitteilung auf dem Bildschirm haben?
Überlegt vorher, ob unter diesen Bedingungen ein eigener Akkutausch noch sinnvoll ist .....
Manfred Wachtel - Contestar
Lieben Dank @manfredwachtel ! Mehr Infos dazu haben wir auch in unserem Blog zusammengefasst: https://de.ifixit.com/News/78890/teileko...
Sandra Hiller -