Introducción
Esta guía muestra cómo quitar y cambiar la batería del Samsung Galaxy S20.
La batería se mantiene en su lugar con un adhesivo fuerte. Se necesita alcohol isopropílico de alta concentración (más del 90%) para aflojar y liberar este adhesivo.
Si la batería está hinchada, toma las precauciones adecuadas y no caliente el teléfono.
Por su seguridad, descargue la batería por debajo del 25% antes de desmontar el teléfono. Esto reduce el riesgo de un peligroso evento térmico si la batería se daña accidentalmente durante la reparación.
Necesitarás adhesivo de repuesto para completar esta reparación.
Qué necesitas
-
-
Calienta un iOpener y aplícalo en el borde inferior de la cubierta trasera durante dos minutos.
-
-
-
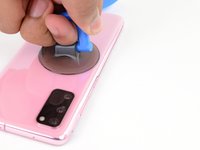
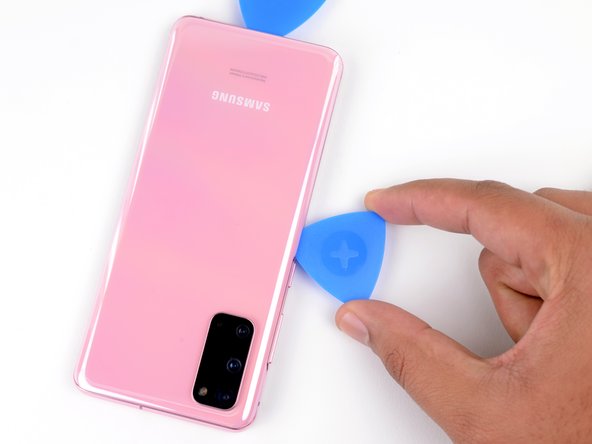
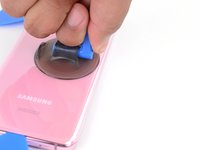
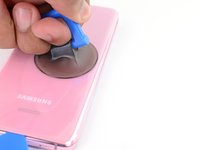
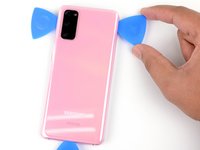
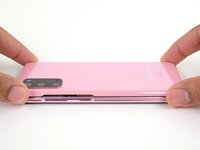
Aplica una ventosa en la parte posterior del teléfono, lo más cerca posible del centro del borde inferior.
-
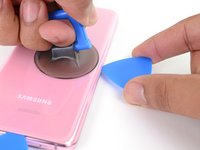
Tira de la ventosa con una fuerza fuerte y constante para crear un espacio entre la cubierta trasera y el marco.
-
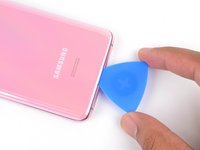
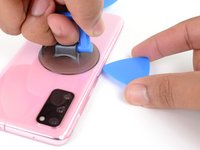
Inserta la punta de una púa de apertura en el hueco.
While pulling on the back glass with the suction cup, I found it helpful to use something like the opener tool to press down on the frame. Made it easy to pull open even with the iOpener.
-
-
-
Aplica un iOpener caliente al borde izquierdo de la tapa trasera durante dos minutos.
-
-
-
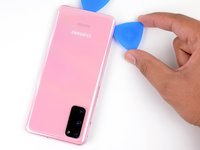
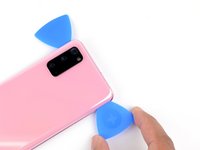
Aplica una ventosa en la parte posterior del teléfono, lo más cerca posible del centro del borde izquierdo.
-
Tira de la ventosa con una fuerza fuerte y constante para crear un espacio entre la cubierta trasera y el marco.
-
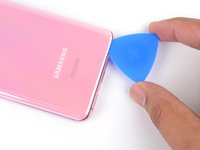
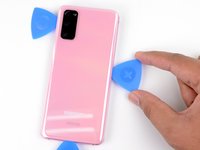
Inserta la punta de una púa de apertura en la grieta.
-
También puedes intentar aplicar unas gotas de alcohol isopropílico de alta concentración (más del 90%) en la costura para ayudar a aflojar el adhesivo.
-
-
-
Aplica un iOpener caliente al borde derecho de la tapa trasera durante dos minutos.
-
-
-
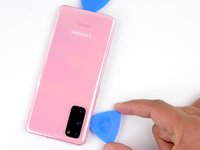
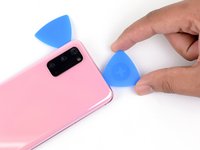
Aplica una ventosa en la parte posterior del teléfono, lo más cerca posible del centro del borde derecho.
-
Tira de la ventosa con una fuerza fuerte y constante para crear un espacio entre la cubierta trasera y el marco.
-
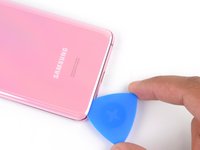
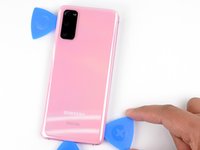
Inserta la punta de una púa de apertura en el espacio.
-
-
-
-
Aplica un iOpener caliente al borde superior de la tapa trasera durante dos minutos.
-
-
-
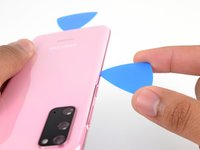
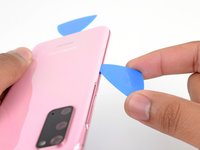
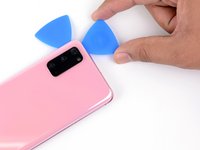
Gradualmente desliza la púa desde el borde derecho del dispositivo alrededor del borde superior derecho.
-
Continúa cortando a lo largo del borde superior hasta la esquina superior izquierda para separar completamente el adhesivo de la tapa trasera
-
-
Herramienta utilizada en este paso:Tweezers$4.99
-
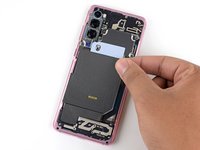
Levanta la tapa trasera despacio. Usa púas de apertura para cortar cualquier adhesivo restante.
-
Remueve la tapa trasera.
-
Este es un buen punto para encender tu teléfono y probar todas las funciones antes de sellarlo. Asegúrate de apagar completamente tu teléfono antes de continuar trabajando.
-
Retira cualquier trozo de adhesivo con un par de pinzas o con los dedos. Aplica calor si tienes problemas para separar el adhesivo.
-
Si usas adhesivos de corte personalizado de Samsung, sigue esta guía.
-
Si estás utilizando cinta adhesiva de doble cara, sigue esta guía.
-
-
-
Usa un destornillador Phillips #00 para remover los cinco tornillos de 4 mm que sujetan el soporte de la placa madre.
-
A lo largo de esta reparación, haz un seguimiento de cada tornillo y asegúrate de que vuelve exactamente a su lugar de origen
-
-
Herramienta utilizada en este paso:Tweezers$4.99
-
Usa un par de pinzas para tirar suavemente hacia arriba y desenganchar el soporte de la placa madre del marco medio de plástico.
-
-
-
Retira suavemente la bobina de carga inalámbrica del dispositivo.
-
Remueve la bobina de carga inalámbrica.
-
-
-
Usa un spudger para levantar y desconectar el conector de la batería.
-
-
-
Usa un destornillador Phillips #00 para quitar los cinco tornillos de 4 mm de largo que aseguran el altavoz y el marco medio inferior.
-
-
Herramienta utilizada en este paso:Tweezers$4.99
-
Inserta la punta de un spudger o un par de pinzas en la muesca de la esquina superior izquierda del marco central y haz palanca para liberar las pinzas que lo mantienen en su lugar.
-
Remueve el altavoz y el marco medio inferior.
-
-
-
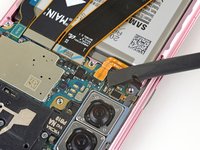
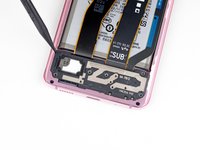
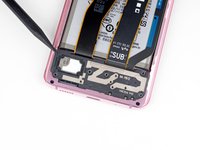
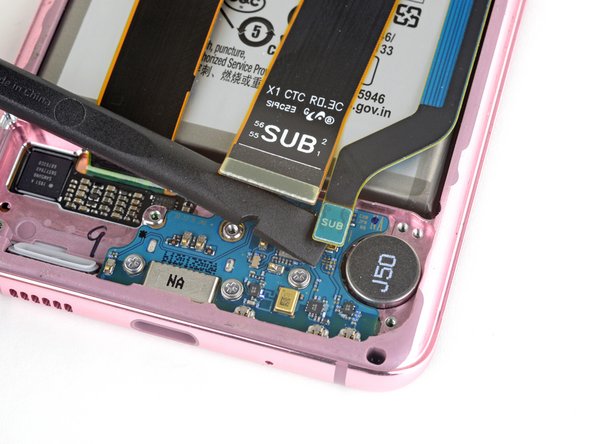
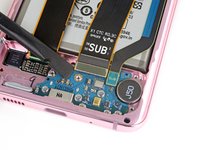
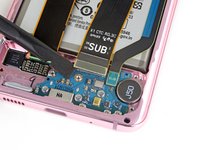
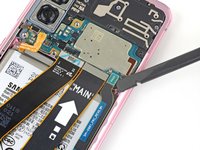
Usa un spudger para levantar y desconectar los cables flexibles principales y auxiliares de la placa hija cerca de la parte inferior del dispositivo.
-
-
-
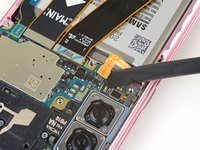
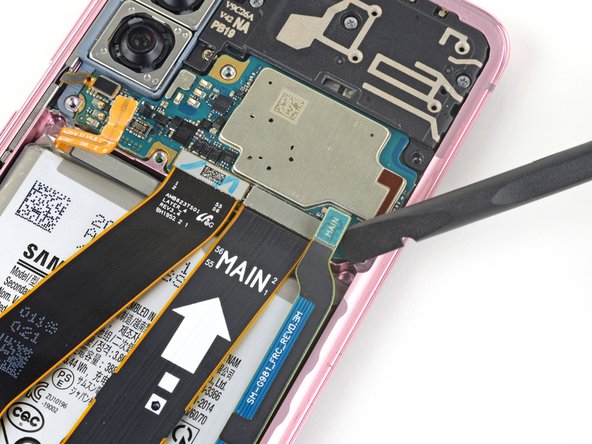
Utiliza un spudger para levantar y desconectar los cables flexibles principales y auxiliares de la placa madre.
-
-
-
Con cuidado despega y remueve los cables flexibles principales y auxiliares.
-
-
-
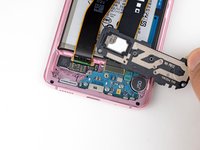
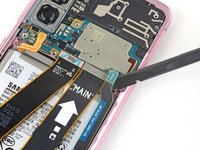
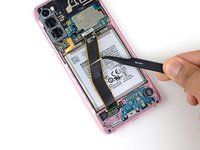
Usa un spudger para levantar y desconectar el cable flexible principal de la placa madre.
-
-
-
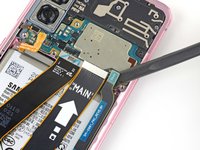
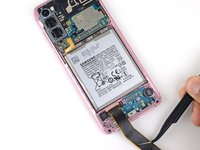
Suavemente despega y dobla el cable flexible de la pantalla fuera del camino de la placa madre y la batería.
-
-
-
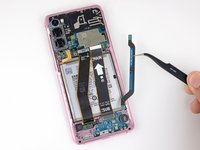
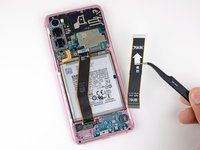
Aplica 1-2 gotas de alcohol isopropílico de alta concentración (más del 90%) en el borde superior de la batería.
-
Espera un minuto para que el alcohol isopropílico ablande el adhesivo.
-
-
-
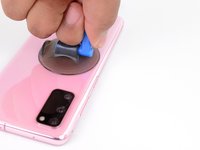
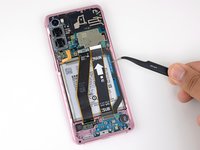
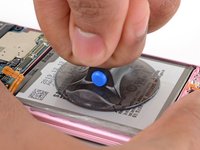
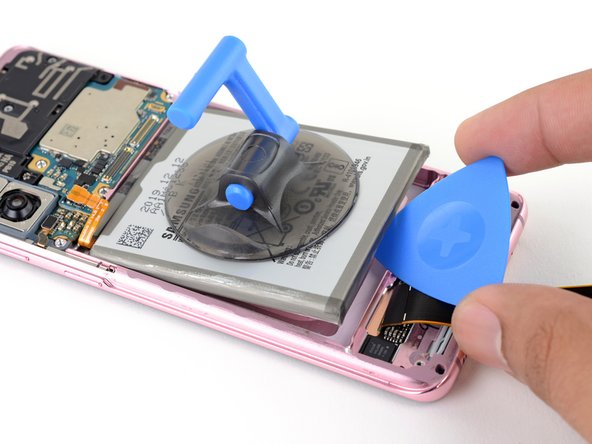
Aplica la ventosa en el centro de la batería.
-
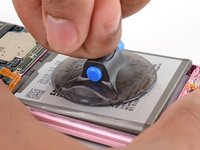
Sujeta la parte superior e inferior del dispositivo contra su superficie de trabajo con una mano y tira firmemente hacia arriba de la ventosa con la otra.
-
El adhesivo necesita tiempo y repetidos tirones en lugar de una fuerza fuerte para aflojarse. Tira de la ventosa con fuerza constante durante 15 segundos seguidos.
-
Si la pila no se afloja, aplica 1-2 gotas de alcohol isopropílico a lo largo de los bordes superior, izquierdo y derecho, espera un minuto y vuelve a tirar.
-
Cuando la batería comienza a levantarse del dispositivo, procede al siguiente paso.
-
-
-
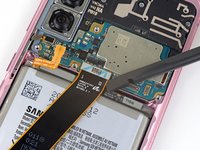
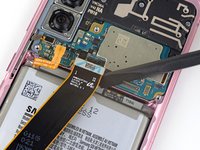
Introduce una púa de apertura por debajo del borde inferior de la pila y gírala para aflojar el adhesivo de la pila.
-
-
-
Extrae la batería.
-
Despega y/o raspa cualquier resto de adhesivo de la batería antes de limpiar la superficie del hueco de la batería con alcohol isopropílico y un paño sin pelusas.
-
Si usaste alcohol isopropílico, espera 10 minutos antes de instalar la nueva batería para dejar que el alcohol se evapore completamente.
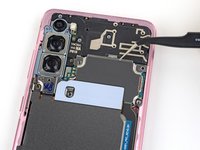
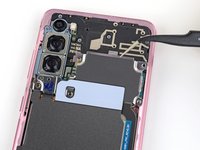
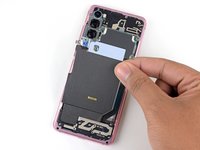
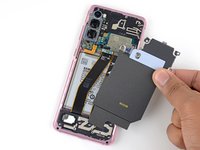
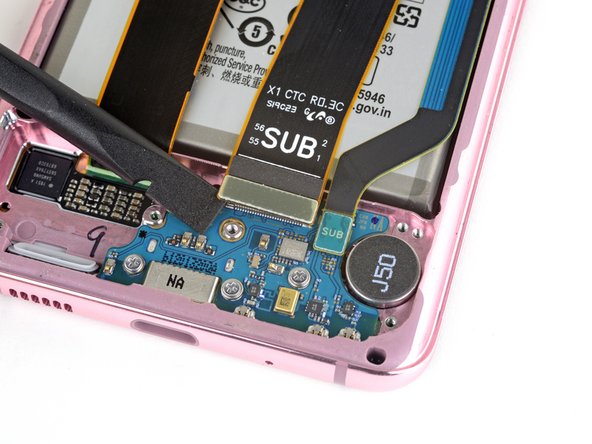
What is the piece behind the battery that looks like its circled called? Is it normal to see this piece when shining a flashlight onto the screen when the phone is off?
That’s the fingerprint sensor! Because it’s embedded in the screen, if you shine a light behind it, you can see it through the front glass.
-


Compara la nueva pieza de repuesto con la original. Es posible que tengas que transferir los componentes restantes o retirar los respaldos adhesivos de la nueva pieza antes de instalarla.
Para volver a montar el dispositivo, sigue los pasos anteriores en orden inverso.
Sigue[enlace|Como realizar un Reseteo del Ciclo de Batería|this guide|new_window=true] para realizar un reinicio del ciclo de la batería, y [enlace|Battery Calibration|calibre tu batería recién instalada|nueva_ventana=true].
Lleva tus desechos electrónicos a un centro de reciclaje certificado.
¿La reparación no salió como planeaste? Echa un vistazo a nuestra comunidad de respuestas para ayuda.
Cancelar: No complete esta guía.
29 personas más completaron esta guía.
Un agradecimiento especial a estos traductores:
100%


Estos traductores nos están ayudando a reparar el mundo! ¿Quieres contribuir?
Empezar a traducir ›

25 comentarios
I had a huge amount of difficulty removing the battery during this repair. The adhesive is really strong, the suction cup doesn't stick to the battery very well and if you lever it out you run the risk of puncturing the battery. It's also really difficult to pull up on the battery while holding the phone down, especially because you want to avoid touching the circuits.
Eventually I succeeded and everything seemed to work but the next day the phone wouldn't switch on. I think maybe the adhesive remover got somewhere it shouldn't have. If I could add something to this guide, it would be "once battery is removed, allow phone to sit for 30 mins to ensure all adhesive remover has evaporated". If I was allowed a do-over I would try to heat the adhesive instead. Or use the string trick. I'm switching to an iphone now because apparently they don't glue their batteries.
Good point! I would suggest to use pure isopropyl alcohol and not something below 99%. The residual water might be not much but still there is a slight chance of it getting somewhere inside. Also the 99% pure alcohol evaporates much faster and leaves no traces. Apple batteries are also glued in with adhesive. What apple does right are the pull-strings to remove the sticky tape between chassis and battery.
Followed every step and managed to complete it but after a couple of minutes the phone screen stopped working and turned black.
I'm pretty sure that happened because the isopropyl alcohol went through the phone into the screen through the gap right under where the battery seats.
If you attempt this at home be aware this might happen, so disconnect the display too or look into using a different method for removing the battery.
I don't think this repair is worth attempting. I also killed my screen with this one, similar to the two commenters above. Whether it was isopropyl alcohol getting into the LCD or whether it was some issue with flimsy connectors I don't know. I was super careful and I've still bricked it, so I'd rate this repair as 'too risky'.
i typically use an iPlastix opening tool, a heating pad and lots of alcohol, get the very tip of the opening tool to sort of bend or roll into a curve, then slip the bent tip into the gap between frame and battery dripping some alcohol onto the tool, eventually you can get the rolled end to slip underneath the battery. then just slide the tool around the perimeter of the battery, cutting the adhesive, eventually, once all the adhesive is cut the battery will easily pry out of the phone. continually apply alcohol to the surface of the tool once you get the curved end under the battery, the alcohol will drip down the tool and find its way under the battery more easily weaking the adhesive.
since the tool is made of plastic, its almost impossible to scratch, bend or puncture the battery during the removal process by using this method, this is also my preferred method for removing bulged batteries that a suction cup wont stick to, or batteries where putting any unnecessary pressure could cause them to burst.
As with other comments, battery swap went fine, but after a bit of use I connected the phone to a charger and screen went black. Strange experience, feels like it's booby trapped.
I used this repair guide to change my battery in my S20. All went well and successfully especially after using this guide. IPA helped massively to remove the battery but I DO NOT RECOMMEND USING IT. i read the comments about the screen going blank etc. i used a heat gun to evaporate the IPA before reassembling the device thinking this would eliminate any issues. I WAS WRONG. DO NOT USE IPA to remove the battery. I turned my phone back on ant it was okay for a few minutes. Then the screen started flickering and turned completely green then went black. The phone still works as i can hear the notification sounds etc but no screen. Again DO NOT USE IPA TO REMOVE BATTERY
When the alcohol gets into the screen, the screen becomes black, it dies. Do not try this guide.
Did this repair to a T, it killed my display about 30 mins later. DONT USE IPA
I even used my heat gun to evaporate all of it off, let the phone sit for an hour too. still killed it!
Hi Bradley,
I'm really sorry to hear of your repair experience. I think the IPA may have seeped through the fingerprint sensor cutout and into the OLED panel.
When the battery adhesive is still intact, it should seal against moderate use of IPA along the top and side edges. I looked over the guide and changed the wording to give clearer guidance and warnings on how much to apply, where to apply it, and when not to use IPA.
Is there any procedure needed to reset the battery stats or charging levels? I replaced without problem but my battery life is not as good as my old battery! Wondering if there is a step on the software side?
Did you figure it out? I have the same issue. Looks like an original battery, but batt life is weak and Samsung Members diagnostics shows battery needs replacement...
Slawek -
The screws are more likely to be #0 JIS rather than #00 Phillips. Certainly my JIS screwdriver fits much better than my Phillips one.
I haven't had a problem with IPA use yet, but the battery adhesive is stupidly strong. Just use a mechanical clip, Samsung. My Blackberry is: slide back off, lift up battery, insert new battery, slide on back cover. Probably five seconds. Things weren't so bad in the 2010s.
The Samsung battery reset app doesn't recognise the QR code on the packaging so far.
As well i killed my screen, i turned up and and worked a few minutes, later I left it charging, and when I came back the screen was completely black, I plug it to my monitor, and the phone is still working but no the screen. Anyway his method did not help me to remove the battery
After all these comments concerning a screen-blackout after using alcohol I didn't dare to use that. Just pulled with the suction handle and pried with different tools from the bottom. That took a lot of time, sweat, fear to break the battery and quite some force. Why do manufacturers glue in the batteries?!
Worked out fine and I'm happy with the new battery.
why does it needs to be below 25%? I understand it being at maximum 60%, but for what I learned Li-ion batteries are unstable at 0% too. Maybe it needs to be better specified?
Toller Guide!
War mein erster Akkutausch.
Statt dem Alkohol hab ich aber den Akku bzw Kleber mit einem Föhn über die Displayseite erwärmt. Hat wunderbar funktioniert.
Klebereste hab ich dann mit 2 Tropfen Desinfektionsgel und nem Wattestäbchen gelöst. Rückbau hat auch ohne Probleme funktioniert.
I completed the swap without affecting the screen. To avoid killing the screen as others have done, I used 2 tiny drops of acetone from a needle behind the battery then applied constant even pressure to the battery over a long period of time. If you do not have a way of getting the solvent accurately only onto the glue, use the constant pull method alone. Be careful about putting tools behind the battery as there is an area behind the battery with a soft membrane.
I completed the swap without obvious issue. However if I unplug the phone from a charger it immediately turns off as if there is no battery at all. I re-opened the phone and disconnected and reconnected all the upper and lower flex cable connectors carefully. This did not resolve the issue. The battery shows 4000 mAh at 100% or 99% charge when connected to USB and powered on. I don't know if there is something I am missing of if I possibly revived a bad replacement battery.
Thanks for this informative instruction manual. What I would like to ask is, where can I find a genuine S20 battery?
Found that using the iOpener did not provide enough heat to weaken the adhesive, went with a hairdryer instead. Make sure to never keep the hairdryer still, and apply heat on high for 30 seconds to 1 minute per side did the job for me. iOpener just did not get hot enough
Phil R - Contestar