Introducción
Utiliza esta guía para quitar y reemplazar las cámaras traseras del iPhone 12. Todos los módulos de la cámara se reemplazan como una sola unidad.
Nota: En iOS 18 y versiones posteriores, puedes calibrar módulos de cámara nuevos y originales con el Repair Assistant de Apple.
Qué necesitas
-
-
Apaga el iPhone antes de empezar a desmontarlo.
-
Retira los dos tornillos pentalobulares P2 de 6,75 mm de longitud situados en el borde inferior del iPhone.
-
-
-
Mide 3 mm desde la punta, y marca dicha distancia sobre la púa de apertura usando un rotulador permanente.
Got to step 2 and realized the fix kit doesn't include an opening pick! Looks like a guitar pick, and I have those lying around. Is that expected? Looks like the pick is used in many steps below. There's a little blue crowbar that isn't mentioned in the instructions. Perhaps that replaces the opening pick?
Hi! I can't see which guide you were using when writing this comment. Can you reply here with which guide and fix kit you used?
I see you posted this in Meta. I hope it's resolved soon! In the meantime, a guitar pick may work well enough for your repair.
what fix kit?
My fix kit didn't include an opening pick either
My AliExpress refurbished screen came with a pick that has a coin-like circle that pops out, so no modification was necessary
It's not an Ifixit KIT if it doesn't include everything. You'll need to order the opening pic separately. Or head to Walmart like myself and look for guitar pics. Hopefully, this will work just as well.
No pick in mine as well. It’s really not clear that you have to order this separately when ordering an IPhone SE 202/2022 screen repair kit. Is this the case?
Frustrated, I ordered a compact package where everything was encapsulated. Useless suction tools could not separate the screen. If it is unable to decouple the screen, then why sucking suction tools you have provided.
For my kit the triangle pick was stuck inside the box with the screen not with the other tools maybe it's also there for you
Y’all are getting far, FAR too detailed with some of this stuff…. Measuring and marking the pick that you won’t actually use to open the device?!? lol that’s kinda funny. Just heat it up, grab a spudger, and the back just pops right off! The iFixit tech need to stick to the KISS method more often, you know KEEP IT SIMPLE STUPID!!! Like l, for reals, I’ve been doing this stuff for YEARS and using iFixit guides regularly and this is just ridiculous at this point!
Will the phone still work if the sensor assembly on the back of the screen is damaged?
-
-
-
Coloca tiras superpuestas de cinta de embalaje transparente sobre la pantalla del iPhone hasta cubrir toda la cara.
-
Si no puedes hacer que la ventosa se adhiera en los próximos pasos, dobla un trozo de cinta resistente (como cinta adhesiva) en un asa y levanta la pantalla con eso.
-
-
Herramienta utilizada en este paso:Clampy - Anti-Clamp$24.95
-
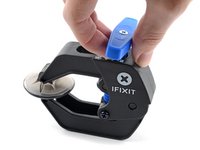
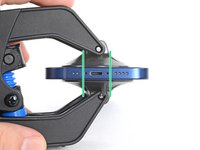
Tira de la manija azul hacia atrás para desbloquear los brazos del Anti-Clamp.
-
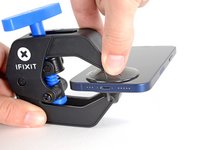
Desliza los brazos sobre el borde izquierdo o derecho del iPhone.
-
Coloca las ventosas justo encima del botón de inicio en la pantalla, una en el frente y otra en la parte posterior.
-
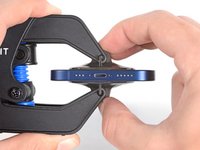
Aprieta las ventosas para aplicar succión en la zona deseada.
-
-
-
Tira de la manija azul hacia delante para bloquear los brazos.
-
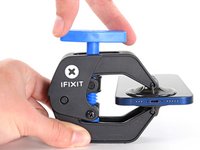
Gira el mango en el sentido de las agujas del reloj hasta que veas que las copas comienzan a estirarse.
-
Asegúrate de que las ventosas permanezcan alineadas entre sí. Si comienzan a salirse de la alineación, afloje ligeramente las ventosas y vuelve a alinear los brazos.
-
-
-
Apoya tu iPhone sobre algo resistente, como un libro de tapa dura, para que descanse con las manos libres y paralelo al suelo; así te resultará más fácil trabajar con él en los pasos siguientes.
-
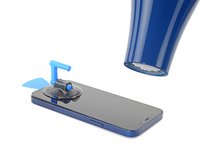
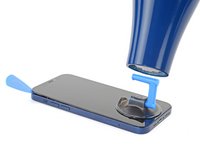
Usa un secador de pelo para calentar a lo largo del borde inferior del iPhone. La pantalla debe sentirse un poco demasiado caliente al tacto.
-
Espera un minuto para que el adhesivo tenga la oportunidad de soltarse y presentar un espacio de apertura.
-
Inserta una púa de apertura debajo del bisel de plástico de la pantalla cuando el Anti-Clamp cree un espacio lo suficientemente grande.
-
Omite los siguientes tres pasos.
-
-
-
Nunca dejes tu secador de pelo en un solo lugar durante un período prolongado de tiempo.
Also: 3D Printer's heated bed set to 70-80 degrees Celcius for a few minutes does the job, as it basically works the same way heating mats used in professional repair shops do.
-
-
-
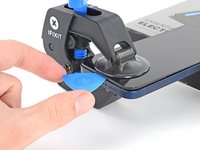
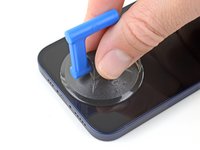
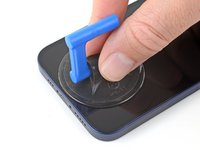
Si utilizas una sola ventosa, aplícala en el borde inferior del teléfono, evitando el borde mismo del cristal.
-
-
-
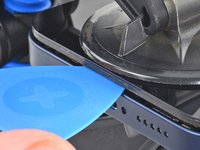
Tira hacia arriba de la ventosa con una presión firme y constante para crear una ligera separación entre la pantalla y el marco.
-
Inserta una púa de apertura en el hueco bajo el bisel de plástico de la pantalla.
This seems impossible. I've been trying for an hour with heat and rocking, and the screen doesn't budge. :(
Don’t give up! Use more heat and a tad more force. I know you may fear breaking it more, but as long as you don’t stick the prying tool too far or tug too hard, you can do it! I have faith that you can do it!
I'm in the same boat, this isn't coming off. I've tried the hair dryer as well as the heating pad from ifixit. Any other ideas?
The suction cup comes off before the screen will
Is there a better tool for this? Just saw a video on YouTube where a kid pryed it open with no heating/etc. in 5 seconds.
I've changed the batteries in probably a half dozen iphones of different models. But 25 minutes of heating and pulling had no effect on iPhone 12
Welp. I finally ended up breaking the screen attempting this. DO NOT ATTEMPT THIS REPAIR! Not worth the broken screen and losing the cost of shipping both ways when you return the battery.
thx, I ll go to an apple repair center
Back (and bad...) experience ! Even if you heat a lot, the screen is hardly sticked. Take care, before sliding the mediator under the screen, this one should be moved up, at least 2 mm. On my side i have slided around 1 mm and .... inserted the mediator between the glass screen and the screen structure ring.... result : glass break and screen to change (my initial exercise was the battery removal !). I feel that next time i will visit a repair center...
Pro tip for anyone having trouble with this. You have to use multiple rounds of heat and pulling. Use a hair dryer and not the iOpener that comes with the fix kit and get it just too hot to touch then quickly start pulling and wiggling it up and down. Once it cools down grab the hair dryer again and repeat it a couple times until you start to get a big enough gap.
I just did this yesterday and it took around 5 rounds of heating and pulling to get it to seperate enough from the body.It's important to insert the pick under the bezel. I just delaminated my screen. The screen was probably fine, but it was glitching, so I wanted to check for a bad connection. Anyway, now I get a new screen.
Under the bezel, eh.
After reading this almost a year later to the day I last commented on it, I now know that the best way I have found to remove a screen, from pretty much any phone, not just this one, is heat (I use a heating pad on 80 degrees celsius) and before putting the phone on the heating pad, I use 91% isopropyl alcohol around the edges that you will be sliding your pry tools in, and I leave it on for 10 min. I then take it off, add more alcohol, and then put it back on the pad for another 5 min. Also, while I am sliding my tools around the screen, I continuously add more alcohol, and if it takes a really long time, then more heat as well. Heat, alcohol, and patience, lots of patience, and you should be good. Hope this helps, good luck!
Can confirm, this does indeed work. Just keep warming it up, lifting up and down, and repeat when phone goes cold. After around 10 rounds it would move enough to where I could see inside the phone when lifted. You can then insert pick
Tip: You can also try to apply heat and lift the other corner, just enough to make it move slightly. This will ease pressure needed to separate the glue on the other side as-well.
No worries guys! it’s completely doable! You just need to be patient and keep trying multiple times
I don't doubt that you folks eventually got this open, but how on earth do you not lose your mind with the suction cup popping off every 5 seconds? Agree with Ryan above, have replaced batteries on several other iPhone generations with nowhere near this much effort. Still working on it going on 1 hr, about 10 rounds of hair dryer heat. Did Apple use a stronger adhesive for the 12?
Success. iOpener doesn't get the phone nearly hot enough. Multiple rounds of hair dryer + isopropyl alcohol dribbled in b/w case and screen while pulling up on suction cup. For me, the bottom left hand corner (volume rocker side) seemed to lift up first, so I moved the suction cup to that corner while doing the heat + alcohol.
When I changed the battery on a 7+ instead of the suction cup/heat method I used an Cacto blade inserted horizontally along the bottom edge to break the seal. Would this work on the 12?
I struggled with this step, but eventually got it. Use LOTS of isopropyl alcohol, and soak the entire perimeter. Let it sit for 30 seconds after application, then heat it up, then pull with the clamp and rock back and forth. Reapply the alcohol and repeat until it works. Took me about 30 mins, but I eventually got it up just enough for the first pick. The iOpener is completely useless, I just used a shrink wrap gun and made sure to hold it 8-12 inches from the phone on the lowest heat setting.
iOpener along the bottom edge, the Anti-Clamp, and three tries about 5 minutes each worked for me. Never popped off, just needed lots of patience and 1.5 screw turns on the clamp. Bottom left corner was first, like another commenter.
-
-
-
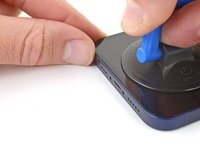
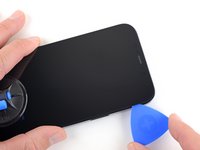
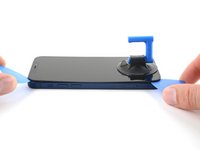
Usa un secador de pelo para calentar el borde derecho del iPhone (el borde con el botón de encendido) durante 90 segundos o hasta que la pantalla esté demasiado caliente para tocarla.
-
-
-
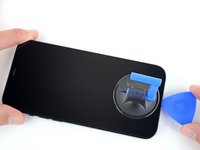
Desliza la púa de apertura alrededor de la esquina inferior derecha del iPhone para separar su adhesivo.
-
Continúa deslizando hacia arriba el borde derecho del iPhone hasta llegar a la esquina superior derecha.
-
Deja la púa en la esquina superior derecha antes de continuar.
There is a spot on this side where a slight ridge in the iPhone frame makes the pick stick. Eventually I used two, one twisting a bit to open a path for the other. But if you're not expecting it you feel like you're going to break something.
-
-
-
-
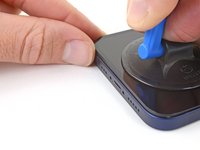
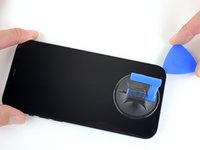
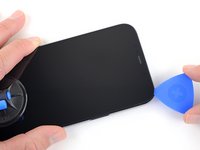
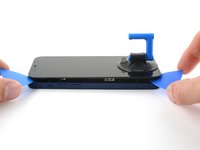
Usa un secador de pelo para calentar el borde izquierdo del iPhone durante 90 segundos o hasta que la pantalla esté un poco demasiado caliente para tocarla.
-
-
-
Deja la púa en la esquina superior izquierda antes de continuar.
-
-
-
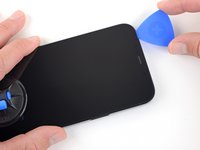
Usa un secador de pelo para calentar el borde izquierdo del iPhone durante 90 segundos o hasta que la pantalla esté un poco demasiado caliente para tocarla.
Also: 3D Printer's heated bed set to 70-80 degrees Celcius does the job - it basically works the same way professional heated mats that are used in phone repair shops.
-
-
I kinda forgot about this step when I opened my first iPhone 12.
For the next one, I'm going to mark that edge of the phone with blue tape roughly where each cable is to help me remember.Also FWIW, I got the 70 cent adhesive cutting tool from Apple with my genuine battery and used that for all my display prying needs after getting the first opening propped with a guitar pick.
It worked great and did not damage anything so no need to sweat inserting something too far and causing damage.
Could you PLEASE move this to step 13?? I tore the front sensor cable. 😭
-
-
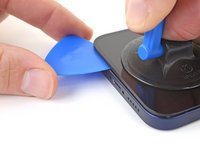
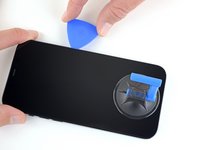
Inserta una segunda púa de apertura en la esquina inferior izquierda del iPhone.
-
Gira ambas púas simultáneamente hasta que se suelten los clips del borde izquierdo.
-
-
-
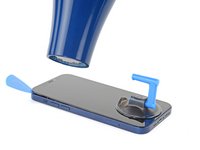
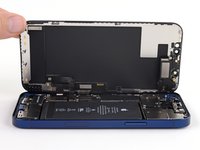
Gira el iPhone de modo que el borde derecho quede mirando hacia ti.
-
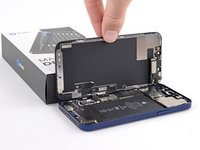
Abre el iPhone girando la pantalla hacia arriba desde el lado derecho, como la tapa de un libro.
-
Apoya la pantalla contra algo para mantenerla apoyada mientras trabajas en el teléfono.
i did this and the shroud with the earpiece speaker still stuck with the phone so its just wedged in there i cant get it out
-
-
-
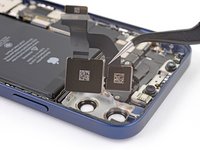
Retira los dos tornillos Y000 de 1.1 mm de longitud que sujetan la batería y la tapa del conector de la pantalla.
Ouch, I see a broken flat here…
Can I use a y 0.6 if I don’t have y000
Yep! The measurements for Y000 are 0.6 mm.
-
-
-
Remueve la tapa.
Hi
On my original display on an iPhone 12, there is no metal hinge as shown here and therefore no place for it when closing the phone. Have double-checked model and the original display - and it is just not there. Is there another model based on serial number?
Hinge marked: https://www.dropbox.com/scl/fi/asztgi60g...
Best regards,
Carsten
-
-
-
Utiliza un spudger o una uña limpia para levantar el conector de la batería de su zócalo en la placa lógica.
-
Dobla el conector ligeramente para alejarlo de la placa lógica y evitar que entre en contacto accidentalmente con el zócalo y proporcione energía al teléfono durante la reparación.
-
-
-
Utiliza un spudger o una uña para desconectar el conector del cable de la pantalla.
-
-
-
Utiliza un spudger o una uña para desconectar el conector del cable del digitalizador.
-
-
-
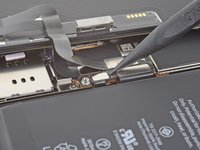
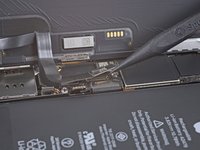
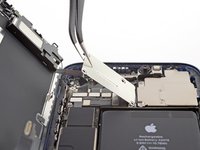
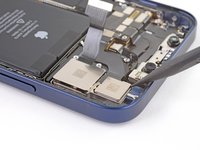
Usa un destornillador Y000 para quitar los cuatro tornillos que sujetan la tapa del conector del sensor frontal.
-
Tres tornillos de 1.1 mm de largo
-
Un tornillo de 1.4 mm de largo
-
-
-
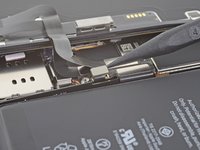
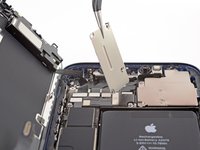
Gira la tapa hacia arriba desde la izquierda hasta que el pequeño clip de la derecha se desenganche.
-
Remueve la tapa.
-
-
-
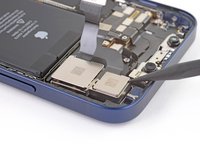
Utiliza un spudger o una uña para desconectar el conector del cable del conjunto del sensor frontal.
-
-
-
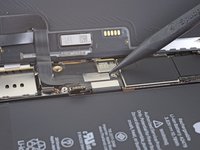
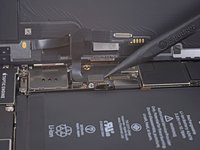
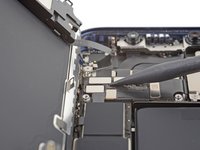
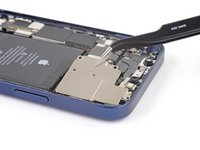
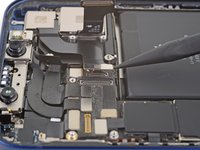
Retira los cinco tornillos que fijan el sensor de la cámara trasera.
-
Un tornillo PH00 de 1.7 mm de longitud
-
Cuatro tornillos Y000 de 1.6 mm
-
-
-
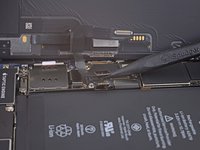
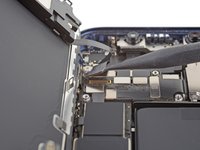
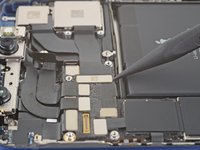
Levanta la tapa de la cámara por el borde más cercano a la placa lógica y retírala.
-
-
-
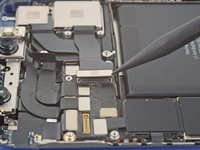
Utiliza un spudger o una uña para desconectar el primer conector del cable de la cámara haciendo palanca para sacarlo de su zócalo.
-
-
-
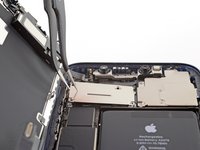
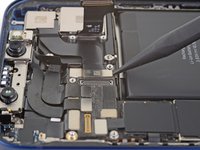
Usa la punta de un spudger para levantar el ensamblaje de la cámara del iPhone.
-
Remueve las cámaras traseras.
-


para tu nueva pieza de repuesto con la original: es posible que tengas que transferir los componentes restantes o retirar los adhesivos de la nueva pieza antes de instalarla.
Para volver a montar el dispositivo, sigue los pasos anteriores en orden inverso.
Después de la reparación, dependiendo de la pieza de repuesto, es posible que puedas calibrarla usando el Asistente de reparación de Apple, disponible a partir de iOS 18. Actualiza tu dispositivo, ve a Configuración → General → Acerca de → Historial de piezas y servicios, toca Reiniciar y finalizar reparación y sigue las instrucciones en pantalla.
Lleva tus residuos electrónicos a un centro de reciclaje certificado.
¿La reparación no ha ido como estaba previsto? Intenta solucionar algunos solución básica de problemas, o pide ayuda a nuestra comunidad de respuestas de iPhone 12.
Cancelar: No complete esta guía.
24 personas más completaron esta guía.
Un agradecimiento especial a estos traductores:
100%


Estos traductores nos están ayudando a reparar el mundo! ¿Quieres contribuir?
Empezar a traducir ›

3 comentarios
I heard that after replacing the camera, this phone won't function well. For example, the power button won't work. Still true to date?
Not true at all
yac -
This youtube video stole your content and you should have them take it down: https://www.youtube.com/watch?v=BEltuGWA...
Do you sell the waterproof seals separately or are they included in the kit?
Heather Furnas - Contestar
Do you sell the waterproof seals separately or are they included in the kit? (I would like to know this as well.)
CaliforniaGunner - Contestar
I just got my Fix Kit and it includes the seals. Not sure if a "part only" version would, though.
Neal Sofge - Contestar