Saltar al contenido principal
Lenovo Legion Y530-15ICH Motherboard Replacement

Lenovo Legion Y530-15ICH Motherboard Replacement

Kaylie Klausing

Kaylie Klausing y 5 otros contribuidores

Última actualización: March 18, 2024

25 minuto
Moderado

Introducción

Ir al paso 1

The motherboard acts as the central hub of communication between all of the components in your device. If random applications are quitting or if you’re seeing the “blue screen of death” (BSoD), it may be time to replace the motherboard in your computer. This guide will go through the steps on how to replace the motherboard of the Lenovo Legion Y530-15ICH.

  1. Lenovo Legion Y530-15ICH Motherboard Replacement, Back Cover: paso 1, imagen 1 de 1
    • Ensure the device is powered off.

    • Use a PZ00 screwdriver bit to remove the eleven screws securing the back cover.

    • Five 7mm screws

    • Two 6mm screws

    • Four 4mm screws

  2. Lenovo Legion Y530-15ICH Motherboard Replacement: paso 2, imagen 1 de 2 Lenovo Legion Y530-15ICH Motherboard Replacement: paso 2, imagen 2 de 2
    • Carefully pry the back cover off the computer using an opening pick.

    • Start at the corner of the laptop and work your way around the side. Gently pull up on the cover until it detaches.

  3. Lenovo Legion Y530-15ICH Motherboard Replacement, Battery: paso 3, imagen 1 de 1
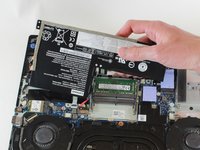
    • Use a Phillips screwdriver to remove the five 4 mm screws holding the battery in place.

  4. Lenovo Legion Y530-15ICH Motherboard Replacement: paso 4, imagen 1 de 2 Lenovo Legion Y530-15ICH Motherboard Replacement: paso 4, imagen 2 de 2
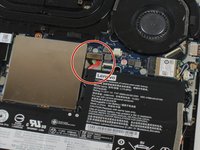
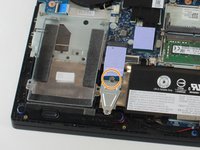
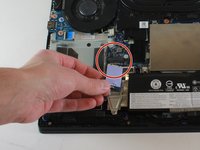
    • Disconnect the battery cable from its motherboard socket by gently pulling it towards the battery.

    • Pull parallel to the battery, not straight up.

    • Now you can safely remove the battery.

    Hello IFixit people!

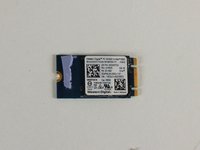
    I ran into an issue after cleaning out the fans and installing an m.2 SSD in my friend's . After the installation I replaced the back cover and tried to boot the machine. When I plugged in the charger cable the charging indicator light wouldn't boot. I went through all the troubleshooting info on Lenovo and Ifixit and even tested the power supply with no definitive fault. Now i've found a Hotspot on the mobo when the laptop is powered off. Just above the battery to the right of the battery plug are a cluster of capacitors or transistors or something that sit at about 130°C when the laptop is powered off. Any ideas for troubleshooting or advice for a fix would be appreciated!

    The board component in question is labeled 1R5910CTS

    cheesehead 1010 - Contestar

  5. Lenovo Legion Y530-15ICH Motherboard Replacement, Fan: paso 5, imagen 1 de 2 Lenovo Legion Y530-15ICH Motherboard Replacement, Fan: paso 5, imagen 2 de 2
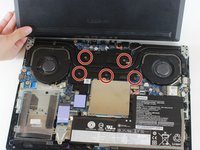
    • Use a JIS #1 screwdriver to loosen the five spring screws located at the middle of the fan piece.

    • Remove the plastic covering after the screws have been loosened.

    • Spring screws will stay attached to the cover.

    There were 6 holding the heat sink on when I did it.

    Bryce Christensen - Contestar

  6. Lenovo Legion Y530-15ICH Motherboard Replacement: paso 6, imagen 1 de 1
    • Use a JIS #1 screwdriver to remove four 4mm screws securing the fans to the device.

  7. Lenovo Legion Y530-15ICH Motherboard Replacement: paso 7, imagen 1 de 1
    • Unplug the wires connecting the two fans to the motherboard.

    • When doing this, tug carefully from side to side.

  8. Lenovo Legion Y530-15ICH Motherboard Replacement: paso 8, imagen 1 de 2 Lenovo Legion Y530-15ICH Motherboard Replacement: paso 8, imagen 2 de 2
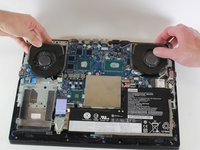
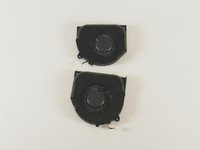
    • Lift the fans out of their positions and remove them from the device.

    Don't forget to pick up thermal paste so you get a good contact between the CPU and GPU and the heat sinks!

    Bryce Christensen - Contestar

  9. Lenovo Legion Y530-15ICH Motherboard Replacement, Solid State Drive: paso 9, imagen 1 de 2 Lenovo Legion Y530-15ICH Motherboard Replacement, Solid State Drive: paso 9, imagen 2 de 2
    • Do not remove the thermal pad.

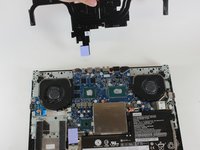
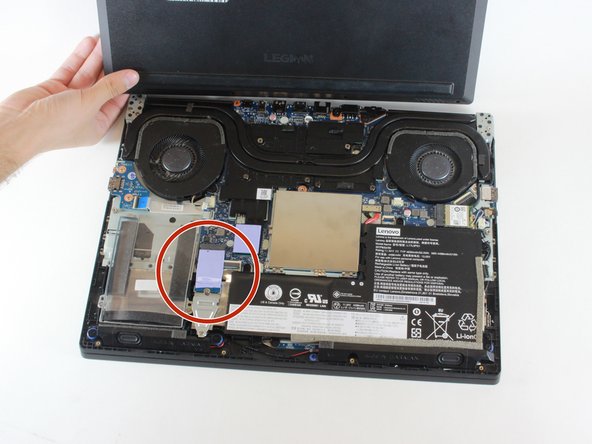
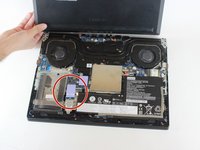
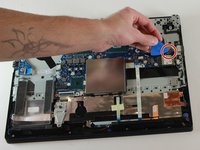
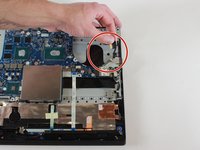
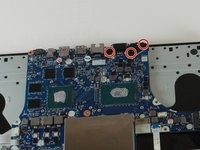
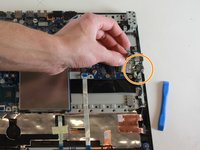
    • Remove one 4mm screw circled in orange in the second picture with a JIS #1 screwdriver.

  10. Lenovo Legion Y530-15ICH Motherboard Replacement: paso 10, imagen 1 de 2 Lenovo Legion Y530-15ICH Motherboard Replacement: paso 10, imagen 2 de 2
    • Carefully remove the SSD from its connector.

  11. Lenovo Legion Y530-15ICH Motherboard Replacement, Motherboard: paso 11, imagen 1 de 2 Lenovo Legion Y530-15ICH Motherboard Replacement, Motherboard: paso 11, imagen 2 de 2
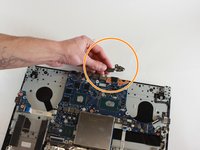
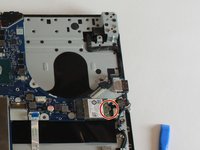
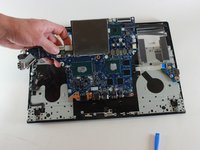
    • Start by disconnecting the ribbon cable that is near the audio driver. It is recommended to use the iFixit Opening Pick to remove the ribbon cable.

  12. Lenovo Legion Y530-15ICH Motherboard Replacement: paso 12, imagen 1 de 2 Lenovo Legion Y530-15ICH Motherboard Replacement: paso 12, imagen 2 de 2
    • Remove three 4mm screws using a JIS #1 screwdriver.

    • Remove the black cover the screws were holding down.

  13. Lenovo Legion Y530-15ICH Motherboard Replacement: paso 13, imagen 1 de 2 Lenovo Legion Y530-15ICH Motherboard Replacement: paso 13, imagen 2 de 2
    • Remove the 4mm screw on top of the audio driver using a JIS #1 screwdriver.

    • Pull the audio cables gently off the audio driver.

    • Remove the audio driver from the motherboard.

  14. Lenovo Legion Y530-15ICH Motherboard Replacement: paso 14, imagen 1 de 1
    • Remove twelve 4mm screws circled in red using a JIS #1 screwdriver.

    • Peel off the Lenovo sticker and remove one 4mm screw with a JIS #1 screwdriver.

  15. Lenovo Legion Y530-15ICH Motherboard Replacement: paso 15, imagen 1 de 1
    • Remove two ribbon cables in the circled areas. Gently pull them out of their ports.

  16. Lenovo Legion Y530-15ICH Motherboard Replacement: paso 16, imagen 1 de 1
    • Remove the final ribbon cable by gently pulling it from its socket.

    • The motherboard is now completely disconnected from the laptop.

  17. Lenovo Legion Y530-15ICH Motherboard Replacement: paso 17, imagen 1 de 2 Lenovo Legion Y530-15ICH Motherboard Replacement: paso 17, imagen 2 de 2
    • Gently lift the motherboard out of the housing.

    Where can I get a new motherboard?

    ساره سعيد - Contestar

Conclusión

To reassemble your device, follow these instructions in reverse order.

4 personas más completaron esta guía.

Equipo

Cal Poly, Team S7-G1, Regan Winter 2020 Miembro de Cal Poly, Team S7-G1, Regan Winter 2020

CPSU-REGAN-W20S7G1

Miembros de 4

12 Guías creadas

3 comentarios

Kaylie Klausing

I hope you burn in !&&*

Safwat Ali - Contestar

You fckking piece of $@$*.

DON'T FOLLOW THIS.

FCKKKK YOUUUUU

Safwat Ali - Contestar

What the hell is wrong with this guy?

Safwat Ali is a real jerk - Contestar

Agregar Comentario

Ver Estadísticas:

Ultimas 24 horas: 3

Ultimos 7 días: 23

Ultimos 30 días: 99

Todo El Tiempo: 9,190