Introducción
Los tornillos pelados son una pesadilla para cualquier aficionado a la reparación. Por mucho que lo intentes, algunos tornillos no quieren salir. La frustración se apodera de ti y, antes de que te des cuenta, esa forma que antes era un «+» se ha convertido en una «O». No te preocupes, te ayudaremos. Esta guía te explicará cómo usar una herramienta rotativa para quitar un tornillo pelado cortando una pequeña hendidura en la cabeza del tornillo, lo que te permitirá quitar el tornillo con un destornillador de cabeza plana.
Técnicas:
Siempre usa gafas de seguridad cuando use una herramienta rotativa para evitar lesiones por escombros o chispas.
Qué necesitas
Resumen del Video
-
-
Tu tornillo está barrido y tu destornillador ya no es suficiente. Antes de usar las herramientas pesadas, intenta lo siguiente:
-
Utiliza destornilladores diferentes. Primero intenta tamaños de cabeza ligeramente más pequeños o más grandes, luego un destornillador de cabeza plana, para ver si puedes conseguir que atrape en alguna parte del tornillo barrido.
-
Si alguna de estas técnicas son fructíferas, ¡felicidades! Tu tornillo es libre.
-
-
-
Estira una banda de goma sobre el tornillo barrido.
-
Inserta un destornillador de tamaño adecuado, y darle un giro.
-
-
Herramienta utilizada en este paso:Screw Extracting Pliers$19.99
-
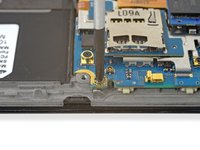
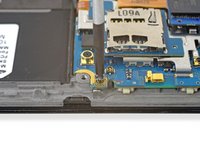
Si la cabeza del tornillo está accesible, prueba con un par de alicates de extracción de tornillo. Si puedes obtener un buen agarre, gira, ¡y el tornillo debería girar también!
-
Una vez que el tornillo se afloja un poco, probablemente puedas terminar de quitar el tornillo con un destornillador.
-
-
-
-
¿Todavía atorado? Trata de añadir un poco de pegamento instantáneo a la parte superior del tornillo.
-
Fija tu destornillador en la cabeza del tornillo, y permite que el pegamento se seque.
-
Utilizando un agarre firme y presión hacia abajo, gira el destornillador para quitar el tornillo.
-
-
-
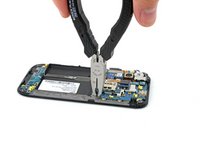
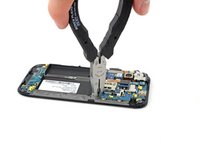
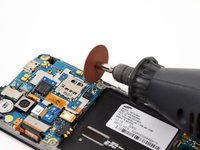
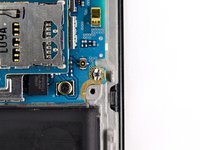
Conecta un disco de corte delgado a tu herramienta giratoria. Antes de cortar cualquier cosa, asegúrate de que el disco esté bien asegurado.
-


Echa un vistazo al video en la introducción para obtener algunos consejos adicionales sobre cómo lidiar con un tornillo barrido. Usa siempre un destornillador de buena calidad. Los destornilladores de baja calidad dañarán los tornillos.
Echa un vistazo al video en la introducción para obtener algunos consejos adicionales sobre cómo lidiar con un tornillo barrido. Usa siempre un destornillador de buena calidad. Los destornilladores de baja calidad dañarán los tornillos.
Cancelar: No complete esta guía.
263 personas más completaron esta guía.
Un agradecimiento especial a estos traductores:
100%


Estos traductores nos están ayudando a reparar el mundo! ¿Quieres contribuir?
Empezar a traducir ›

66 comentarios
I usually use the soldering iron, resting on the screw head dilation of the materials or any glue on the thread, but if the damage the screw head is large only with the idea of same rotary tool.
The soldering iron trick works great on screws that have Loctite! I have a red dot sight for my target pistol. I needed to remove a tiny hex head set screw. I almost broke the allen wrench and it still wouldn't budge. I applied heat to the allen wrench near the head of the screw and let it sit for half minute or so. The heat broke the loctite and the screw came right out! Thanks for reminding me and for posting this for everyone's knowledge.
"To reassemble your device, follow these instructions in reverse order."
Yeah, that makes perfect sense... If you put the saw in reverse it glues all the buts of iron back onto the screw :-)
But other than that, this could be useful in some situations. Be careful,of the iron filings on your electronics!
Haha, good catch! We've fixed the conclusion. Apologies to all who tried so very hard to follow these instructions in reverse.
There's always the ultimate tool if it won't go out, the drill.
Of course you'll have to make new threads if you drill out a screw. However, as a "weapon of last resort", the drill always works.