Saltar al contenido principal
Honeywell HY-204 Fan Motor Replacement

Honeywell HY-204 Fan Motor Replacement

Armando Jacob Espinoza

Armando Jacob Espinoza y 2 otros contribuidores

Última actualización: December 19, 2014

15 - 20 minutos
Moderado

Introducción

Ir al paso 1

This guide will walk you through the removal of your fan motor. It should be fairly easy, although you will need to crimp the wires to remove the motor.

Qué necesitas

Herramientas

Ver más…

  1. Honeywell HY-204 Fan Motor Replacement, Case: paso 1, imagen 1 de 2 Honeywell HY-204 Fan Motor Replacement, Case: paso 1, imagen 2 de 2
    • Before you begin, be sure to unplug the fan.

    • Remove the four 14 mm screws from the back of the device using the Phillips #0 Screwdriver.

  2. Honeywell HY-204 Fan Motor Replacement: paso 2, imagen 1 de 2 Honeywell HY-204 Fan Motor Replacement: paso 2, imagen 2 de 2
    • Pull the front and back parts of the case away from each other until the back is free from the front. This may require a large amount of force.

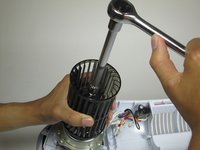
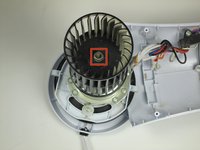
  3. Honeywell HY-204 Fan Motor Replacement, Fan Blades: paso 3, imagen 1 de 2 Honeywell HY-204 Fan Motor Replacement, Fan Blades: paso 3, imagen 2 de 2
    • Remove the hex nut from the fan motor with a 10mm hexagonal ratcheting socket wrench.

    • The nut uses a left-handed thread.

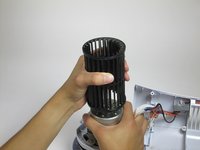
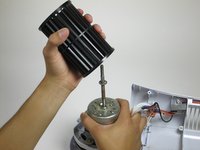
  4. Honeywell HY-204 Fan Motor Replacement: paso 4, imagen 1 de 2 Honeywell HY-204 Fan Motor Replacement: paso 4, imagen 2 de 2
    • Grasp the fan blade firmly and pull upward to remove it from the center column of the fan.

    • The slots on the fan blades and center column need to be aligned for reassembly.

  5. Honeywell HY-204 Fan Motor Replacement, Fan Motor: paso 5, imagen 1 de 2 Honeywell HY-204 Fan Motor Replacement, Fan Motor: paso 5, imagen 2 de 2
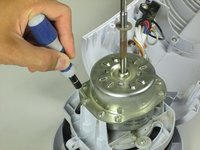
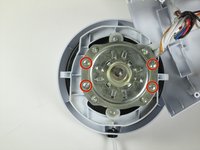
    • Remove the four 12.7mm screws using the Phillips #0 Screwdriver.

    • Once the screws are removed, lift the motor off its base.

  6. Honeywell HY-204 Fan Motor Replacement: paso 6, imagen 1 de 2 Honeywell HY-204 Fan Motor Replacement: paso 6, imagen 2 de 2
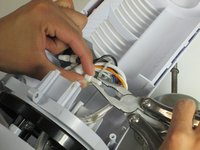
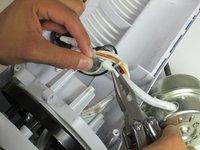
    • Remove the wire connectors from the black, brown, red, blue, white, grey, and green wires. To do this, grip each wire with your hand and use the pliers to de-crimp the heads of each wire connector by applying pressure to the wider ends of the connector until it falls free.

    • While reassembling, apply pressure to the more narrow ends of the wire connectors to re-crimp them onto the wires.

Conclusión

To reassemble your device, follow these instructions in reverse order.

2 personas más completaron esta guía.

Equipo

Cal Poly, Team 10-40, Amido Fall 2014 Miembro de Cal Poly, Team 10-40, Amido Fall 2014

CPSU-AMIDO-F14S10G40

Miembros de 3

7 Guías creadas

2 comentarios

Where do you purchase the replacement fan motors from?

mattb - Contestar

Do you know where I can find the fan motor replacement?

Dave Smith - Contestar

Agregar Comentario

Ver Estadísticas:

Ultimas 24 horas: 0

Ultimos 7 días: 1

Ultimos 30 días: 20

Todo El Tiempo: 6,647