Saltar al contenido principal
HTC One M9 Motherboard Replacement

HTC One M9 Motherboard Replacement

Rodolfo Meave

Rodolfo Meave y 19 otros contribuidores

Última actualización: May 7, 2024

30 minuto
Difícil
Necesita más imágenes

Introducción

Ir al paso 1

Is your HTC One M9 device not booting up or is it experiencing random lock ups and freezing issues? This indicates that the motherboard is damaged and needs to be repaired. A motherboard is basically the foundation of any electronic device and plays a significant role connecting every component in the device. While repairing the motherboard is possible, this guide emphasizes on replacement when the damage is too severe and is beyond repair.

A motherboard is susceptible to damages due to overheating, electrical damage, contact with fluids or heavy impacts. A malfunctioning motherboard is more likely to exhibit these symptoms:

  • Burning smell
  • Unresponsive device or freezing issues
  • Components of devices are not working properly

Before using this guide, be sure to verify the working condition of the battery and the screen of your phone. Dead battery or screen can result in booting issues. Use this link to troubleshoot your phone if it doesn't turn on: HTC One M9 Troubleshooting

Step 8 requires you to apply heat using iOpener to loosen the adhesives. Refer to the Instrucciones de iOpener during this step.

Before beginning, make sure to power off your phone completely and disconnect from any external power source.

Qué necesitas

Partes

Herramientas

Ver más…

  1. HTC One M9 Motherboard Replacement, MicroSD Card: paso 1, imagen 1 de 3 HTC One M9 Motherboard Replacement, MicroSD Card: paso 1, imagen 2 de 3 HTC One M9 Motherboard Replacement, MicroSD Card: paso 1, imagen 3 de 3
    • The microSD card tray is located on the upper right hand side of the phone, above the volume buttons. To open the tray, insert a microSD card eject tool, or a paperclip, into the small hole in the microSD card tray.

    • Then press the tool or paperclip to eject the microSD card tray.

    • This may require a significant amount of force.

    • When reinserting the microSD card, ensure that it is in the correct orientation to the tray. The electrical connectors should be inserted first, with the microSD card face up.

    • It is normal for the microSD to sit imperfectly in the tray. The microSD card is easy to reposition within the tray.

  2. HTC One M9 Motherboard Replacement, SIM Card: paso 2, imagen 1 de 3 HTC One M9 Motherboard Replacement, SIM Card: paso 2, imagen 2 de 3 HTC One M9 Motherboard Replacement, SIM Card: paso 2, imagen 3 de 3
    • Insert a SIM card eject tool or a paperclip into the small hole besides the SIM card tray, located on the upper section of the left edge of the phone.

    • Press to eject the tray.

    • This may require a significant amount of force.

    • When reinserting the SIM card, ensure that its contacts are facing to the rear side. The tapered corner of the SIM card has to point to the outer bottom corner of the tray.

  3. HTC One M9 Motherboard Replacement, Rear Case: paso 3, imagen 1 de 3 HTC One M9 Motherboard Replacement, Rear Case: paso 3, imagen 2 de 3 HTC One M9 Motherboard Replacement, Rear Case: paso 3, imagen 3 de 3
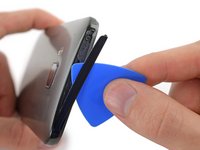
    • Using a plastic opening pick or a spudger, gently pry and remove the cover on top of the case.

    • Remove the two 4 mm T5 Torx screws on the top of the case.

  4. HTC One M9 Motherboard Replacement: paso 4, imagen 1 de 3 HTC One M9 Motherboard Replacement: paso 4, imagen 2 de 3 HTC One M9 Motherboard Replacement: paso 4, imagen 3 de 3
    • Work a plastic opening pick around the perimeter of the device to separate the rear case from the display assembly.

    • The SIM card tray and Micro SD card tray must be removed before the back cover can be removed.

    • Be careful around the power and volume buttons, as they are fairly delicate.

    • Be careful when separating the body from the display assembly, as the rear-facing camera may be stuck to the body with adhesive.

  5. HTC One M9 Motherboard Replacement, Motherboard: paso 5, imagen 1 de 1
    Herramienta utilizada en este paso:
    Tweezers
    $4.99
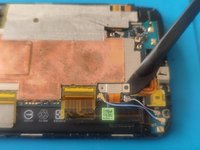
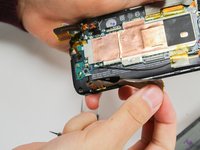
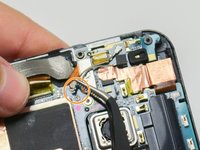
    • Use a pair of tweezers to get underneath the white and blue cable connectors and gently push them upwards to disconnect them.

  6. HTC One M9 Motherboard Replacement: paso 6, imagen 1 de 2 HTC One M9 Motherboard Replacement: paso 6, imagen 2 de 2
    • Remove the two 1.5 mm screws that secure the battery connector to the motherboard, using a Phillips #00 screwdriver.

    • Use a spudger to gently pry up the battery connector from its socket.

    • Do not apply pressure to the socket.

  7. HTC One M9 Motherboard Replacement: paso 7, imagen 1 de 2 HTC One M9 Motherboard Replacement: paso 7, imagen 2 de 2
    • Peel back the Kapton tape from the ZIF connectors.

    • Use a spudger or your fingernail to lift the hinged retainer clips on the ZIF connectors, and gently slide the cables out.

  8. HTC One M9 Motherboard Replacement: paso 8, imagen 1 de 3 HTC One M9 Motherboard Replacement: paso 8, imagen 2 de 3 HTC One M9 Motherboard Replacement: paso 8, imagen 3 de 3
    • Using the tweezers, carefully lift the tape covering the electrical strip, as shown in the picture.

    • Be gentle when lifting the tape as it can tear easily.

    • Use a spudger or your fingernail to lift the hinged retainer clip on the ZIF connector, and slide the cable out.

  9. HTC One M9 Motherboard Replacement: paso 9, imagen 1 de 3 HTC One M9 Motherboard Replacement: paso 9, imagen 2 de 3 HTC One M9 Motherboard Replacement: paso 9, imagen 3 de 3
    • Peel back the Kapton tape from the remaining three ZIF connectors, then use a spudger or your fingernail to lift the hinged retainer clips on the ZIF connectors, and slide the cables out from each.

    • The third ZIF connector is mostly underneath the motherboard. When reassembling your device, make sure it is placed back underneath.

  10. HTC One M9 Motherboard Replacement: paso 10, imagen 1 de 3 HTC One M9 Motherboard Replacement: paso 10, imagen 2 de 3 HTC One M9 Motherboard Replacement: paso 10, imagen 3 de 3
    • Remove the dual LED flash cover with a pair of tweezers. The cover is held on with a small amount of adhesive.

    • Using a heated pair of tweezers would ease the removal of flash cover, as the heat helps weaken the adhesive .

    • Remove the cover using a minimum amount of force. The flash cover may be glued to the antenna cable(s) below.

    • Use a pair of tweezers to disconnect the two antenna cables near the camera.

    • Some models of this phone will have only one antenna cable at this location.

    • Disconnect the antenna cable near the bottom right of the phone.

  11. HTC One M9 Motherboard Replacement: paso 11, imagen 1 de 1
    • Remove the three 4 mm T5 Torx screws that secure the motherboard.

  12. HTC One M9 Motherboard Replacement: paso 12, imagen 1 de 2 HTC One M9 Motherboard Replacement: paso 12, imagen 2 de 2
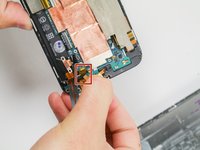
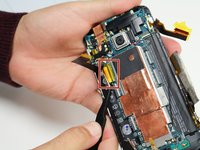
    • Use a pair of tweezers to lift the vibrator out of its slot.

    • Avoid damaging the wires connecting the vibrator to the motherboard. Use the minimum amount of force.

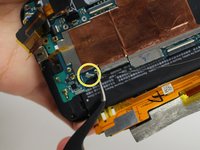
    • Use an iOpener or heat gun to loosen the adhesive at the bottom of the motherboard.

    • Refer to the Instrucciones de iOpener for further info.

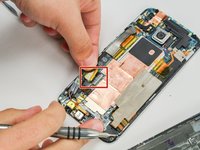
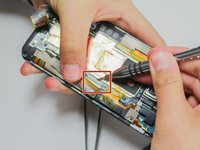
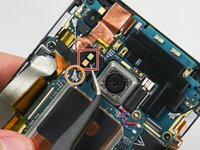
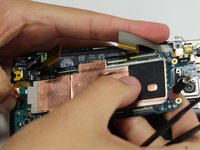
    • Use a plastic opening tool, or a spudger, along the edges of the case to gently pry the motherboard out of the case.

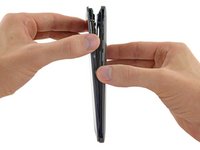
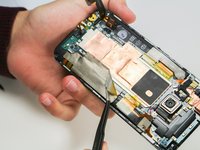
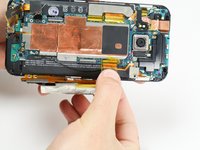
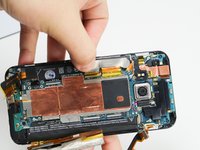
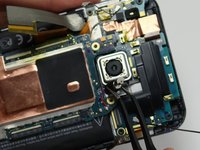
    • Gently lift the motherboard out of the case, beginning from the top corner (near the camera).

Conclusión

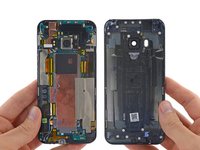
Continue to a specific replacement guide for further instructions on replacing what you wish to replace in you HTC One M9.

15 personas más completaron esta guía.

Rodolfo Meave

Miembro Desde 04/14/15

1,437 Reputación

2 Guías creadas

Equipo

Cal Poly, Team 6-16, Maness Spring 2015 Miembro de Cal Poly, Team 6-16, Maness Spring 2015

CPSU-MANESS-S15S6G16

4 Miembros

16 Guías creadas

5 comentarios

Not really that hard!

Well, i repair phones everyday and HTC is always a difficult brand, but I would rate the M7 as harder to repair than the M9.

The only part that should be very very remarked is while lifting up the motherboard, if you don't warm the adhesive it will be very difficult to get it out of the case, yesterday I did one and broke 1 led of the notifications leds!

Rafael B - Contestar

do u have any m9 motherboard for sale? I am searching for one

Abdin Syakirin -

No sir, i don’t sell any parts for any phone.

After messing with the HTC 10 i must say that’s my most difficult HTC to do as of yet, a nightmare!

Rafael B -

I own an HTC M9 and I need its motherboard. Any chance you could tell me where to find it?

yelgaonkar ketaki - Contestar

Anbody know where is located Gps Antenna of htc M9 plus. Pkease help me.in map my location blue dot is not accurate correctly. Sometng problem in hardware gps Antenna like.

shamsujezias - Contestar

Agregar Comentario

Ver Estadísticas:

Ultimas 24 horas: 2

Ultimos 7 días: 7

Ultimos 30 días: 14

Todo El Tiempo: 11,335