Saltar al contenido principal
HP Pavilion x360 14m-ba011dx SSD Replacement

HP Pavilion x360 14m-ba011dx SSD Replacement

Griffin O’Shields

Griffin O’Shields y 3 otros contribuidores

Última actualización: October 18, 2024

30 minuto
Moderado

Introducción

Ir al paso 1

If your HP Pavilion x360 14m-ba011dx laptop’s SSD is no longer functioning or perhaps you would like to expand the memory capacity of your computer, this guide will walk you through how to replace the SSD card.

Qué necesitas

Kits de reparación

Estos kits contienen todas las piezas y herramientas necesarias para completar esta guía.

Partes

Herramientas

  • Phillips #00 Screwdriver
    Phillips #00 Screwdriver
  • Spudger
    Spudger

Ver más…

  1. HP Pavilion x360 14m-ba011dx SSD Replacement, Battery: paso 1, imagen 1 de 2 HP Pavilion x360 14m-ba011dx SSD Replacement, Battery: paso 1, imagen 2 de 2
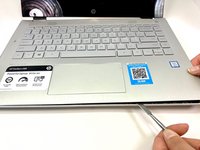
    • Remove the top left and right rubber pads closest to the hinge of screen using a plastic spudger to expose the screws underneath.

    • Remove the following 6 screws from the bottom of the device using a Phillips #00 Screwdriver:​

    • Two 7.5 mm screws.

    • Three 5 mm screws.

    • One 6.5 mm screw.

  2. HP Pavilion x360 14m-ba011dx SSD Replacement: paso 2, imagen 1 de 1
    • Push into the two screw holes that were under the rubber pads with the screwdriver to pop the keyboard out just a little.

    • Do this with the screen open so that you do not damage the screen.

    • Do not remove keyboard all the way.

  3. HP Pavilion x360 14m-ba011dx SSD Replacement: paso 3, imagen 1 de 2 HP Pavilion x360 14m-ba011dx SSD Replacement: paso 3, imagen 2 de 2
    • Separate the keyboard from the rest of the device using a metal or plastic spudger around the edges.

    • Pull up gently just until you can see the cables attaching the keyboard to the motherboard.

    • Flip the small white flaps holding the cables to the motherboard open to unplug the cords.

  4. HP Pavilion x360 14m-ba011dx SSD Replacement: paso 4, imagen 1 de 2 HP Pavilion x360 14m-ba011dx SSD Replacement: paso 4, imagen 2 de 2
    • Remove the purple cable attaching the battery to the motherboard by flipping the black flap and pulling the cable out.

    • Remove seven 4 mm screws using a Phillips #00 Screwdriver.

  5. HP Pavilion x360 14m-ba011dx SSD Replacement: paso 5, imagen 1 de 1
    • Remove the battery by gently pushing battery up, then pulling.

  6. HP Pavilion x360 14m-ba011dx SSD Replacement, Motherboard: paso 6, imagen 1 de 2 HP Pavilion x360 14m-ba011dx SSD Replacement, Motherboard: paso 6, imagen 2 de 2
    • Unclip the 5 cables connecting the motherboard to the computer.

  7. HP Pavilion x360 14m-ba011dx SSD Replacement: paso 7, imagen 1 de 1
    • Remove ten 4 mm screws using a Phillips #00 screwdriver.

  8. HP Pavilion x360 14m-ba011dx SSD Replacement: paso 8, imagen 1 de 1
    • Gently remove the motherboard.

  9. HP Pavilion x360 14m-ba011dx SSD Replacement, SSD: paso 9, imagen 1 de 3 HP Pavilion x360 14m-ba011dx SSD Replacement, SSD: paso 9, imagen 2 de 3 HP Pavilion x360 14m-ba011dx SSD Replacement, SSD: paso 9, imagen 3 de 3
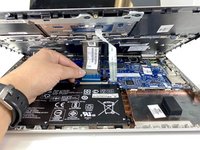
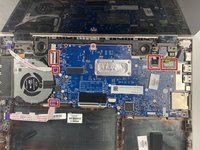
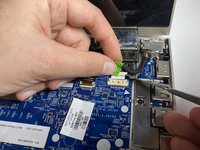
    • Flip the motherboard over to expose the SSD.

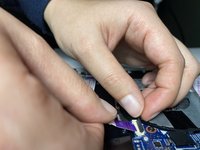
    • Using a Phillips #00 screwdriver, remove one 3 mm silver screw that holds the SSD in place.

  10. HP Pavilion x360 14m-ba011dx SSD Replacement: paso 10, imagen 1 de 1
    • Carefully lift and remove the SSD assembly by gently sliding it out of its slot.

Conclusión

To reassemble your device, follow these instructions in reverse order.

0 comentarios

Agregar Comentario

Ver Estadísticas:

Ultimas 24 horas: 2

Ultimos 7 días: 21

Ultimos 30 días: 78

Todo El Tiempo: 3,055