Saltar al contenido principal
HP Envy x360 m6-aq103dx Hard drive Replacement

HP Envy x360 m6-aq103dx Hard drive Replacement

Jordan Eremeyeff

Jordan Eremeyeff y 3 otros contribuidores

Última actualización: January 22, 2020

10 minuto
Moderado

Introducción

Ir al paso 1

Is the hard drive on you HP Envy x360 m6-aq103dx acting up or not working correctly? Follow this simple guide to replace the hard drive. You'll need a plastic opening tool and a Phillips Head #1 screwdriver.

Qué necesitas

Kits de reparación

Estos kits contienen todas las piezas y herramientas necesarias para completar esta guía.

Partes

Herramientas

Ver más…

  1. HP Envy x360 m6-aq103dx Hard drive Replacement, Bottom Cover: paso 1, imagen 1 de 3 HP Envy x360 m6-aq103dx Hard drive Replacement, Bottom Cover: paso 1, imagen 2 de 3 HP Envy x360 m6-aq103dx Hard drive Replacement, Bottom Cover: paso 1, imagen 3 de 3
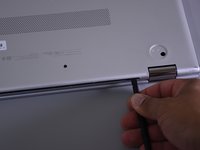
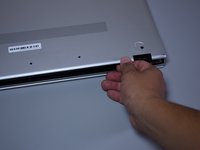
    • Flip the laptop over to expose the underside.

    • Remove the two grip pads with blue plastic opening tool by inserting the tool between the laptop and the pads and slowly lifting up.

    • The grip pads are tacky, remove slowly to avoid separating the adhesive.

  2. HP Envy x360 m6-aq103dx Hard drive Replacement: paso 2, imagen 1 de 1
    • Remove the two 8 mm Phillips Head screws that were under the grip pads using a Phillip's Head 1 Screwdriver.

  3. HP Envy x360 m6-aq103dx Hard drive Replacement: paso 3, imagen 1 de 1
    • Remove the six 5 mm Torx screws using a T5 Torx Screwdriver.

  4. HP Envy x360 m6-aq103dx Hard drive Replacement: paso 4, imagen 1 de 3 HP Envy x360 m6-aq103dx Hard drive Replacement: paso 4, imagen 2 de 3 HP Envy x360 m6-aq103dx Hard drive Replacement: paso 4, imagen 3 de 3
    • Use the nylon spudger to pop off the bottom cover by inserting it into the heat vent and twisting to the left or right.

    • You may hear a slight clicking or popping, but that is normal.

  5. HP Envy x360 m6-aq103dx Hard drive Replacement, Hard Drive: paso 5, imagen 1 de 3 HP Envy x360 m6-aq103dx Hard drive Replacement, Hard Drive: paso 5, imagen 2 de 3 HP Envy x360 m6-aq103dx Hard drive Replacement, Hard Drive: paso 5, imagen 3 de 3
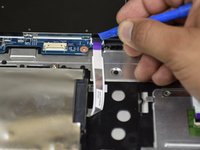
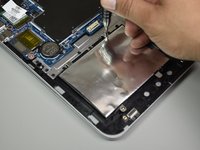
    • Disconnect the ribbon cable with the purple tag by flipping the black tab with the plastic opening tool.

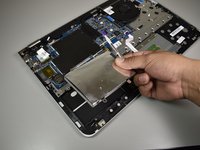
    • Disconnect the ribbon cable by gently pulling it away from the connector with your fingers.

  6. HP Envy x360 m6-aq103dx Hard drive Replacement: paso 6, imagen 1 de 3 HP Envy x360 m6-aq103dx Hard drive Replacement: paso 6, imagen 2 de 3 HP Envy x360 m6-aq103dx Hard drive Replacement: paso 6, imagen 3 de 3
    • Remove the two Phillips head screws (5 mm) using the Phillip's head #1 screwdriver.

    • Use your hands to lift the hard drive up and remove it.

Conclusión

To reassemble your device, follow these instructions in reverse order.

5 personas más completaron esta guía.

Equipo

Cal Poly, Team S4-G3, Livingston Fall 2017 Miembro de Cal Poly, Team S4-G3, Livingston Fall 2017

CPSU-LIVINGSTON-F17S4G3

4 Miembros

9 Guías creadas

Un comentario

Great guide. Only thing i did different was not removing the ribbon cable. It’s not necessary. Just unscrew the hard drive enclosure and you’ll have plenty of room to disconnect the sata connector plugged in to the drive.

Ron H - Contestar

Agregar Comentario

Ver Estadísticas:

Ultimas 24 horas: 1

Ultimos 7 días: 8

Ultimos 30 días: 31

Todo El Tiempo: 7,429