Saltar al contenido principal
HP Envy Sleekbook m6-k010dx LCD Replacement

HP Envy Sleekbook m6-k010dx LCD Replacement

codi whittaker

codi whittaker y 2 otros contribuidores

Última actualización: August 12, 2022

10 minuto
Moderado

Introducción

Ir al paso 1

If your computer turns on but nothing is displayed on the LCD, it might be time to replace it. This guide will walk you through each step.

Qué necesitas

Herramientas

  1. HP Envy Sleekbook m6-k010dx LCD Replacement, Battery: paso 1, imagen 1 de 1
    • Remove the twelve 9 mm Phillips #00 screws.

  2. HP Envy Sleekbook m6-k010dx LCD Replacement: paso 2, imagen 1 de 2 HP Envy Sleekbook m6-k010dx LCD Replacement: paso 2, imagen 2 de 2
    • Use the plastic opening tool and your hands to remove the bottom cover.

  3. HP Envy Sleekbook m6-k010dx LCD Replacement: paso 3, imagen 1 de 1
    • Disconnect the battery power cable from the motherboard.

  4. HP Envy Sleekbook m6-k010dx LCD Replacement: paso 4, imagen 1 de 1
    • Remove the six 6 mm Phillips #00 screws from the battery.

  5. HP Envy Sleekbook m6-k010dx LCD Replacement: paso 5, imagen 1 de 2 HP Envy Sleekbook m6-k010dx LCD Replacement: paso 5, imagen 2 de 2
    • Lift the battery out of the laptop.

  6. HP Envy Sleekbook m6-k010dx LCD Replacement, LCD: paso 6, imagen 1 de 2 HP Envy Sleekbook m6-k010dx LCD Replacement, LCD: paso 6, imagen 2 de 2
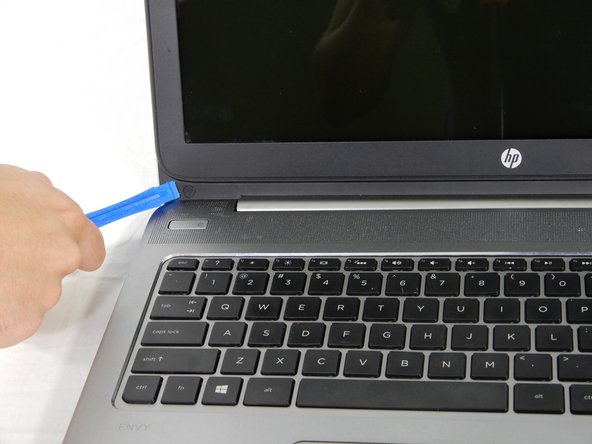
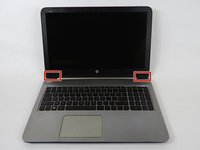
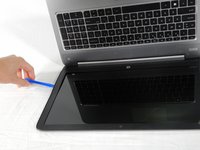
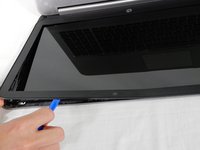
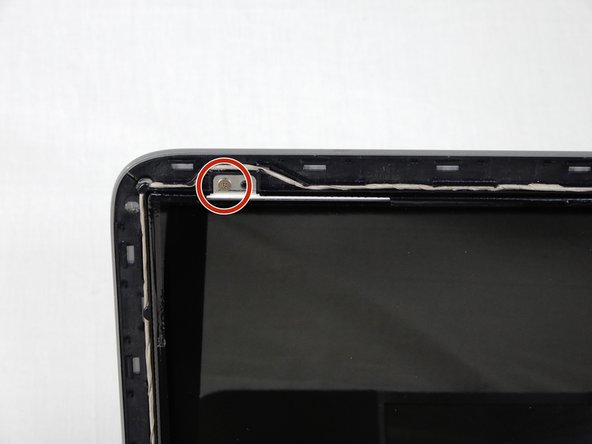
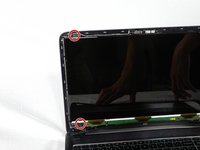
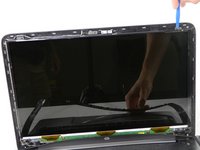
    • Remove the stickers from the bottom left and right corner of the device with a plastic opening tool.

  7. HP Envy Sleekbook m6-k010dx LCD Replacement: paso 7, imagen 1 de 1
    • Remove the two 2.5mm Phillips #00 screws found underneath the previously removed stickers.

  8. HP Envy Sleekbook m6-k010dx LCD Replacement: paso 8, imagen 1 de 3 HP Envy Sleekbook m6-k010dx LCD Replacement: paso 8, imagen 2 de 3 HP Envy Sleekbook m6-k010dx LCD Replacement: paso 8, imagen 3 de 3
    • Use the plastic opening tool to pry the bezel free from the LCD housing.

  9. HP Envy Sleekbook m6-k010dx LCD Replacement: paso 9, imagen 1 de 2 HP Envy Sleekbook m6-k010dx LCD Replacement: paso 9, imagen 2 de 2
    • Remove the four 2.5mm Phillips #00 screws located in each corner of the LCD screen.

  10. HP Envy Sleekbook m6-k010dx LCD Replacement: paso 10, imagen 1 de 2 HP Envy Sleekbook m6-k010dx LCD Replacement: paso 10, imagen 2 de 2
    • Use the plastic opening tool to remove the LCD screen from its housing.

    • Lay the LCD screen flat on the keyboard.

  11. HP Envy Sleekbook m6-k010dx LCD Replacement: paso 11, imagen 1 de 1
    • Disconnect the cable which connects the LCD to the motherboard.

    • Pul the LCD screen out.

Conclusión

To reassemble your device, follow these instructions in reverse order.

2 personas más completaron esta guía.

codi whittaker

Miembro Desde 02/14/18

508 Reputación

3 Guías creadas

Equipo

USF Tampa, Team S1-G4, Nance Spring 2018 Miembro de USF Tampa, Team S1-G4, Nance Spring 2018

USFT-NANCE-S18S1G4

Miembros de 4

15 Guías creadas

0Guía Comentarios

Agregar Comentario

Ver Estadísticas:

Ultimas 24 horas: 0

Ultimos 7 días: 12

Ultimos 30 días: 24

Todo El Tiempo: 985