Saltar al contenido principal
Google Pixel 9 Pro/Pro XL Rear Cover Detachment

Google Pixel 9 Pro/Pro XL Rear Cover Detachment

Spencer Day

Spencer Day y otro contribuidor

Última actualización: September 25, 2024

Sin estimación
Moderado
Sólo Prerrequisito
Esta guía solo debería usarse como prerrequisito para otras guías. Por tanto, estará incompleta.

Introducción

Ir al paso 1

This guide shows how to separate the adhesive on your Google Pixel 9 Pro/Pro XL.

Qué necesitas

Herramientas

  1. Google Pixel 9 Pro/Pro XL Rear Cover Detachment, Safety precautions: paso 1, imagen 1 de 2 Google Pixel 9 Pro/Pro XL Rear Cover Detachment, Safety precautions: paso 1, imagen 2 de 2
    • Let your Pixel's battery drain below 25% before starting this repair. A charged lithium‑ion battery may catch fire if damaged.

    • Unplug all cables and completely power down your phone.

  2. Google Pixel 9 Pro/Pro XL Rear Cover Detachment, Adhesive information: paso 2, imagen 1 de 3 Google Pixel 9 Pro/Pro XL Rear Cover Detachment, Adhesive information: paso 2, imagen 2 de 3 Google Pixel 9 Pro/Pro XL Rear Cover Detachment, Adhesive information: paso 2, imagen 3 de 3
    • Adhesive secures the perimeter of the rear cover to the frame.

    • When separating the adhesive, don't insert your tool more than 3 mm under the rear cover to avoid damaging the internal components.

    • Measure 3 mm from the tip and mark your opening pick with a permanent marker. Alternatively, you can tape a coin to a pick 3 mm from the tip.

  3. Google Pixel 9 Pro/Pro XL Rear Cover Detachment, Apply a suction handle: paso 3, imagen 1 de 2 Google Pixel 9 Pro/Pro XL Rear Cover Detachment, Apply a suction handle: paso 3, imagen 2 de 2
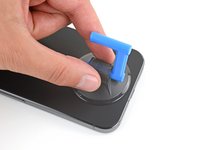
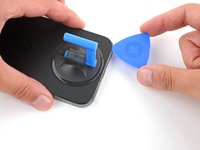
    • Attach a suction handle to the bottom edge of the rear cover, as close to the edge as possible.

  4. Google Pixel 9 Pro/Pro XL Rear Cover Detachment, Insert an opening pick: paso 4, imagen 1 de 3 Google Pixel 9 Pro/Pro XL Rear Cover Detachment, Insert an opening pick: paso 4, imagen 2 de 3 Google Pixel 9 Pro/Pro XL Rear Cover Detachment, Insert an opening pick: paso 4, imagen 3 de 3
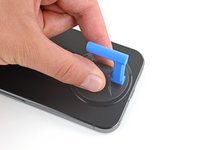
    • Pull up on the suction handle with strong, steady force to create a small gap under the rear cover.

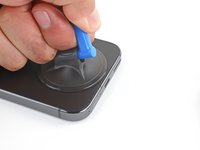
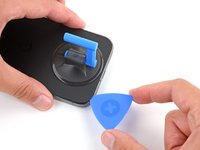
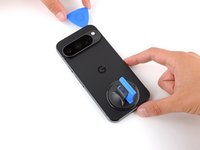
    • Insert the tip of an opening pick in the gap.

  5. Google Pixel 9 Pro/Pro XL Rear Cover Detachment, Separate the rear cover adhesive: paso 5, imagen 1 de 3 Google Pixel 9 Pro/Pro XL Rear Cover Detachment, Separate the rear cover adhesive: paso 5, imagen 2 de 3 Google Pixel 9 Pro/Pro XL Rear Cover Detachment, Separate the rear cover adhesive: paso 5, imagen 3 de 3
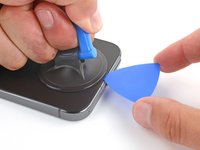
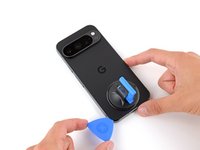
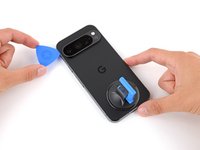
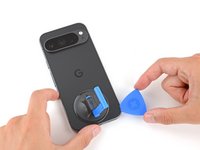
    • Slide your opening along the bottom edge to separate the adhesive securing it.

    • Remember: don't insert the opening pick deeper than 3 mm.

  6. Google Pixel 9 Pro/Pro XL Rear Cover Detachment: paso 6, imagen 1 de 3 Google Pixel 9 Pro/Pro XL Rear Cover Detachment: paso 6, imagen 2 de 3 Google Pixel 9 Pro/Pro XL Rear Cover Detachment: paso 6, imagen 3 de 3
    • Slide your opening pick up the left edge and along the top edge to separate the adhesive.

  7. Google Pixel 9 Pro/Pro XL Rear Cover Detachment: paso 7, imagen 1 de 3 Google Pixel 9 Pro/Pro XL Rear Cover Detachment: paso 7, imagen 2 de 3 Google Pixel 9 Pro/Pro XL Rear Cover Detachment: paso 7, imagen 3 de 3
    • Slide your pick down the right edge to separate the remaining adhesive.

Linea de Meta

Spencer Day

Miembro Desde 09/14/22

94,646 Reputación

662 Guías creadas

Equipo

iFixit Miembro de iFixit

Staff

118 Miembros

19,425 Guías creadas

0 comentarios

Agregar Comentario

Ver Estadísticas:

Ultimas 24 horas: 4

Ultimos 7 días: 7

Ultimos 30 días: 8

Todo El Tiempo: 25