
GoPro Hero4 Silver Motherboard Replacement
Introducción
Ir al paso 1In this guide we will be showing you how to replace the motherboard in your GoPro Hero4 Silver. The motherboard is the brain of the camera, controlling all of its functions. Before you begin make sure the battery is removed from the device and that you have the necessary tools to preform this repair.
Qué necesitas
Partes


Herramientas


Ver más…
-
-
Start by removing the silver plastic face from the camera using a plastic opening tool. Insert the plastic opening tool into the middle of each edge and lift up the tabs that keep the camera face on.
-
The seven plastic tab locations are marked in red.
-
-
-
Remove the three 8 mm Phillips #000 screws on each corner of the camera.
-
Remove the single 4 mm Phillips #000 screw on the bottom left corner of the camera.
The screw heads are Philips #0 on my Hero 4 (and not #000 as described in the instructions).
Definitely a 000
Just want to point out that the screw in the top left corner is slightly placed beneath the LCD. Use caution when trying to unscrew.
Mine was as well, I’m glad I’m not the only one
and &&^&^$^ instructions waste my money
-
-
-
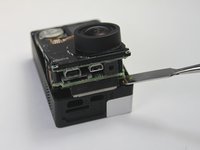
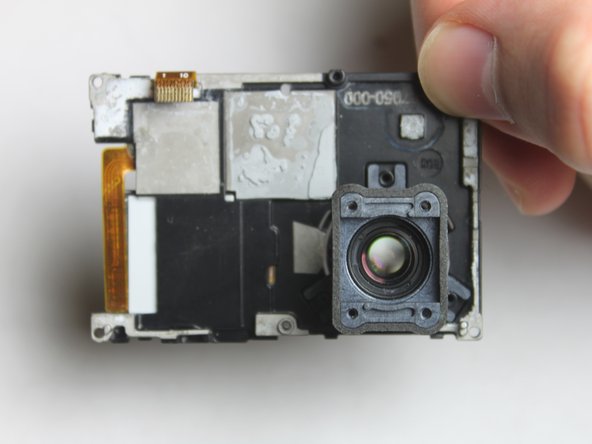
To remove the motherboard assembly from the camera casing, use the plastic opening tool on the lens side of the camera to pry the motherboard assembly out of the camera housing.
-
To avoid breaking the plastic on the lens side of the camera (see photo), pry along the edges near the corners.
-
-
-
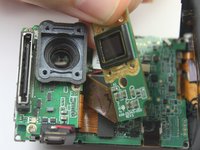
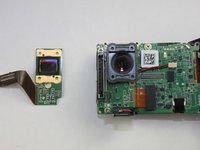
To remove the sensor assembly, simply peel off the lens towards the attached ribbon cable.
-
The sensor has ribbon cables running to the motherboard via a black rectangular connector.
-
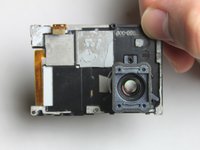
To remove the sensor, use the spudger to pry up each side, Then, lift the connector straight up from its socket.
-
With the old camera sensor assembly removed, you can now replace it with a new sensor.
The thin copper tabs, visible on the far right screen of STEP 5, have pulled out (as it did with mine). How do you get these back in? They are very thin and when the 2 halves of the camera are put close together, there is no room to access this, or get leverage to force them back in the slots they came out of.
did you guys figure it out on how to put it together?
gens909 -
Same thing happened to me. Nightmare to put back in. The ribbon connectors are for the rear lcd and I think the side button. To re attach the cable you basically need to remove the motherboard from the front piece to get to the tabs where the ribbons go into. There is very little cable length to attach it and it comes off very easily while trying to re assemble.
@ keith
looks like you can't. Mine did the same thing and I think it's now trash. I should have just used the procedure to unscrew the lens without taking the camera apart.
I either damaged something or dislodged something because the colors on the LCD screen are washed out and the image is not clear, almost pixelated. The camera itself works and the image taken appears to fine. I'll live with it like this.
I bought the image sensor form ifixit, replaced it, and... 3/4 secs after turning the GoPro on, it still freezes :(. Now I do not even see the image in the display anymore -_-'
-
-
-
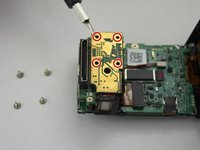
Remove the three 8 mm Phillips #000 screws securing the Hero port to the motherboard.
The screw under the lense is unable to be removed as it hit the lense.
I went to step 9 and once the lense was seperated from the motherboard I had plenty of room.
I removed the screw in the top middle of the picture so the mother board would come loose. I then gently pried the motherboard up off the black plastic of the lens plate and the assembly moved enough that the third screw of the port assembly could finally be removed. When going back together, hook the port assembly cable up before screwing it down with the three screws. Its a bit easier.
I did this too, much easier
Thanks Rich. That's what worked for me.
WARNING: I almost broke my camera following this step. If you are following these instructions in order to replace your lens, stop now. These instructions are incomplete, and misleading; you don't need to remove this piece in order to complete a lens replacement. What you're looking for instead is this: https://www.youtube.com/watch?v=fLxQC_55...
-
-
-
Herramienta utilizada en este paso:Tweezers$4.99
-
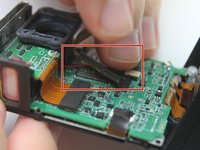
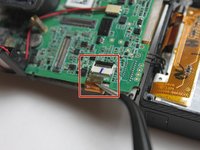
Use a pair of tweezers to disconnect the ribbon cable from the ZIF connector by flipping up the black retaining flap. You should then be able to pull the cable free.
-
Once the ribbon cable is disconnected, you can remove the black plastic bracket which holds the camera lens.
What can of cable is this? Which are the specs? I need a 10cm length piece of ribbon cable but I don't know the keywords to command it on the internet.
Need more information about the other set of ribbon cables on the back of the boards, about three ribbon cables ???,need pintures of those .
-
-
-
Flip the motherboard assembly and camera housing over so you can access the back of the motherboard.
-
Look for the white connector that has two wires that lead from the mother board to the battery compartment in the camera housing.
-
Using the metal tweezers, pull upward on the connector to disconnect the clip.
Next to this little white connector there are three ZIF connectors. These need disconnected too. During my first attempt at this I reconnected the white connector first when reassembling the unit. This appears not the best order of doing things. You may want to put the black plastic cover back first, followed by connecting the 3 ZIF connectors. Then continue to re-assemble the unit and leave the white connector to later.
-
-
-
With the speaker assembly removed, you can now replace the motherboard.
-


To reassemble your device, follow these instructions in reverse order.
To reassemble your device, follow these instructions in reverse order.
Cancelar: No complete esta guía.
28 personas más completaron esta guía.
Equipo

USF Tampa, Team 2-1, Blackwell Fall 2015 Miembro de USF Tampa, Team 2-1, Blackwell Fall 2015
USFT-BLACKWELL-F15S2G1
Miembros de 4
20 Guías creadas
11Guía Comentarios
Do step 9 before step 6. It's near impossible to get the middle screw out in the order the guide presents. There's also a screw that isn't mentioned that needs to be removed in order to complete step 9. You can see the screw in step 6's picture right above the QR bar code.
Hi team,
How would you secure the flex cables, next to the power connector, back to the motherboard?
Did you ever get an answer as i have the same problem
Same problem
gelmi -
Anything on this yet?
Hi, I broke the power connector Step 11. Is it possible to solder cables in another point? https://goo.gl/photos/xWjvvbgndME7zeuC6
Just a slight heads up on the reassembly: Be careful when reattaching the cables because they WILL disconnect if you aren't careful. I saw there was a comment for how to keep them secure. Generally I use Tape until the motherboard is to a point where its ready to be slid back into the plastic housing. Tweezers are your best friend :)
Anybody put heat transfer paste back on the processor chip?? I opened my camera up and the paste was all dried up and didn’t look like it worked well. Is this why the boards fail in the first place?? Maybe storage in a hot space will dry up the paste and accelerate the cameras life span
Hi All,
I finally figured out why my date/time resets every time I change the battery - the keep-alive (coin/watch) battery must be dead. I located it on the mother board (may thanks, Zach and iFixIt!). Does anyone know the part number of this battery? iFixIt, do you have a tutorial for this one? Has anyone ever changed this battery? Wonder why they don’t use a capacitor that recharges every time a battery is installed?
Thanks!
Tim in Borneo
My go pro got underwater. Now I see some salty corrosion ( Kind of white powder on some parts of the motherboard ), I am not sure if replacing the motherboard will be enough, or I will need to replace other parts ??? Sorry I know it is a difficult question but maybe someone has a comment. best regards
Hello everyone where I can buy Motherboard
First step should be make sure you remove memory card first. I accidentally left mine and broke it trying to remove the assembly from the case.
Brad Hodgkinson - Contestar