
Dell Inspiron Mini 1012 Hard Drive Replacement
Qué necesitas
Kits de reparación
Estos kits contienen todas las piezas y herramientas necesarias para completar esta guía.


Partes


Herramientas


Ver más…
-
-
Turn the device over so that the back (white side) of the device is facing up.
-
Remove battery from laptop by pushing the two tabs outward and pull the battery outward. The tabs are highlighted in blue. Place the battery off to the side.
-
Remove the 3 screws highlighted in red that secure the keyboard to the case using the screw driver with largest phillips head in the box.
-
Make sure to keep the screws separated by step to ensure that they can be put back in the correct location when reversing the steps.
-
-
-
-
Pull the ribbon cable to release the keyboard.
-
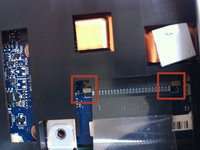
If necessary push the release tabs highlighted in red with a plastic spudger, these secure the keyboard ribbon cable. Lay the keyboard face down off to the side of your work space.
Not “if it’s necessary “…IT’S NECESSARY. Release the friction clips before attempting to pull out the ribbon cable as not doing so risks breaking the ribbon cable. Use a spudger or small flat head screwdriver to gently push out each side. Since the battery has already been removed, there’s no reason to worry about causing a short circuit using a metal screwdriver, but be gentle… these little bastards break easily.
-
-
-
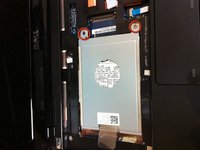
Remove the 2 Phillips head screws securing hard drive to case. Use the same screw driver bit as before.
-
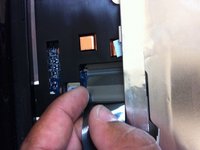
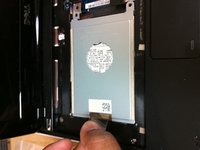
Pull the plastic tab connected to the hard drive outward in the left hand direction to remove hard drive from case. Place the hard drive off to the side.
There should only be one (1) Phillips bolt holding in the hard drive as the other side will be secured by the middle bolt of the three bolts removed from the bottom of the laptop. It goes through the bottom, and then through the hard drive mount holes into the bottom of the keyboard. So don’t look for two bolts on the inside of the laptop, there’s was only ever one. No need to worry about whether you lost one and don’t attempt to replace a bolt for the empty hole or you won’t be able to secure the keyboard properly upon reassembly, not that there’s any threading in the empty side hole to screw a bolt into in the first place.
Also, don’t put the hard drive back in according to this guide’s directions, or you’ll break something. Put the hard drive in just to the left of its intended final position (the holes won’t line up at this point), then slide it over to the right until the holes finally line up. This will allow the contacts to slide into place properly without risking breaking the connector.
One last thing, if you’re replacing the hard drive, which you probably are or you wouldn’t have done all this, you’ll need to remove the mounting bracket from the old hard drive by unscrewing the four (4) 2.5mm black Phillips bolts on the sides, so you can move it to the new hard drive in order to be able to properly mount the new hard drive. Then reinsert it and connect it as mentioned above.
-


To reassemble your device, follow these instructions in reverse order.
To reassemble your device, follow these instructions in reverse order.
Cancelar: No complete esta guía.
16 personas más completaron esta guía.
4 comentarios
Its a standard 2.5" SATA and yes you can replace it with a SSD from any local computer store or even Best Buy.
I bought a Kingston SSD to upgrade mine, but cloning the old hard drive or even trying to install the SSD cleanly doesn’t work, Windows says it wont install and it doesn’t boot. The BIOS isn’t very helpful either.
This guide should not be rated moderate because everything is straight forward. The trickiest step was removing the keyboard. Once it is disassembled to the point of replacing the hard drive, you can also replace pretty much everything else also.