
Acer Aspire One 722 Battery Replacement

Introducción
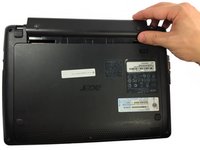
Ir al paso 1It’s recommended to change Acer Aspire One 722 batteries after approximately one year of use. Normally a fully charged Acer Aspire One 722 battery will support the system for 7 hours, but as the batteries’ lifetime goes down it needs to charge frequently. Take this precaution, if your battery gets swollen. But it’s better to replace the battery before it gets swollen.
Use this simple guide to replace your Acer Aspire One 722 battery. Follow these 5 easy steps which will take no longer than 3 minutes and restore your Acer laptop to like-new performance.


To reassemble your device, follow these instructions in reverse order.
To reassemble your device, follow these instructions in reverse order.
Cancelar: No complete esta guía.
12 personas más completaron esta guía.

Equipo

UMass Dartmouth, Team 5-6, Gulbrandsen Fall 2015 Miembro de UMass Dartmouth, Team 5-6, Gulbrandsen Fall 2015
UMASSD-GULBRANDSEN-F15S5G6
3 Miembros
10 Guías creadas
4 comentarios
First rate easy to understand completed in less than a minute.many thanks
Thank you, you are a hero of 2021.
Thank you. Simple, yes, but a little encouragement always helps.