Saltar al contenido principal
Dell Inspiron 15 5584 Battery Replacement

Dell Inspiron 15 5584 Battery Replacement

Sam Vorn

Sam Vorn y 3 otros contribuidores

Última actualización: July 12, 2023

5 - 7 minutos
Fácil
Guía de Estudiante Destacada

Introducción

Ir al paso 1

Use this guide for assistance in replacing the battery in your Dell Inspiron 15 5584.

The battery acts as the power supply for all components of the laptop. Without a battery, the laptop will not function. An old or damaged battery may not hold as much charge as it previously had, and can also possibly not provide enough charge to other components of the device.

Before tampering with your device, make sure to drain the battery and turn off your laptop. Working with live electricity is a fire hazard and can cause injury/damage to electrical components. Furthermore, ensure the laptop is not plugged into any external power sources prior to starting this removal.

Qué necesitas

Kits de reparación

Este kit contiene todas las piezas y herramientas necesarias para completar esta guía.

Partes

Herramientas

Ver más…

  1. Dell Inspiron 15 5584 Battery Replacement, Bottom Cover: paso 1, imagen 1 de 1
    • Make sure to turn off and unplug your laptop before starting.

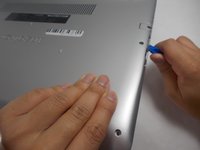
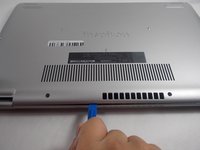
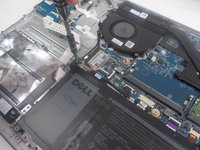
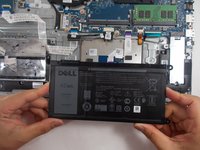
    • Turn over the laptop so that the bottom is facing upwards, and the Inspiron logo is upside-down.

  2. Dell Inspiron 15 5584 Battery Replacement: paso 2, imagen 1 de 3 Dell Inspiron 15 5584 Battery Replacement: paso 2, imagen 2 de 3 Dell Inspiron 15 5584 Battery Replacement: paso 2, imagen 3 de 3
    • Remove the seven 7 mm screws from the bottom using a Phillips #0 screwdriver.

    • Loosen the two captive back corner screws using a Phillips #0 screwdriver.

    • The two corner screws are not removable. A clicking sounds indicates that the screw is fully loosened.

  3. Dell Inspiron 15 5584 Battery Replacement: paso 3, imagen 1 de 2 Dell Inspiron 15 5584 Battery Replacement: paso 3, imagen 2 de 2
    • Slide an iFixit opening tool underneath the right side USB port and the keyboard.

    • Gently trace the iFixit opening tool along the entire outer rim of the laptop, carefully applying an upwards pressure.

    • Be careful not to force open the plate or push too much off without loosening the other sides. This can cause the bottom cover to crack.

  4. Dell Inspiron 15 5584 Battery Replacement: paso 4, imagen 1 de 2 Dell Inspiron 15 5584 Battery Replacement: paso 4, imagen 2 de 2
    • Gently pry off the bottom cover from the laptop.

    • Use the iFixit opening tool to loosen any spots you may have missed from Step 3.

  5. Dell Inspiron 15 5584 Battery Replacement, Battery: paso 5, imagen 1 de 2 Dell Inspiron 15 5584 Battery Replacement, Battery: paso 5, imagen 2 de 2
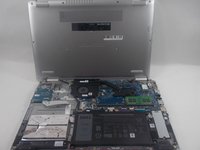
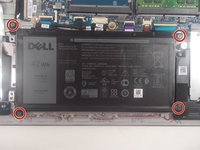
    • Remove the four 3.5 mm screws holding the battery down with a JIS #0 screwdriver.

  6. Dell Inspiron 15 5584 Battery Replacement: paso 6, imagen 1 de 3 Dell Inspiron 15 5584 Battery Replacement: paso 6, imagen 2 de 3 Dell Inspiron 15 5584 Battery Replacement: paso 6, imagen 3 de 3
    • Detach the motherboard connector tab from the top left of the battery.

    • Remove the battery from the device.

    • Be sure to carefully wiggle the connector out from the battery socket. Ripping it out too forcefully could damage the socket.

Conclusión

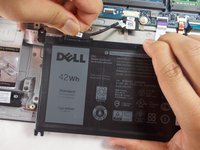
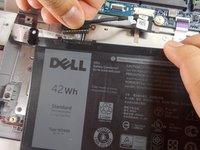
To reassemble your device, follow these instructions in reverse order.

Una persona más ha completado esta guía.

Sam Vorn

Miembro Desde 03/29/22

977 Reputación

9 Guías creadas

Equipo

UMass Dartmouth, Team 1-1, Mellen Spring 2022 Miembro de UMass Dartmouth, Team 1-1, Mellen Spring 2022

UMASSD-MELLEN-S22S1G1

3 Miembros

10 Guías creadas

2 comentarios

I used this guide for a Dell Inspiron 5579 and it was close enough. The 5579 is larger. There were 10 screws instead of 9, and the back corner screws were removable. For the battery there were only the 2 left screws to remove as the 2 right battery mounts were also case-mounting screws. Was easy peazy. Now just need to charge it! Thanks!

John Highet - Contestar

Thanks for this guide! I discovered right away that I bought the battery for the 5548 accidentally and had to ship it back. I got the battery for the 5584, and by following this guide, I got it up and running within minutes.

One concern: the new battery has a closer port for the motherboard connector tab, which means the cable for that tab has to bend a bit. Hopefully I haven't introduced a problem with heat or anything.

Gianfranco Berardi - Contestar

Agregar Comentario

Ver Estadísticas:

Ultimas 24 horas: 7

Ultimos 7 días: 18

Ultimos 30 días: 44

Todo El Tiempo: 3,446