Saltar al contenido principal
iPad Mini CDMA Small Metal Bracket Replacement

iPad Mini CDMA Small Metal Bracket Replacement

Walter Galan

Walter Galan y 4 otros contribuidores

Última actualización: May 7, 2024

Sin estimación
Moderado
Sólo Prerrequisito
Esta guía solo debería usarse como prerrequisito para otras guías. Por tanto, estará incompleta.

Introducción

Ir al paso 1

Prereq for removing speakers with battery.

Qué necesitas

Herramientas

Ver más…

  1. iPad Mini CDMA Small Metal Bracket Replacement, Small Metal Bracket: paso 1, imagen 1 de 3 iPad Mini CDMA Small Metal Bracket Replacement, Small Metal Bracket: paso 1, imagen 2 de 3 iPad Mini CDMA Small Metal Bracket Replacement, Small Metal Bracket: paso 1, imagen 3 de 3
    Herramienta utilizada en este paso:
    Tweezers
    $4.99
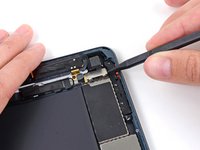
    • Use the tip of a spudger to start peeling up the right side of the black tape covering the small metal bracket.

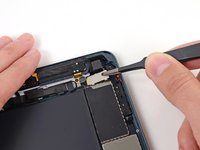
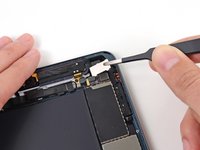
    • Peel the tape up the rest of the way with tweezers, and remove it from the bracket.

  2. iPad Mini CDMA Small Metal Bracket Replacement: paso 2, imagen 1 de 2 iPad Mini CDMA Small Metal Bracket Replacement: paso 2, imagen 2 de 2
    • Use a plastic opening tool to push the metal bracket slightly to the left.

  3. iPad Mini CDMA Small Metal Bracket Replacement: paso 3, imagen 1 de 2 iPad Mini CDMA Small Metal Bracket Replacement: paso 3, imagen 2 de 2
    • Use the tip of a spudger to lift up the lower side of the metal bracket.

  4. iPad Mini CDMA Small Metal Bracket Replacement: paso 4, imagen 1 de 2 iPad Mini CDMA Small Metal Bracket Replacement: paso 4, imagen 2 de 2
    • Grab the bracket with tweezers and lift it up out of the iPad.

    • During reassembly, hook the top edge of the plate in place first, then lower the bottom into its slots.

Conclusión

To reassemble your device, follow these instructions in reverse order.

0 comentarios

Agregar Comentario

Ver Estadísticas:

Ultimas 24 horas: 0

Ultimos 7 días: 0

Ultimos 30 días: 4

Todo El Tiempo: 136