Saltar al contenido principal

Xbox 360 S Bottom Panel Replacement

Qué necesitas

  1. Xbox 360 S Bottom Panel Replacement, Hard Drive: paso 1, imagen 1 de 3 Xbox 360 S Bottom Panel Replacement, Hard Drive: paso 1, imagen 2 de 3 Xbox 360 S Bottom Panel Replacement, Hard Drive: paso 1, imagen 3 de 3
    • Orient the Xbox 360 S so that the bottom of the console is facing toward you.

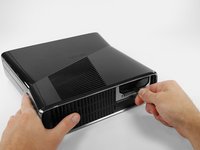
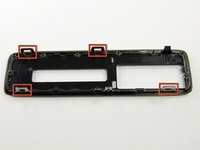
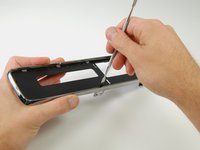
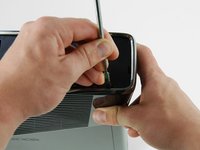
    • Push the latch holding down the hard drive cover to the left.

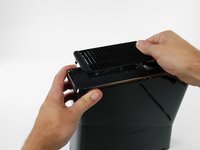
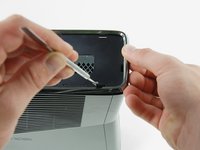
    • Pull the hard drive cover away from the console.

  2. Xbox 360 S Bottom Panel Replacement: paso 2, imagen 1 de 3 Xbox 360 S Bottom Panel Replacement: paso 2, imagen 2 de 3 Xbox 360 S Bottom Panel Replacement: paso 2, imagen 3 de 3
    • Firmly grasp the fabric tab labeled with the size of the hard drive (e.g. "250 GB") attached to the hard drive.

    • Pull the hard drive straight out of the console.

    • The fabric tab is attached to a catch further inside the hard drive housing. It will take some force to pull the hard drive out.

  3. Xbox 360 S Bottom Panel Replacement, Bottom Panel: paso 3, imagen 1 de 1
    • In the following steps, you will remove the bottom vent.

    • It is attached to the bottom panel by the seven clips shown.

  4. Xbox 360 S Bottom Panel Replacement: paso 4, imagen 1 de 2 Xbox 360 S Bottom Panel Replacement: paso 4, imagen 2 de 2
    • Orient the Xbox 360 S so that the hard drive port is facing up and the faceplate is facing to the left.

    • Insert a metal spudger between the black bottom vent and the silver rim of the bottom bezel, in the rear right corner of the vent.

    • Rotate the spudger away from the console, prying the vent up from the bottom bezel.

    • Be sure to rotate the spudger far enough so that the clips on the vent are lifted past the silver rim of the bottom bezel.

  5. Xbox 360 S Bottom Panel Replacement: paso 5, imagen 1 de 3 Xbox 360 S Bottom Panel Replacement: paso 5, imagen 2 de 3 Xbox 360 S Bottom Panel Replacement: paso 5, imagen 3 de 3
    • In the same manner as described above, pry the two remaining clips on the bottom right edge.

    • All of the clips along both the right and front edge should now be free. If other clips have come undone as well, that is fine.

  6. Xbox 360 S Bottom Panel Replacement: paso 6, imagen 1 de 2 Xbox 360 S Bottom Panel Replacement: paso 6, imagen 2 de 2
    • Remove the bottom vent by lifting it away from the bottom bezel.

  7. Xbox 360 S Bottom Panel Replacement: paso 7, imagen 1 de 2 Xbox 360 S Bottom Panel Replacement: paso 7, imagen 2 de 2
    • In the following steps, you will remove the bottom bezel, which is attached to the rest of the console by the six clips shown.

    • The clips shown in red can be detached by inserting a metal spudger underneath the bottom edge of the clip. Once underneath the bottom edge, simply prying away from the console will free the clip.

  8. Xbox 360 S Bottom Panel Replacement: paso 8, imagen 1 de 2 Xbox 360 S Bottom Panel Replacement: paso 8, imagen 2 de 2
    • Insert a metal spudger through the slit near the rear left corner of the bottom bezel.

    • Rotate the spudger away from the device while lifting the rear bezel up with the other hand.

    • You may hear a "pop" signifying the clip has cleared its catch.

  9. Xbox 360 S Bottom Panel Replacement: paso 9, imagen 1 de 2 Xbox 360 S Bottom Panel Replacement: paso 9, imagen 2 de 2
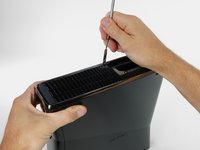
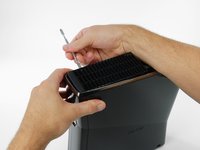
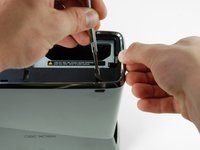
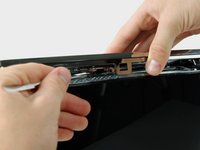
    • Insert a metal spudger through the left middle slit of the bottom bezel, and between the bottom edge of the clip and the left case.

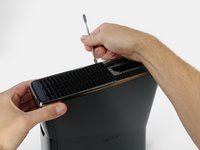
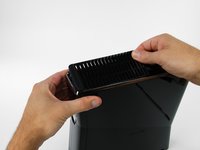
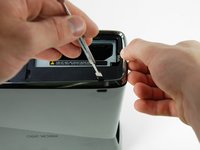
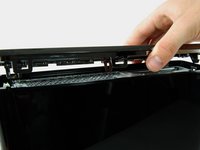
    • Simultaneously pull the bottom bezel up and rotate the spudger away from the console to free the clip.

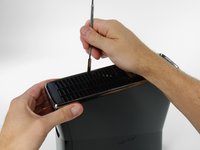
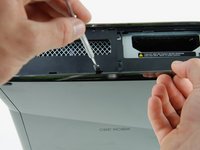
    • In a similar fashion, free the clip at the front of the bottom bezel's left edge.

    • The entire left side of the bottom bezel should now be free.

  10. Xbox 360 S Bottom Panel Replacement: paso 10, imagen 1 de 2 Xbox 360 S Bottom Panel Replacement: paso 10, imagen 2 de 2
    • Turn the console around so that the faceplate is facing to the right and the right case is facing toward you.

    • Insert the spudger into the rear-most slit on the right edge of the bottom bezel, and wedge it behind the clip by pushing the spudger down while pushing the tip of the spudger against the right case.

    • Simultaneously release the clip and pull the bottom bezel up.

    • This clip is especially hard to remove. Some force will be required to insert the spudger correctly.

  11. Xbox 360 S Bottom Panel Replacement: paso 11, imagen 1 de 1
    • This clip does not have a slit in the bezel to guide you. You can locate the clip by looking under the bezel near the hard drive slot.

    • Insert a spudger between the silver rim and bottom bezel directly above the clip shown.

    • Release the clip while pulling up on the bottom bezel.

  12. Xbox 360 S Bottom Panel Replacement: paso 12, imagen 1 de 2 Xbox 360 S Bottom Panel Replacement: paso 12, imagen 2 de 2
    • This clip is smaller than the others and should not be removed from above like the others.

    • Lift the left edge of the bottom bezel up enough to gain clearance.

    • Insert a metal spudger behind the left edge of the last clip, and push the clip away from the right case.

Conclusión

To reassemble your device, follow these instructions in reverse order.

49 personas más completaron esta guía.

Matthew Newsom

Miembro Desde 01/05/10

39,452 Reputación

67 Guías creadas

0 comentarios

Agregar Comentario

Ver Estadísticas:

Ultimas 24 horas: 4

Ultimos 7 días: 18

Ultimos 30 días: 71

Todo El Tiempo: 50,465