Introducción
Utiliza esta guía para reemplazar una batería gastada en tu Touch de segunda generación. Este procedimiento requiere soldadura.
Qué necesitas
-
-
La imagen de la izquierda (ya se quitó el panel frontal) muestra las ubicaciones de los clips de metal (que se muestran en rojo) que se ajustan al marco de plástico. En los siguientes pasos, intenta levantar el panel frontal de los espacios entre estos clips.
-
-
-
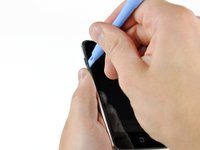
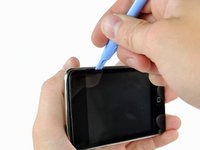
Inserta suavemente una herramienta de apertura de plástico, cerca de los botones de control de volumen, entre el marco de plástico de la pantalla y la carcasa de metal.
-
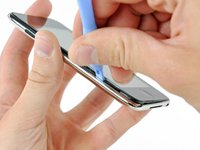
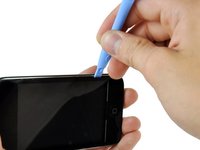
Gira la herramienta alejándola del Touch para hacer palanca en el panel de vidrio.
If you are planning on reusing the front bezel / seal around the glass screen, be careful not to rip it up too much when loosening the screen.
If you bought a new front panel there is a rubber seal around it so dont worry about ripping it up to open your iPod
Cita de mikeseptak:
If you bought a new front panel there is a rubber seal around it so dont worry about ripping it up to open your iPod
sometimes if you buy a new front it doesn't come with the front bezel, so make sure it does before you rip the old one up. otherwise you can get a new front bezel from ebay.
Cracked the glass dropping on tile floor. I used a metal guitar pick to remove the glass/digitizer/bezel/"o" ring assembly, noting the clips in the first picture, I worked my way around and between the clips - starting at the volume control - first to loosen the glass/digitizer, then to go deeper and vertically lift the bezel and free the bezel from the clips. As others say - if you purchase from this site DO NOT worry about the bezel OR the "o" ring around the bezel - just get the entire thang out and the new one slips/snaps into place with ease - entire process took about 10min for removal and 3 for replacement - and I HAVE A NEW WORKING iPod TOUCH!! Jerry -Houston, TX - 281-687-2755 for questions...
And the service and shipping are excellent - and now I'm gonna buy a new MacBook keyboard from this company and fix my daughters stuck "z" key - I love IFIXIT - would recommend to ALL - products and instructions are EXCELLENT - yes ebay *may* be cheaper but you get what you pay for... HIGHLY RECOMMEND IFIXIT...
Cita de jgreengold:
Cracked the glass dropping on tile floor. I used a metal guitar pick to remove the glass/digitizer/bezel/"o" ring assembly, noting the clips in the first picture, I worked my way around and between the clips - starting at the volume control - first to loosen the glass/digitizer, then to go deeper and vertically lift the bezel and free the bezel from the clips. As others say - if you purchase from this site DO NOT worry about the bezel OR the "o" ring around the bezel - just get the entire thang out and the new one slips/snaps into place with ease - entire process took about 10min for removal and 3 for replacement - and I HAVE A NEW WORKING iPod TOUCH!! Jerry -Houston, TX - 281-687-2755 for questions...
I am not familiar with a Metal Guitar pick, The plastic ones break very easily. (Even my Fender one) Did your metal pick damage the metal frame of your iPod? Were you able to remove the touch screen, o-ring, and plastic bezel without further damage to the parts?
When I attempted to use a metal screwdriver I damaged the LCD.
Cita de barlowdo:
I am not familiar with a Metal Guitar pick, The plastic ones break very easily. (Even my Fender one) Did your metal pick damage the metal frame of your iPod? Were you able to remove the touch screen, o-ring, and plastic bezel without further damage to the parts? When I attempted to use a metal screwdriver I damaged the LCD.
Not too hard to find - either at music store a sometimes as a jewelry
"charm"... Mine is the latter - very thin, very stiff. It did not damage
the frame of the iPod at all. However - after replacing the new part I noted
a plastic protector sheet on the *underside* of the new screen - upon
removing the new top glass panel using the same guitar pick a second time, I
too damaged the LCD - I also damaged the bezel and O ring. The O ring is
very difficult to get off in a reusable condition. The bezel can come off
clean with patience - which I apparently have little of and hence purchased
a second glass top assembly to go along with the new LCD. I think the key
here is patience and very slow going - I also purchased an iPod opening tool
as another key learning is that while the guitar pick does work - it tends
to get inserted too deep damaging the bezel (separating it from the glass or
breaking it) or damaging internal parts. But the opening tool can sometimes
be not firm enough. I imagine with practice one can remove the entire
assembly in completely reusable condition - the trick it seems is to
understand that the bezel has vertical sides that must be lifted vertically
after being unclipped from the case - and that the glass has a tendency to
separate from the bezel...
I tried a flathead screwdriver and cracked the front panel.I learned that prying with a flathead screwdriver will damage it.
Cita de jgreengold:
Not too hard to find - either at music store a sometimes as a jewelry
"charm"... Mine is the latter - very thin, very stiff. It did not damage
the frame of the iPod at all. However - after replacing the new part I noted
a plastic protector sheet on the *underside* of the new screen - upon
removing the new top glass panel using the same guitar pick a second time, I
too damaged the LCD - I also damaged the bezel and O ring. The O ring is
very difficult to get off in a reusable condition. The bezel can come off
clean with patience - which I apparently have little of and hence purchased
a second glass top assembly to go along with the new LCD. I think the key
here is patience and very slow going - I also purchased an iPod opening tool
as another key learning is that while the guitar pick does work - it tends
to get inserted too deep damaging the bezel (separating it from the glass or
breaking it) or damaging internal parts. But the opening tool can sometimes
be not firm enough. I imagine with practice one can remove the entire
assembly in completely reusable condition - the trick it seems is to
understand that the bezel has vertical sides that must be lifted vertically
after being unclipped from the case - and that the glass has a tendency to
separate from the bezel...
Last night I recalled I use to own a metal pic it was a thumb pic for slide guitar. Anyway I decided to use my metal tools I bought from this site which are more rounded edges than the flat bladed screw driver that comes with kits. I made more progress with the metal tools and got what I think is all sides mostly up accept for the home button side which is really fighting me. I can easily tell where a clip is by sliding the tool alongside until I bump up against the side of a clip but I find it very difficult to push straight down to catch the top of the clip which it would seem would push away from the bezel. I am just not sure why this is difficult to do. I have a broken 2nd gen which I use as reference and it looks like the clip would easily push away. At any rate I am in the same predicament as you. I got the 2nd gen together only to find the home button sticks and wifi range is not what it use to be. So I am attempting to take the iPod apart a 2nd time to fix these issues without breaking the touch screen and lcd and so am taking my time. I just don't want to have to replace these brand new parts and have more money in this 8 gig 2nd gen than if I had just bought a brand new one.
Cita de jgreengold:
And the service and shipping are excellent - and now I'm gonna buy a new MacBook keyboard from this company and fix my daughters stuck "z" key - I love IFIXIT - would recommend to ALL - products and instructions are EXCELLENT - yes ebay *may* be cheaper but you get what you pay for... HIGHLY RECOMMEND IFIXIT...
Hi jgreengold, Can you help me to check if your iPod touch is like mine on this picture?: http://i44.tinypic.com/2a8ga6p.jpg
My iPod touch bottom glass is a bit raised over the chrome bezel at the right part. Please check it and many thanks for your reply!!
best I can see my touch glass is level with the frame - whether this picture is pre or post glass replacement, you need to gently, slowly, firmly, press down to try to seat the glass better in the frame/clip. I've see cases where after removint a glass top, the removal of the bexel is not perfect and it may leavel some of the black plastic bexel in the clip which makes it impossible to then copmpletely seat the new top glass/bezel.
isn't this instruction misleading? :
"Gently insert an iPod opening tool between the glass front panel and its plastic surround near the headphone jack."
i agree with mgardner: "Be sure to pry between the outer case and the rubber gasket and not between the gasket and the glass"
I changed the text to reflect this. It's currently the "unverified" version.
no way -
-
-
-
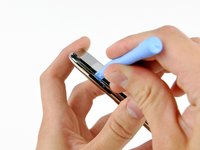
Inserta la herramienta de apertura de plástico entre el panel frontal y su marco de plástico y haz palanca en varios puntos a lo largo del borde izquierdo del Touch.
Careful not to use a (metal) spudger too hard, or it's really easy to bust the LCD screen with the pressure.
That happened to me, stabbed the LCD. Now its soild white with a green line
Joe45110 -
Cita de Tom:
If you insert the tool between the silver case and the plastic surround, you may be able to remove the digitizer and plastic surround as a "single piece".
That's the way I did it!
I have mine popped up about 1 mm on the top side and on both sides but so far have made no progress on bottom "home button" side. I think I have released the clips on the sides but I can't really see them and can't feel them with the small flat bladed screw driver that comes with replacement kits.
I would love to use the small plastic tool to pry up on the o ring plastic bezel side but I know I would easily cut the o- ring.
Has anyone got anymore suggestions?
Cita de barlowdo:
I have mine popped up about 1 mm on the top side and on both sides but so far have made no progress on bottom "home button" side. I think I have released the clips on the sides but I can't really see them and can't feel them with the small flat bladed screw driver that comes with replacement kits.
Update: I have been told that basically all I have accomplished is to raise the glass up above the surface of the metal case and really have not even got to the plastic bezel and disconnecting the clips. So maybe I have got no where so far.
I would love to use the small plastic tool to pry up on the o ring plastic bezel side but I know I would easily cut the o- ring.
Has anyone got anymore suggestions?
Cita de barlowdo:
Update: I have been told that basically all I have accomplished is to raise the glass up above the surface of the metal case and really have not even got to the plastic bezel and disconnecting the clips. So maybe I have got no where so far.
The metal clips from Step1 (shown in red) that snap on to the plastic frame are not right at the side of the display glas (under the black rubber) but a little more to the middle!
I thought I opened the metal clips - but what I really did was broke the plastic frame! Now my plastic frame is only on the top and bottom but it still fixes the front panel...
agreed - or a metal quitar pick or ay other metal object. It is relatively easy to insert such an instrument and get under the bezel placing direct pressure on the LCD screed... Slow, shallow, and easy... lifting vertically
Cita de barlowdo:
I finally got mine apart. The lower left metal clip was the absolute worst to get loose. Of course none of them were easy or obvious when they would let go freeing up the Bezel. It looks like I can reuse the complete touch screen and home button assembly and the rubber o ring is only slightly blemished around the lower left clip. I had to use the included repair kit flat bladed screw driver to loosen the last clip. All the other clips I was able to remove by using the metal tools sold thru this site. I did not want to use the flat bladed screw driver as it can damage the o ring but the other tools would just not catch the clip enough to lift it away from the bezel and then allowing the bezel to pop up.
So a question, "Why was my Home Button Jamming?" it is a self contained unit. Once out of the pod and in fact even after freeing up most of the bezel it works fine.What could it have been catching on when it is completely assembled? Is there side word pressure or torsional pressure introduced by the bezel snap clips and metal outside frame ?
Thanks to anyone with any suggestions about why the home button sticks in the unit but not when it is out of the unit.
I had to take mine apart again due to Home Button issues. The touch screen had come loose from the plastic bezel causing the home button to work incorrectly. In the process of trying to clean up old glue I broke the ribbon cable on the brand new only been used for a coupe of months touch screen. I ended up taking the screen all the way off and was left with popping out the plastic bezel without breaking it. I thought it would be difficult but with the touch screen already out of the way I got the plastic bezel off in under 20 minutes.
barlowdo -
The new screen i got its home button does not click idk if its just mine but it messes with me because your used to hearing a click when it registers
-
-
-
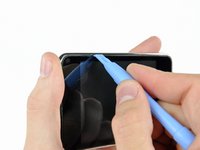
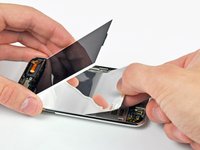
Continúa levantando el borde izquierdo hasta que los bordes superior e inferior comiencen a levantarse del Touch.
-
Una vez que los bordes superior e inferior se hayan levantado ligeramente del Touch, usa la herramienta de apertura para asegurarte de que el marco de plástico se separe de los clips a lo largo del interior del Touch.
Step 2
*Gently insert an iPod opening tool between the glass front panel and its plastic surround...
First pic from Step 4 shows what is meant.
But on all the other pics it looks like the opening tool is inserted between the plastic surrounding and the metall body!?
Cita de James Bond:
Step 2
*Gently insert an iPod opening tool between the glass front panel and its plastic surround...
First pic from Step 4 shows what is meant.
But on all the other pics it looks like the opening tool is inserted between the plastic surrounding and the metall body!?
I checked again and the pics from Step 4+ are correct.
But I would advice the following way:
Cita de Tom:
If you insert the tool between the silver case and the plastic surround, you may be able to remove the digitizer and plastic surround as a "single piece".
-
-
-
Continúa con el procedimiento de palanca, ahora concentrándote en separar el marco de plástico de los clips metálicos internos.
-
Haz palanca a lo largo del borde superior del Touch para separar aún más el panel frontal del resto del dispositivo.
OK I've repaired many of these now and I think I've found the trick. The trick is to start near the volume buttons and get one or two of the clips released. Then I work my way down the unit, across the bottom, up the side. The top then pretty much comes on it's own. The trick for each clip is, once I can apply upward prying pressure on the plastic frame, I get the spudger between the clip and the frame and the frame will come out of the clip. It's almost never a dramatic pop, it just slides up. I keep a dead, open one on my desk as a reference as to exactly where the clips are.
-
-
-
Levanta el panel frontal a lo largo del borde derecho utilizando el método descrito en los pasos anteriores.
-
Finalmente, trabaja alrededor de todo el perímetro del panel frontal hasta que se levante ligeramente del panel posterior.
This image shows at best an aspirational use for this tool. I have used so many of these and they are mostly useless except for prying up the connectors. As soon as you get about 1mm into the case it shreds and loses the edge, or breaks right below the reinforcing part. Tell me I’m wrong.
-
-
-
Usa el extremo plano de un spudger (o una herramienta de apertura) para levantar el conector del cable de la pantalla táctil de la placa lógica superior.
As with the iPhone, the number one reason for removing the digitizer is if it’s smashed. Removing the broken glass from the mid-frame is a delicate procedure and can be very tedious and time consuming. The rubber gasket and home button can be easily damaged if you are overzealous with a heat gun. The mid-frame section is now readily available as an orderable spare part (about £5!) and in my opinion you’ll get a much neater, cleaner repair if you replace this part too. There is however no need to purchase a new home button and switch as this can be easily removed from the old mid-frame and applied to the new one, you will need a hot iron to melt the plastic rivets that hold it in place though.
So what is the orientation for the putting the home button back in. The button has two tabs. Do the tabs face vertical or horizontal? What keeps the button from rotating? Do the tabs fit into slots?
barlowdo -
My iPod touch has the glass screen cover a bit raised over the chrome bezel at the bottom right, as you can see in this:
http://i44.tinypic.com/2a8ga6p.jpg
Is this normal?
Crazy simple! Wow! Now I pretty much have a new iPod. Thanks iFixit!
-
-
-
Inserta una pequeña herramienta de apertura de iPod con el borde inclinado hacia la parte inferior de la pantalla entre la luz de fondo de plástico blanco y el protector de metal debajo de ella.
-
Haz palanca a lo largo del borde inferior de la pantalla lo suficiente como para agarrarlo con los dedos.
Be careful not to put too much pressure on the LCD screen here or it will "bleed" or crack.
-
-
-
-
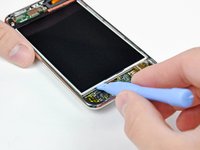
Mientras sostienes la pantalla con una mano, pasa una herramienta de apertura de iPod por los dos bordes largos del reflector de mylar unido a la bandeja de metal de la pantalla.
-
Cuando esté lo suficientemente libre de la bandeja de visualización, retira el reflector de mylar del Touch.
Step 11. Upon dissection of my iPod touch I note that the mylar reflector is attached firmly to the back of the LCD panel and NOT to the tray as pictured. I assume that the new LCD panel that I ordered from ifixit includes this mylar reflector pre attached to the back of the LCD?
I have a similar question about the Mylar
1. What is it for? The LCD appears to be a closed unit so I do not think it is for lighting the LCD. Is it a reflector for the Wifi or Blue Tooth?
2. Which way is it suppose to face. Shiny side up or shiny side down? In the pic above it is shiny side up but I see on my replacement LCD it is stuck on shiny side down.
Cita de barlowdo:
I have a similar question about the Mylar
1. What is it for? The LCD appears to be a closed unit so I do not think it is for lighting the LCD. Is it a reflector for the Wifi or Blue Tooth?
2. Which way is it suppose to face. Shiny side up or shiny side down? In the pic above it is shiny side up but I see on my replacement LCD it is stuck on shiny side down.
I'm fairly confident that the mylar is there for viewing the display in direct sunlight and for reflecting the backlight/incoming sunlight back out through the LCD. If you hold the display assembly (without mylar) in front of a very intense light source, you'll notice it is a bit transparent and that light transmits through both the LCD and the backlight. Now, if you check out the metal tray that the LCD sits in, you'll notice that it is not a uniform flat surface due to many voids for screw holes, etc. If you were to view the display in direct sunlight without the mylar in place, you'd probably see all the voids in the metal display tray as unwanted "shadows" in your display. I'd install the mylar with the shiny side facing toward the outer glass, as oriented in our repair guide.
-
-
-
Levanta ligeramente la bandeja metálica de la pantalla (la batería está unida a su parte inferior) y retira la pantalla del Touch, teniendo cuidado con el delicado cable que puede quedar atrapado.
Works as advertised - I did it!... Replaced LCD and Glass Digitizer in about 45 min (took my time)... Steps are perfectly described - just a reminder to all - remember to take off all protective films used in shipping on both sides of the LCD and both sides of the glass digitizer during installation. You do not want to have to remove the top again (that was a $69.00) mistake on my part...
What indication did you have that the plastic protectors were still on the new screens? Did parts fit too tightly? Was the screen Dim?
Just curious as this may be some issues others are experiencing.
barlowdo -
During re-assembly, make sure the new battery is positioned low on the back of the metal tray so it does not sit on the edge of the circut board. I dident realize i had done this until I applied a little pressure while seating the LCD screen and I cracked it. Now I get to replace the LCD.
So during re-assembly I transferred the logic board into a second case to avoid the headaches that stripped screws can cause but now every LCD I plug into the unit shows only a white screen and nothing else. I don't remember damaging anything, but did make the top-left screw (next to the digitizer connector) just a wee-bit too tight without realizing that the plastic spacer behind it had broken off.
Again, I don't see any rips in that part of the cable, but I also don't know anywhere else I could have damaged. Does anyone have an idea of why the LB doesn't want to show an image anymore?
-
-
-
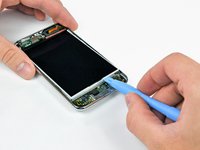
Usa el extremo plano de un spudger para sacar la batería del adhesivo que la sujeta a la bandeja de exhibición de metal.
-
Retira la bandeja de exhibición de metal y déjala a un lado.
-
Coloca la batería plana en la carcasa trasera.
-
-
-
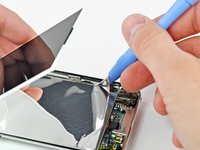
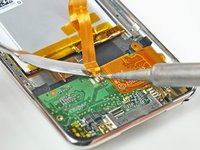
Comienza a trabajar desde un lado del cable plano de la batería. En nuestro caso, empezamos por la izquierda. Calienta la almohadilla de soldadura más a la izquierda mientras haces palanca suavemente desde debajo del cable plano para liberarlo de la placa. Repite este proceso para cada una de las dos almohadillas restantes.
Since the battery solder pads are lead-free soldered you need a higher temperature.
Solder with a temperature of about 320 to 340 °C. (I had to go up to 420 °C at my Soldering Station!?)
Avoiding frying the board...
I was noticing that your using a metal spudger to pry up each contact on the solder pad and cautioning not to bridge the contact. I'm thinking there could be a small amount of voltage left in the battery that if you bridged the solder pad with the metal spudger you could fry the board. Why not just cut the batteries ribbon cable before beginning? As long as the sync cable is not plugged in, I don't see where the device could get any charged in case the spudger slipped. (my kind of luck)
A CHISEL TIP ON YOUR SOLDERING IRON IS KEY
---------------------------------------------------------------
I ripped off pads using the method described here at ifixit. A better solution...
Use an iron with a chisel, not connical, tip. Your iron should be hot enough where you can touch one soldered section at a time -- it only takes about 2 seconds to melt the solder and "lightly" lift up on the cable.
removing the battery...
http://www.youtube.com/watch?v=LrFaXblPn...
be sure to watch the follow up video showing how to attach the battery, you will need a braid, but the tutorial is invaluable.
soldering on the new battery...
http://www.youtube.com/watch?v=aWeTbC-Oh...
P.S. If someone has a tutorial on getting solder pads to stick back or using solder to create new pads, I still have my first iPod touch that I goofed up following the directions shown on ifixit. I would love to see how you can repair the pads.
-
-
-
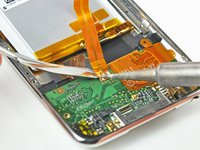
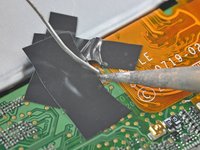
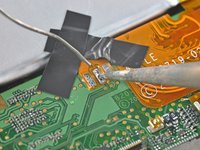
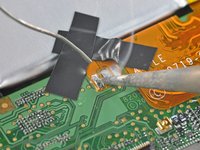
Luego, usa la punta de un soldador para aplanar la soldadura en las almohadillas de soldadura de la placa lógica. Las imágenes muestran una toma de 'antes' y 'después'.
What if I yanked the battery ribbon and the middle solder pad ripped out of the logic board? =/
Just did the same thing with the right pad. Any suggestions, anyone?
-
-
-
Coloca tu batería en el panel posterior, con el lado del cable hacia abajo, y usa dos tiras pequeñas de cinta aisladora para sujetar el cable contra las almohadillas de soldadura.
-
Coloca una tira de cinta sobre el extremo del cable plano de la batería para cubrir dos de las almohadillas de soldadura y mantén los contactos contra la placa lógica.
-
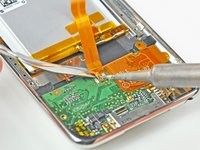
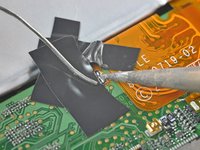
Calienta el contacto más a la derecha hasta que la soldadura debajo se derrita y aplica una pequeña cantidad de soldadura al contacto, permitiendo que fluya a través de los dos agujeros en el cable y hacia la placa lógica.
-
Tan pronto como la soldadura fluya hacia la unión, retira tanto la soldadura como el soldador.
-
-
-
Retira el trozo de cinta que cubre los dos cables restantes. Si estás satisfecho con la posición del cable en relación con las almohadillas en la placa, continúa. Si no es así, desuelda la primera conexión y vuelve a intentarlo.
-
Suelda las dos almohadillas restantes a la placa lógica, teniendo cuidado de no sobrecalentar el cable o la placa.
-


Para volver a armar tu dispositivo, sigue estas instrucciones en orden inverso.
Para volver a armar tu dispositivo, sigue estas instrucciones en orden inverso.
Cancelar: No complete esta guía.
127 personas más completaron esta guía.
Un agradecimiento especial a estos traductores:
100%

¡ Francisco Javier Saiz Esteban nos está ayudando a reparar el mundo! ¿Quieres contribuir?
Empezar a traducir ›

10 comentarios
1 thing I misunderstood or otherwise.
When removing the touch glass/front of the iPod you need to be very very very careful to actually get between the plastic/rubber and outer chrome frame, not between the glass and and the plastic/rubber part. Otherwise this will break all of your plastic pieces that are glued to your touch screen.
Another thing is I removed one of the contacts from the circuit board while removing the battery. I thought the ipod was toast. But upon further investigation I realized that that contact went though the board. So I scraped that area down to the other contacts and applied solder to it. Then I was able to reinstall the new battery. PHEW!
cool. you've got a same problem with me :)
Be careful when you insert your ipod opening tool into your device in step 2 and step 3. The ipod opening tool shouuld be inserted between the metal part and the rubber pad, not between the rubber pad and the edge of touch screen. It will damage your rubber pad surrounding the touch screen. Even though I did some damage to the rubber pad, it looks good when I finish the replacement :)
Did it! Taking apart the case of the Touch (first steps) was the hardest part. Soldering the battery in was a bit tricky. I tinned the connectors prior to soldering and that made it much easier than adding solder later. Reassembly took only about 20 minutes. Disassembly was about 45 minutes. Broke left side of plastic frame around glass front but when reassembled its no problem. You would never know it. I'm really pretty good at electronic assembly and I would agree that its very difficult.
Refer to this thread and I would suggest not desoldering the old pads. This happened to me and I was careful and work with electronics everyday.
Unfortunately the plastic tools I bought from here didn't work well and disintegrated into the iPod as I was trying to pry the front panel off. Ended up breaking the display's touch screen connector cable with al the worry about the plastic falling into the ipod. Oh well, this was a last ditch effort anyway, the OS is so old I can't get app updates anymore. I would argue that the tools they sell are not worth it but the repair guides are pretty good. I guess I'll be returning the bits I no longer need.
This was the most difficult repair I have ever attempted. The plastic tool was not adequate to remove the top glass. I ended up using jewelers screwdrivers. And of course I cracked the glass. The plastic ring around the glass also broke into multiple pieces. It was difficult getting everything aligned when putting it back together. It just did not snap back together. I cracked the glass in another spot. After that I dropped it in the circular file. Sorry Mr Ifixit, I tried.
Hello from 2016. I followed the instructions. Unfortunately, the plastic does disintegrate as you're trying to push off the front bezel. I had to use a tiny jeweler's pry to force it open. I went into the screen glass and not the plastic inadvertently doing some damage. That was the hardest part.
Long story short, I did manage to replace the battery. The iPod touch now boots properly. But the touchscreen is no longer functional.
Meh, desperation for salvage. I tried!
A quick note that worked great for me. Print out the picture that has the locations of the metal connector clips and scale it to actual size. Then place the iTouch on top of the printed picture and it will show you exactly where to insert the opening tool. Use it as a template.
sean - Contestar
Did anyone see a rubber seal? It's just a plastic frame that's slightly rubbery. It's not made of two parts as far as I can tell.
no way - Contestar