Saltar al contenido principal
Seville Classics MSC10166 Disassembly

Seville Classics MSC10166 Disassembly

Queena Phung

Queena Phung y 8 otros contribuidores

Última actualización: January 20, 2025

Sin estimación
Moderado
Fotos de acción
Necesita mejores imágenes
Necesita más imágenes
¡Viñetas!
Faltan Detalles

Introducción

Ir al paso 1

This repair guide solves any rotation and vibration problems that the fan might have. The track at the bottom of the fan is the main source of rotation and vibration problems. Use the tear-down guide to remove all other components to get to the track.

Qué necesitas

iFixit gana una comisión si finalizas una compra usando estos enlaces.
  1. Seville Classics MSC10166 Disassembly, PCB (Printed Circuit Board): paso 1, imagen 1 de 1
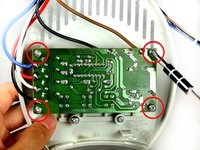
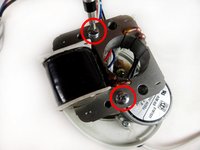
    • Use the Phillips #2 screwdriver to remove the four 6 mm screws by unscrewing counterclockwise.

  2. Seville Classics MSC10166 Disassembly: paso 2, imagen 1 de 1
    • Pull the front and back cover apart.

    • Be careful not to pull the front cover off completely. It holds the wires.

  3. Seville Classics MSC10166 Disassembly: paso 3, imagen 1 de 1
    • Remove the Phillips 6 mm screw that holds the circuit board to the outer shell of the fan.

    • Shock warning: Make sure the fan is unplugged before removing the circuit board.

  4. Seville Classics MSC10166 Disassembly: paso 4, imagen 1 de 1
    • Remove the top cover containing the circuit board and the wires by pulling it away from the outer shell of the fan.

  5. Seville Classics MSC10166 Disassembly: paso 5, imagen 1 de 2 Seville Classics MSC10166 Disassembly: paso 5, imagen 2 de 2
    • Remove the screws from the four corners of the circuit board.

    • Remove the circuit board from the top cover.

    • Do not touch the other side of the circuit board to avoid damaging the circuit elements.

  6. Seville Classics MSC10166 Disassembly, Rotating Blade and Transformer: paso 6, imagen 1 de 2 Seville Classics MSC10166 Disassembly, Rotating Blade and Transformer: paso 6, imagen 2 de 2
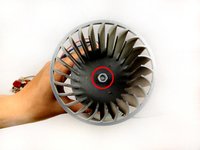
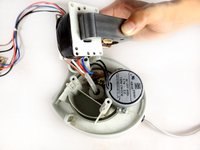
    • In order to remove the fan blade pliers were used to remove the holding nut.

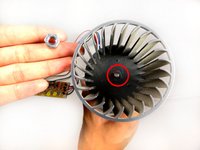
    • After the holding nut is loose, use the pliers to pull up to remove the nut.

  7. Seville Classics MSC10166 Disassembly: paso 7, imagen 1 de 1
    • Remove the two bronze Phillips 29-mm bolts that hold the fan blade to the transformer.

    • Use a pair of pliers to hold the nut at the bottom of the transformer, as you unscrew from left-to-right at the top of the transformer. After, pull up and remove both the screw and nut.

  8. Seville Classics MSC10166 Disassembly: paso 8, imagen 1 de 2 Seville Classics MSC10166 Disassembly: paso 8, imagen 2 de 2
    • Next, remove the two silver Phillips (8-mm head) 40-mm screws from the transformer.

    • Remove screws by pulling them away from the base.

    • The transformer should be free after this step.

  9. Seville Classics MSC10166 Disassembly, Seville Classics MSC10166: paso 9, imagen 1 de 2 Seville Classics MSC10166 Disassembly, Seville Classics MSC10166: paso 9, imagen 2 de 2
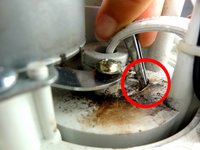
    • Clean the track, removing any obstructions.

    • Lubricate the track with grease.

Conclusión

To reassemble your device, follow these instructions in reverse order.

2 personas más completaron esta guía.

Queena Phung

Miembro Desde 09/26/12

114 Reputación

3 Guías creadas

Equipo

Cal Poly, Team 15-46, Forte Fall 2012 Miembro de Cal Poly, Team 15-46, Forte Fall 2012

CPSU-FORTE-F12S15G46

5 Miembros

6 Guías creadas

0 comentarios

Agregar Comentario

Ver Estadísticas:

Ultimas 24 horas: 2

Ultimos 7 días: 7

Ultimos 30 días: 27

Todo El Tiempo: 11,327