Saltar al contenido principal
Samsung WB35F Flash Capacitor Replacement

Samsung WB35F Flash Capacitor Replacement

Sarmad Khan

Sarmad Khan y 4 otros contribuidores

Última actualización: November 25, 2020

15 - 30 minutos
Moderado

Introducción

Ir al paso 1

This guide will give user step by step instructions on how to replace the flash capacitor of the camera.

Qué necesitas

Herramientas

Ver más…

  1. Samsung WB35F Flash Capacitor Replacement, Rear Case: paso 1, imagen 1 de 3 Samsung WB35F Flash Capacitor Replacement, Rear Case: paso 1, imagen 2 de 3 Samsung WB35F Flash Capacitor Replacement, Rear Case: paso 1, imagen 3 de 3
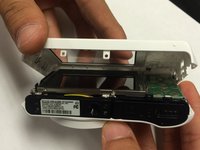
    • The first thing to do will be unscrew all the screws using Phillips #000 Screwdriver.

    • Keep all the screws in order. Black screws goes under the bottom of camera, and the silver screws goes on the sides and inside of the camera.

  2. Samsung WB35F Flash Capacitor Replacement: paso 2, imagen 1 de 2 Samsung WB35F Flash Capacitor Replacement: paso 2, imagen 2 de 2
    • Using the spudger, and plastic opening tool open the casing of camera.

  3. Samsung WB35F Flash Capacitor Replacement: paso 3, imagen 1 de 3 Samsung WB35F Flash Capacitor Replacement: paso 3, imagen 2 de 3 Samsung WB35F Flash Capacitor Replacement: paso 3, imagen 3 de 3
    • Once you open the camera case, you will be able to work on any part of the camera.

  4. Samsung WB35F Flash Capacitor Replacement, Flash Capacitor: paso 4, imagen 1 de 2 Samsung WB35F Flash Capacitor Replacement, Flash Capacitor: paso 4, imagen 2 de 2
    • Caution: Touching the capacitor wires may cause serious injury. Use a capacitor discharge probe to safely rid the capacitors of dangerous charges.

    • Carefully take out the capacitor using the spudger.

  5. Samsung WB35F Flash Capacitor Replacement: paso 5, imagen 1 de 1
    • Disconnect the wire from battery and replace the old battery with new battery.

    • Connect the wires to new battery and put the battery back in terminal.

    • Connect the positive wire to the positive terminal of the battery and negative wire to the the negative terminal of the battery.

Conclusión

To reassemble your device, follow these instructions in reverse order.

Sarmad Khan

Miembro Desde 01/09/15

525 Reputación

5 Guías creadas

Equipo

USF Tampa, Team 1-6, Tanski Winter 2015 Miembro de USF Tampa, Team 1-6, Tanski Winter 2015

USFT-TANSKI-W15S1G6

Miembros de 4

10 Guías creadas

0 comentarios

Agregar Comentario

Ver Estadísticas:

Ultimas 24 horas: 1

Ultimos 7 días: 13

Ultimos 30 días: 39

Todo El Tiempo: 2,123