Saltar al contenido principal
Samsung Galaxy Note 10.1 microSD Port Replacement

Samsung Galaxy Note 10.1 microSD Port Replacement

Tyler Salomone

Tyler Salomone y 4 otros contribuidores

Última actualización: January 11, 2019

20 minuto
Fácil
Fotos de acción
Mejor introducción

Qué necesitas

Partes

Herramientas

Ver más…

iFixit gana una comisión si finalizas una compra usando estos enlaces.
  1. Samsung Galaxy Note 10.1 microSD Port Replacement, Removing the Top Piece: paso 1, imagen 1 de 3 Samsung Galaxy Note 10.1 microSD Port Replacement, Removing the Top Piece: paso 1, imagen 2 de 3 Samsung Galaxy Note 10.1 microSD Port Replacement, Removing the Top Piece: paso 1, imagen 3 de 3
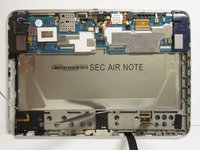
    • This is the back of the device and where you willl begin to take it apart

    • It is necessary to remove the silver piece covering the camera first before removing the bigger back piece.

    • Use the plastic opening tools to pry along the indicated box.

    • Lift up the silver piece to reveal the rest of the back cover.

  2. Samsung Galaxy Note 10.1 microSD Port Replacement, Removing the Back Cover: paso 2, imagen 1 de 3 Samsung Galaxy Note 10.1 microSD Port Replacement, Removing the Back Cover: paso 2, imagen 2 de 3 Samsung Galaxy Note 10.1 microSD Port Replacement, Removing the Back Cover: paso 2, imagen 3 de 3
    • Unscrew the three 5 mm screws indicated by the red circles with the Philips #00 screwdriver.

    • Using the plastic opening tools pry along the bottom of the device, moving to the sides of the cover to the top.

    • Remove the back cover.

    • At this point use anti-static gloves or do NOT take it apart on carpet.

  3. Samsung Galaxy Note 10.1 microSD Port Replacement, Removing the microSD Port: paso 3, imagen 1 de 3 Samsung Galaxy Note 10.1 microSD Port Replacement, Removing the microSD Port: paso 3, imagen 2 de 3 Samsung Galaxy Note 10.1 microSD Port Replacement, Removing the microSD Port: paso 3, imagen 3 de 3
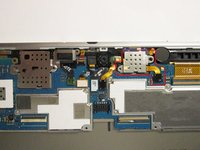
    • Unscrew the two 2 mm screws indicated by the red circles with the #00 Philips Screwdriver.

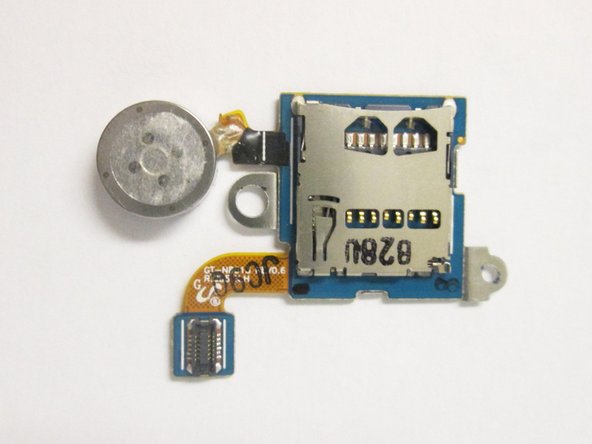
    • Starting with the black motherboard connector, remove the module indicated by the red box in the second picture.

    • Replace the microSD port with a similar model.

Conclusión

To reassemble your device, follow these instructions in reverse order.

5 personas más completaron esta guía.

Tyler Salomone

Miembro Desde 09/22/14

1,032 Reputación

3 Guías creadas

Equipo

USF Tampa, Team 3-7, Brown Fall 2014 Miembro de USF Tampa, Team 3-7, Brown Fall 2014

USFT-BROWN-F14S3G7

Miembros de 3

9 Guías creadas

2 comentarios

Be sure to include screw lengths to the nearest mm on all guides.

Dan Brown - Contestar

In this guide, you missed a step on removing the battery.

John Peterson - Contestar

Agregar Comentario

Ver Estadísticas:

Ultimas 24 horas: 1

Ultimos 7 días: 1

Ultimos 30 días: 17

Todo El Tiempo: 3,953