Introducción
Sigue esta guia para reemplazar un ventilador defectuooso o dañado en la Nintendo Switch Lite.
Advertencia: Este procedimiento requiere desmontar la pletina protectora y el disipador térmico. La pasta térmica deberá ser eliminada y limpiada de ambas partes, así como de la CPU. Deberá aplicarse pasta térmica nueva en la pletina protectora y el disipador térmico antes de volver a montar ambas partes.
Qué necesitas
-
-
Usa un destornillador Y00 para quitar los cuatro tornillos de 6.3 mm de largo que aseguran el panel trasero.
-
-
-
Usa un destornillador JIS 000 o un Phillips 000 para remover los siguientes tornillos que sujetan el panel trasero.
-
Dos tornillos de 3.6 mm en la parte superior del dispositivo.
-
Dos tornillos de 3.6 mm en la parte inferior del dispositivo.
I accidentally stripped the back screw and now I can't open it. I removed all the other screws. What should I do?
-
-
-
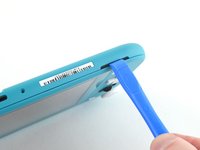
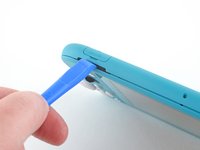
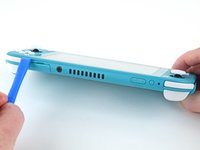
Inserta una herramienta de apertura en la rejilla del altavoz izquierdo en la parte inferior del dispositivo.
-
Gira la herramienta de apertura para liberar los clips que aseguran el panel trasero.
-
-
-
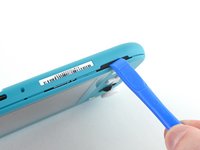
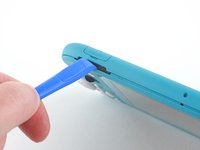
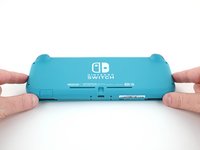
Desliza la herramienta de apertura por la esquina inferior izquierda para liberar los clips del lado izquierdo del dispositivo.
-
-
-
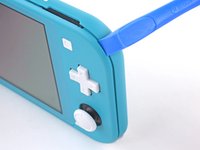
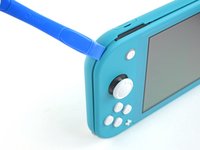
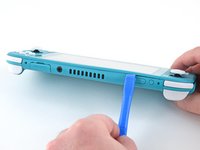
Inserta la herramienta de apertura en la rejilla del altavoz derecho en la parte inferior en el dispositivo.
-
Gira la herramienta de apertura para liberar los clips.
-
-
-
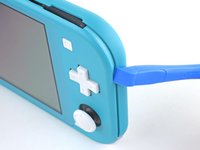
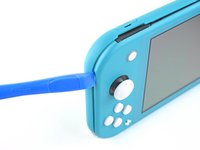
Desliza y empuja la herramienta de apertura por la esquina inferior derecha para liberar los clips del lado derecho del dispositivo.
-
-
-
-
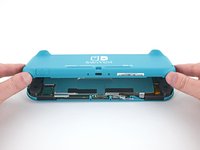
Levanta el borde inferior del panel trasero abriéndolo como un libro.
-
Remueve el panel trasero.
-
-
-
Usa un destornillador JIS 000 o un Phillips (de cruz) 000 para remover los cuatro tornillos siguientes:
-
Tres tornillos de 3.1 mm
-
Un tornillo de 4.5 mm
There are four screws instead of three mentioned
With how easy it seems to be to do serious damage with the next few steps, I figured I'd say that realistically you can skip steps 9-13 when doing this repair. While they provide a bit of extra security by disconnecting the battery, the left stick is completely accessible and replaceable without touching the heat shield or anything underneath (And steps 17 and 18 disconnect power from the daughter board regardless).
i stripped a &&^&^$^ screw
Well I actually removed the screw right next to the 4.5 screw. I did not realize it till my son showed me why the plate wouldn't release. Ha ha, it's funny now but yeah not a big deal. I could have bent it badly assuming I took all screws out though. For anyone reading this before going in. 👍
-
-
-
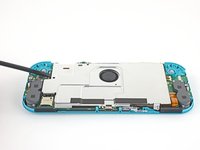
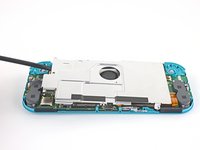
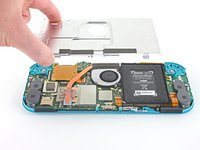
Usa un spudger o sus dedos para levantar la placa del escudo y sacarla del dispositivo.
-
Remueve la placa de escudo.
What type of Thermal Paste would you guys recommend? I clicked on the picture but nothing.
Personnaly i use some Mx-6 from Artic, really good quality/price, never have to complain.
Nothing -
-
-
-
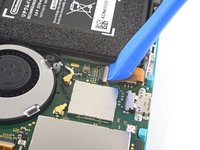
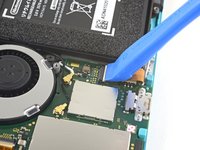
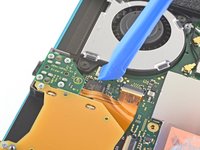
Utiliza una herramienta de apertura o tu uña para levantar la pequeña tapa de cierre con bisagra del conector ZIF del cable de interconexión de la placa madre.
The clip broke off when trying to remove this cable. Audio only works through headphones and the display now won’t turn on after the clip broke. Does anyone know where I could get a clip or how I could fix it without it?
Mi è successa la stessa cosa è non so come ripararla! Chissà se c’è un modo!
-
-
-
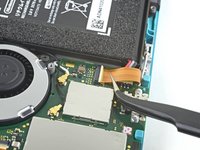
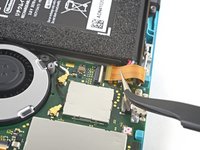
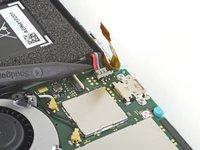
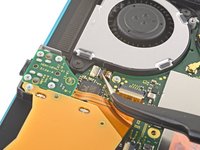
Usa un par de pinzas para sacar el cable de interconexión de su conector en la placa madre.
I turned the unit off beforehand, I used tweezers just like the instructions said (ifixit branded) , my device sparked and now it won’t turn back on
The flap came off is it important or is there a way t fix it?
We're you able to get it working without the white flap? My screen is not working after putting it back together and i noticed this white flap was falling off
Did you get it working without the white flap? Everything on the switch works fine except for audio going through headphones and the display not turning on.
do not use metal sharp pointed tweezers! you will rip your ribbon cable. Use the inside of a Bic type pen or something else dull and plastic to pull the cable away by putting the pen part where the first bend is.
Maybe tape the Tweezers or smear some hot glue on them to insulate them to save you time and money.
Maybe put all the Warnings at the start of the guide as well. We fix it geeks tend to get excited when fixing things 😁
-
-
-
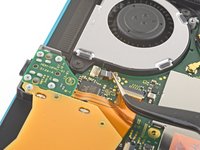
Usa la punta de un spudger para levantar el conector de la batería de su zócalo en la placa madre.
Caution the connector may not be properly soldered onto the motherboard. For me it snapped off the pins and now have to find a place to get that fixed if even possible. may have bricked it.
Yup, broke the connector right off the motherboard. Thanks, ifixit -_-
I backed out when I reached this point. I couldn't risk damaging it. Do u just need to pull it up? Did you mean that it might have been soldered shut below?
You should just need to pull straight up, but make sure you’re pulling on the wires or the gray plug—do not pull on the black socket or it can snap off of the motherboard.
With how easy it seems to be to do serious damage at this point, I figured I'd say that realistically you can skip steps 9-13 when doing this repair. While they provide a bit of extra security by disconnecting the battery, the left stick is completely accessible and replaceable without touching the heat shield or anything underneath (And steps 17 and 18 disconnect power from the daughter board regardless).
just broke my connector... ifixit PLEASE put a warning on how fragile the solder on this connector is.
Note for this step, you do not need to apply a lot of force. I used two tools here: small screwdriver to hold down the black base, and one side of fine-tipped tweezers to get under all 3 wires. Gently, push down on the tweezers to push the wires upwards, which should force the gray connector up and off the base. It did not take a lot of force. Take your time and it will be fine. Again, like others have said, do NOT pull or pry up the black base.
-
-
-
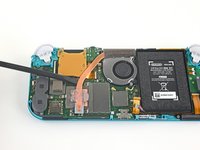
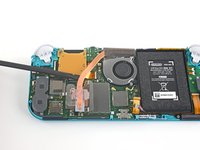
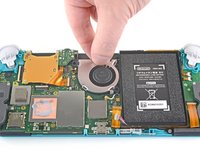
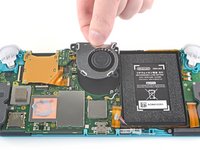
Usa el extremo plano de un spudger o tus dedos para despegar con cuidado la espuma que está adherida al ventilador.
When reassembling, the foam may fold down between the fan and heatsink, blocking airflow. Gently lift the foam back up on top of the fan. The adhesive film should hold the foam together.
Is removing the heat sink absolutely necessary?
It’s not necessary, but it makes it much easier to remove and replace the game card reader, since the heat sink partially covers the connector.
Not really…….. I never remove it. It slides out quite easily once disconnected.
-
-
-
Usa un destornillador JIS o un destornillador oficial iFixit PH 000 para quitar los tres tornillos de 3 mm que aseguran el disipador de calor a la placa madre.
Non le tre ventole ma le tre viti
Grazie per avercelo segnalato! Ho apportato la modifica. iFixit è una wiki, quindi ogni utente può modificare le pagine: se trovi altri errori in futuro, sentiti libero di fare la modifica tu stesso!
-
-
-
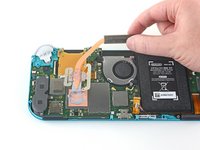
Usa un spudger o tus dedos para levantar el disipador de calor y sacarlo de la placa madre.
16.5 remove cartridge / headphones jack……….
My kit did not come with thermal paste..
-
-
-
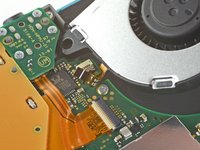
Usa una herramienta de apertura o la uña para levantar la pequeña solapa de bloqueo con bisagras en el conector ZIF del cable del ventilador.
-


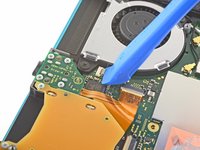


Para montar de nuevo la consola, por favor sigue estas mismas instrucciones en orden inverso.
Recuerda tirar los desechos electrónicos en el contenedor apropiado.
¿La reparación no ha funcionado? Prueba algún diagnóstico de averías sencillas, o pregunta a la comunidad de Nintendo Switch Lite para recibir ayuda.
Cancelar: No complete esta guía.
7 personas más completaron esta guía.
Un agradecimiento especial a estos traductores:
100%


Estos traductores nos están ayudando a reparar el mundo! ¿Quieres contribuir?
Empezar a traducir ›

2 comentarios
I used this guide to put my new fan in and let me just say THANK YOU!!! All I could find was ones for regular Switches on YouTube and not the Lite. The only problem I had was I'm not sure which side of the cable on the fan should be facing up. I looked on your website and the fan listen on here has one side with a gold part at the end where you insert it into the connector. Is that the side that goes up?
Many thanks for this guide it helped me so much it was pretty straight forward to do but attaching the fan ribbon/power cord and trying not to strip the tiny screws heads was probably the hardest bits really
All my screws got stripped any ideas on how to remove?
Almost A Mammal - Contestar
A Y0 screwdriver seemed to work better for me.
Tommy Morrill - Contestar
What type of screw driver do I use to un screw the screws and which way
Luca Capito - Contestar
Y 0.6 was all I had but it seemed to fit perfectly
Trevor - Contestar
Like really snug? I've gotten away with using Drivers either bigger or smaller but I hate doing it. But if 0.6 is the exact size I need, then I'll get that. I don't wanna strip my client's Switch Lite's screws.
Vincent Valodze -