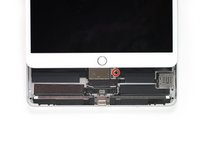
Introducción
Sigue esta guía para remover o reemplazar la pantalla en un iPad Air 3 para modelos Wi-Fi y celular.
El sensor de Touch ID del botón inicio esta unido a la tarjeta lógica. En orden de dejar el Touch ID funcionado, necesitarás transferir el botón de inicio original al nuevo conjunto de panel frontal.
Algunas fotos en esta guía son de un diferente modelo y pueden contener discrepancias visuales, pero no afectarán el procedimiento.
Qué necesitas
-
-
Es posible que deba volver a aplicar calor repetidamente durante este proceso para evitar que el adhesivo se enfríe y se endurezca.
-
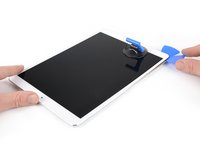
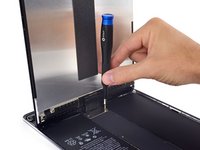
Prepara un iOpener y colócalo en el borde inferior de la pantalla del iPad durante unos dos minutos.
-
-
Herramienta utilizada en este paso:Clampy - Anti-Clamp$24.95
-
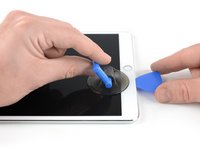
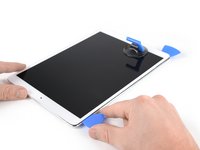
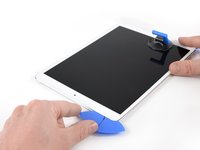
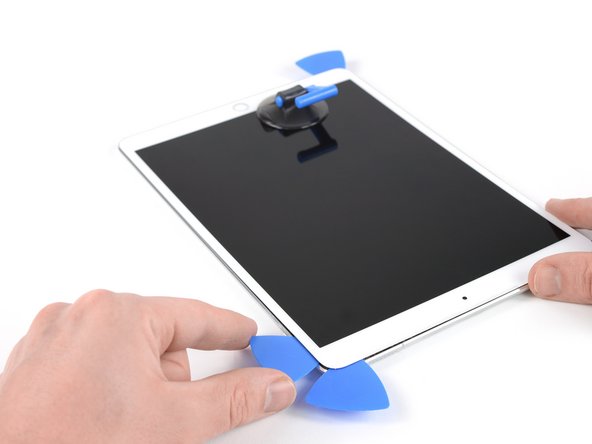
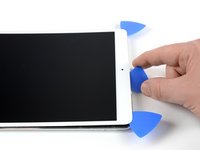
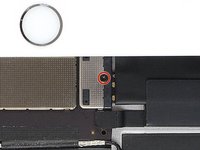
Coloca una ventosa junto al botón de inicio del iPad y presiona hacia abajo para crear un sello.
-
Tira firmemente hacia arriba de la ventosa para crear un pequeño espacio entre el panel frontal y la carcasa trasera.
-
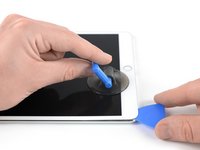
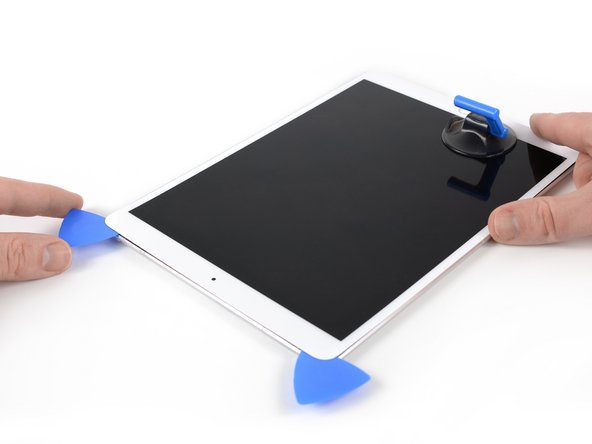
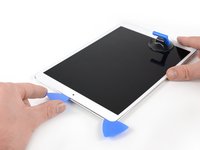
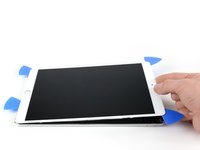
Una vez que hayas abierto un espacio suficiente, inserte una púa de apertura en el espacio.
i used a proper suction tile puller (small one from DIY store used to hold bathroom tiles) to lift the screen off after heating around the edge using a heat gun. Be careful - It didn't damage anything. The tiny suction things that come with those iPhone kits are not strong enough for this. The one in picture might be good, but looks similar to the kits ones that have key ring.
The suction cup that comes with the iPad battery replacement is plenty large enough and strong enough.
CAUTION, do not push the picks in more than a the width of the replacement screen adhesive strips. You will damage the $200 screen, maybe break the glass. The screen is multiple layers and the picks can get in-between the layers if you push too far in. I got into trouble at the lower left corner. After getting the screen loose, I found that I only need a 2-3 millimeters on the sides and bottom, and four or five millimeters in the corners.
These comments need to be highlighted and added to the guide. The pictures showing the pick placement are very misleading. The thickness of the adhesive is only 2mm as you had mentioned! Waiting now for my replacement screen. Apples products look amazing but now I realize I would have been way better off just living with a one hour battery and or buying a new ipad.
-
-
-
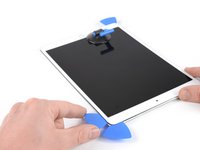
Corta el adhesivo debajo de la pantalla deslizando la púa a lo largo del borde de la pantalla, hacia la esquina inferior izquierda.
-
Deja la púa en su lugar temporalmente para evitar que el adhesivo se vuelva a sellar.
-
-
-
Aplica calor al borde izquierdo del iPad durante unos dos minutos, o hasta que esté un poco demasiado caliente para tocarlo cómodamente.
-
Si es necesario, vuelve a calentar su iOpener durante unos segundos o hasta que esté demasiado caliente para tocarlo. Ten cuidado de no sobrecalentar el iOpener o podría explotar.
-
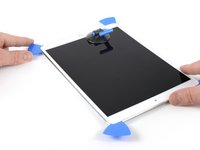
Inserta una segunda púa de apertura en la esquina inferior izquierda del iPad.
-
Desliza la segunda púa de apertura a lo largo del lado izquierdo de la pantalla para separar el adhesivo debajo.
-
Deja la púa de apertura insertada cerca de la esquina superior izquierda del iPad para evitar que el adhesivo se vuelva a sellar.
-
-
-
Aplica calor al borde final derecho del iPad durante unos dos minutos, o hasta que esté un poco demasiado caliente para tocarlo cómodamente.
-
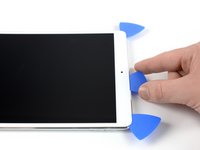
Inserta una cuarta púa de apertura en la esquina superior derecha del iPad.
-
Desliza la púa de apertura hacia la esquina inferior derecha para cortar el adhesivo.
-
Desliza la púa de apertura alrededor de la esquina inferior derecha, haciendo una pausa para aplicar más calor si es necesario, y corta el adhesivo restante en el borde inferior, pero deténte antes de llegar al botón de inicio.
We must be very careful when we are prying left and right size bezel to peel off the screen as there very little gap between edges and LCD. Slightly inside push can crack LCD. We need to pay full care and raising edges very very slowly.
-
-
-
Inserta una quinta púa de apertura en la parte superior del iPad cerca (pero no directamente) de la cámara frontal.
-
Gire suavemente la púa para separar el ensamblaje de la pantalla del iPad.
-
Si es necesario, aplique más calor y / o corte cualquier adhesivo restante que evite que la pantalla se separe.
Be very gentle when twisting. My screen broke in this step. I would not twist it but try to remove glue further as there is a aluminium support of the screen in the wide area beneath the light sensors and there is glue on that also preventing in easy lifting the screen. Just be careful not to damage the light sensors and camera.
-
-
-
-
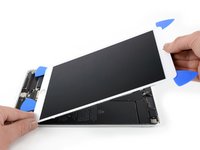
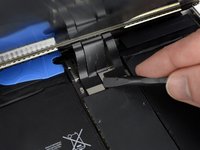
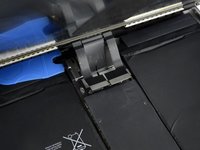
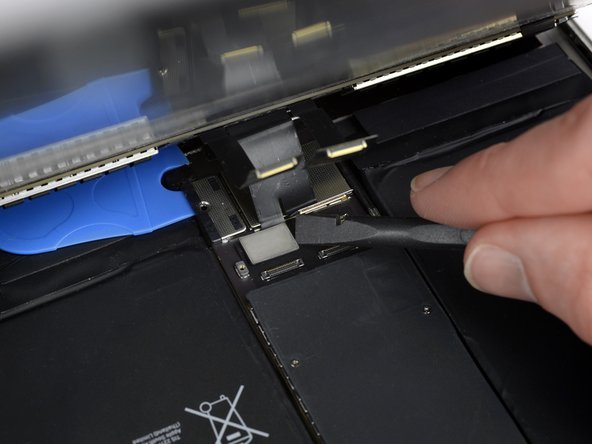
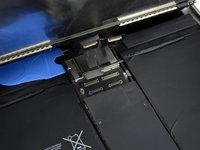
Levanta el ensamblaje de la pantalla desde su borde superior y deslízalo con cuidado hacia arriba (hacia la cámara frontal y el conector para auriculares), hasta que el tornillo que sujeta el conector de alimentación de la batería se vea en la parte inferior.
How do you go about getting to this battery connector as it is covered by a large metal shield above the logic board, if you do not disconnect the battery you risk frying the back light.
The metal shield is not relevant for this. You can leave it in place or remove it if it comes of. Once the screw of the plate is removed you will be able to lift the print a little bit and put someting between the battery connector and the board connector. The connector is beneath the print. Look further on to see a deck card is used for this.
-
-
This picture looks nothing like my A2152 battery connector. I can’t really tell what is happening here.
This is an iPad Pro not an iPad Air which is different.
Dan -
-
-
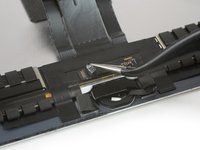
Para desconectar la batería, desliza una punta de un bloqueador de baterías o la punta de una púa de apertura bajo el conector de alimentación de la batería para asegurar que el circuito de alimentación se interrumpe.
-
Deja el bloqueador de la batería en su lugar mientras trabajas.
I found it very hard to fit something under the battery power connector. I did not have a battery blocker, so I tried a playing card. I was not able to slide it between the springs. The section of the battery power connector, above the cantilever springs, did not seem to want to give at all, like in the picture above. If other people had success, I would love to hear how.
I didn’t have success either, but i kept myself grounded, and avoided battery contact as much as possible.
I used a playing card cut to shape. I had to make a couple, to try a few times.. It does go in eventually. Not deep, but enough to break connection. You can test by trying to switch on iPad.
It took some time but I was able to get it under the back part and slide it forward.
You must disconnect the battery before plugging the new screen. I think i didn't break the circuit in first attempt and shorted the screen, the result was half of the screen didn't work. I used a playing card. Second attempt was successful with new screen.
I believe I have a good solution to this problem. I was dissatisfied with the thickness of the battery blocker, or even a thin guitar pick, for that matter; both required force and I feared bending the springs or leaving the connection intact.
What worked for me was cutting a small strip of non-conductive, static-proof film (the kind that RAM and other sensitive components come in). There was every reason to trust in its non-conductivity but just to be sure, I used a VOM to test; its resistance was out of the VOMs range, meaning that its conductivity was nil. I used a spudger to gently lift the logic board off of the battery contacts and slid the non-conductive strip in between; went without a hitch.
When reassembling, I laid the strip on the battery contacts, laid the logic board on top, installed it, connected the display panel and gently drew the slip out and installed the battery screw. Worked like a charm.
These are some extremely misleading set of instructions and picture. Much better if you have the battery discharged, so don't need to worry about blocking the connector. But DO NOT force anything in the through the socket and certainly do not try to bend up the soldered cover, as it appears to be happening in the picture. You will break the connector, most likely resulting in ipad shutting down every 3 minutes from the notorious "thermal sensor missing" panic system crash.
-
-
-
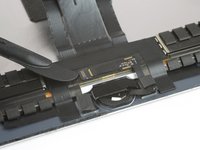
Levante lentamente la pantalla desde su borde superior, teniendo cuidado de no tensar los cables planos conectados.
-
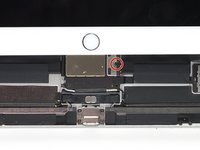
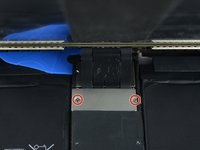
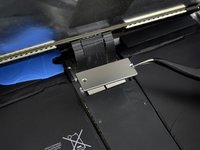
Quite los dos tornillos Phillips de 1,3 mm que sujetan el soporte de la cubierta del conector de la pantalla.
-
Retire el soporte de la cubierta del conector de la pantalla.
Here it is very precocious steps to do. Flx cables to connectors are small in size and we cannot lift the display vertically. Therefore, we may struggle to unscrew the metal shield. We need to use smaller size of philip screw driver or place vertically the display to create enough gap between philip screw driver and the cover bracket. Similarly, when we are replacing new display we need to be carefully connect four flex cable with connectors with logic board.
agree, with re-assembly very tiny screws and awkward positioning, the back two cables pop off if not careful.
I did this step using just the tip of the PH000 screwdriver, it made it much easier to get my hands into the small space, the replacement screen from ifixit had tighter cables that I was not comfortable stretching out to go to a 90* angle to screw back on. Make sure your tip is magnetized for best results :)!
Meaning no disrespect for this excellent guide, I found this photo to be a bit misleading; at least in my case. It clearly shows about 90˚ between the case and the display. I tested the limits with the one I was repairing and could find no way to raise the display far enough to clear a screwdriver without jeopardizing the cables. I resorted to the same solution that Amber Wooldridge discovered; using a PH000 bit and hand-tightening. I had a tiny needle-nosed plier that I used to tighten them a bit (but very gently).
-
-
-
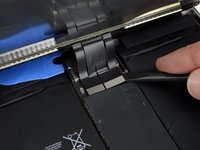
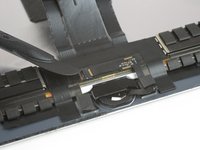
Usa un spudger para desconectar los dos conectores flexibles de la pantalla visible haciendo palanca suavemente hacia arriba de sus enchufes.
-
Para volver a colocar los conectores a presión como éste, alinea con cuidado y presiona hacia abajo en un lado hasta que encaje en su sitio, y luego repite en el otro lado. No presiones en el centro. Si el conector está mal alineado, las clavijas pueden doblarse y causar daños permanentes.
-
-
-
Usa tu spudger para levantarlos suavemente y desconectarlos.
I went to replace the LCD assembly on an ipad Air 3, and one of the flex cables on the new LCD assembly broke in half. The flex cables on the old assembly work well and are intact. Is it possible to transfer the old flex cable(s) to the new assembly, or can I solder the broken pieces of the new flex cable together? I have also contacted the part supplier about this and am awaiting a response.
-
-
-
Retira el ensamblaje de la pantalla.
Definitely test your iPad’s functions before sealing it up. I needed to reopen the display to reconnect the display connectors in order to have the display functioning properly. As a result, the adhesive strips did not work as well and I needed to tape some of the edges closed with a small section of strong clear packing tape.
I stuck the adhesive to the chassis first. That was messy because the plastic that covers the adhesive seems to be for screen side first. So you end up exposing both sides and those collect dust. I now realise you're supposed to put the adhesive on screen first. Not sure if it would have made much difference in the outcome (mine screen is not stuck in some places).
I found this out too. I had two sealing kits and they were both meant to be fixed on the screen first. I did not managed to get the screen to stick with the body as well. Now used some B6000 glue in addition.
agrior -
-
-
-
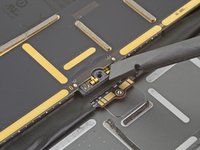
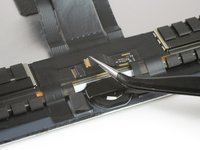
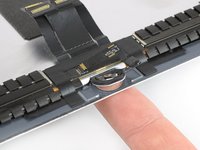
Usa tu iOpener o secador de pelo durante aproximadamente un minuto para calentar el área del botón de inicio a fin de ablandar el adhesivo que asegura los componentes del botón de inicio.
-
-
Herramienta utilizada en este paso:Tweezers$4.99
-
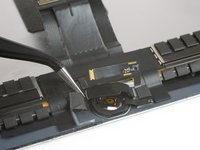
Usa un par de pinzas para despegar cualquier cinta que cubra el conector ZIF sobre el botón de inicio.
-
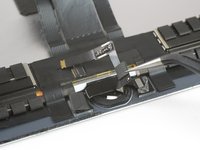
Usa la punta de un spudger, una herramienta de apertura o la uña para levantar la pequeña solapa de bloqueo con bisagras en el conector ZIF del cable del botón de inicio.
-
-
Herramienta utilizada en este paso:Halberd Spudger$2.99
-
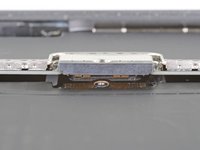
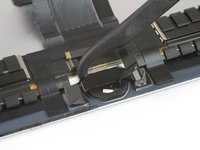
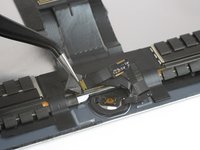
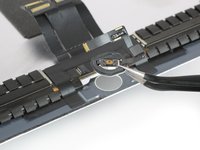
Levanta suavemente el soporte del botón de inicio insertando el gancho de un spudger halberd o el borde plano de un spudger normal debajo del soporte y haz palanca suavemente hacia el borde inferior del iPad.
-
-
-
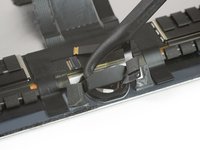
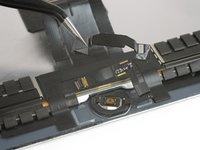
Levanta el soporte del botón de inicio comenzando por el lado izquierdo.
-
Tira con cuidado de él hacia la pantalla, asegurándose de no dañar el cable del botón de inicio.
-
Quita la mayor cantidad posible de residuos de adhesivo viejo y luego límpielo con acetona o alcohol isopropílico de alta concentración (90% o más).
-
Asegura el soporte con un pegamento de alta adherencia, super pegamento o cinta de doble cara de alta resistencia. Asegúrate de que el soporte esté alineado correctamente antes de permitir que se seque el adhesivo, o el botón de inicio no hará clic cuando se presione.
You cannot use Tesa or double side tape under bracket. There is some greater technique or material we need to use. I tried super glue even, though, I really not work what original clicking sounds. It happens almost all digital home button related all iPad. We need to strive to find its accurate solution.
What width/size Tesa tape (mm) do we require?
I ordered tesla tape without noticing the width and ended up with 2mm tape. I used three strips of it for this step, so 6mm would be perfect for the home button bracket. Having said that, the 2mm size is probably better if you need it for attaching the display, but I never needed it for that because I loved how the pre-cut adhesive strips in step 16 worked really well.
hdh607 -
-
-
-
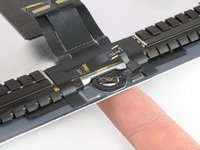
Usa la punta de su dedo para presionar el botón de inicio y empújalo suavemente desde la parte frontal de la pantalla.
-
Quita el botón de inicio.
When we lift home button at very last stage, there is also ring/round plastic bracket that we need to peel off and re-attached to home button when transferring to the new display.
Do you glue the plastic ring on both sides , So is it glued to the lcd but also to the home button ?
Thanks for the tutorial, but it ends way to soon. The instructions on installing the new home button are vague, and there is nothing about when to remove the battery blocker or what adhesive is acceptable to use to reattach the screen. Would be great to see this tutorial cover everything from start to finish.
The responsive click is present, but does not have any function on the screen. Is there any correlation between the click and functionality, or did I maybe destroy the cable ?
If it physically clicks but does not invoke any action then maybe the cable does not sit properly inside the ZIF-connector or the cable might be damaged. Try to re-connect and make sure it’s in the ZIF-connector all the way.
I'v transferred a home button to a new screen and stuck it down with b-7000 adhesive. When I go to test and put the screen in place, I push the button but it seems to not stay stuck to the new screen. What should I do? I also have a white plastic ring that was part of the button. Should I have left it on there or remove it?
I changed the LCD but now its completely dim.
What might be the cause?
Either the cable is not installed correctly or You have blown the backlit ic. You will have to send it for micro soldering to replace the chip. Always make sure you disconnect the battery before any repair is performed.
-
-
-
Solo queda la pantalla.
When replacing the screen; the adhesive that came with the new screen is not that great or maybe i'm doing something wrong with it. The first time i used it, i heat gunned the edge, and parts of the screen still wouldn't stick. So i used a second set, and tried not to touch the adhesive, i used tweezers alot. It was a bit better second time, but, the case we have wraps around the edge of screen, and is basically holding giving extra confidence to hold screen on.
-


Compara tu nueva parte de reemplazo con la parte original — puede que necesites transferir componentes restantes o remover respaldos de adhesivo de la parte nueva antes de instalarla.
Para reensamblar tu dispositivo, sigue estas instrucciones en orden inverso.
Lleva tu basura electrónica a un R2 or e-Stewards certified recycler.
¿La reparación no fue como lo planeado? Prueba basic troubleshooting, o pide ayuda en iPad Air 3 Answers community.
Cancelar: No complete esta guía.
18 personas más completaron esta guía.
Un agradecimiento especial a estos traductores:
100%

¡ Fernando Salazar Garcia nos está ayudando a reparar el mundo! ¿Quieres contribuir?
Empezar a traducir ›

2 comentarios
I used this guide to remove and replace a cracked screen from iPad Air 3 successfully. My comments are in the sections above , i summarise here (1) i used a proper suction tile puller (small one from DIY store used to hold bathroom tiles) to lift the screen off after heating around the edge using a heat gun. (2) You must disconnect the battery before plugging the new screen. I think i didn't break the circuit in first attempt and shorted the screen, the result was half of the screen didn't work. I used playing card. (3) The adhesive that came with the new screen is not that great or maybe i'm doing something wrong with it. The first time i used it, i heat gunned the edge (adhesive on), and parts of the screen still wouldn't stick. So i used a second set, and tried not to touch the adhesive, i used tweezers alot. It was a bit better second time, but, the case we have wraps over screen, holds it on.
I used the guide as well and the replacement went well except the home button. The touch-id sensor is working, but until I have new glue, I need to use Assistive touch. Guess I need to glue the home button a bit more.