Introducción
Utiliza esta guía para reemplazar una pila gastada o muerta en tu Huawei Watch 2.
Para tu seguridad, descarga la batería por debajo del 25% antes de desmontar tu Huawei Watch 2. Esto reduce el riesgo de un evento térmico peligroso si la batería se daña accidentalmente durante la reparación.
Nota: Si tu batería está hinchada, toma las precauciones adecuadas.
Nota: Esta guía te indica que sólo debes cambiar la batería. Sin embargo, si deseas reemplazar el ensamblaje de la batería, es un procedimiento diferente y puedes encontrar la guía apropiada del ensamblaje de la batería aquí. Asegúrate de que tienes la pieza correcta antes de empezar esta guía.
Qué necesitas
-
-
Antes de comenzar las reparaciones, quita el reloj del cargador y apágalo.
-
-
-
-
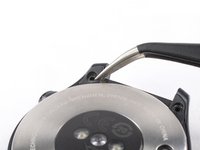
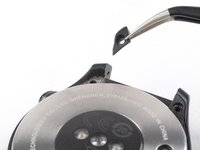
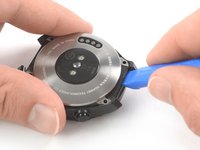
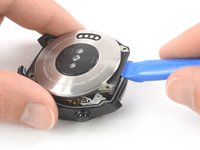
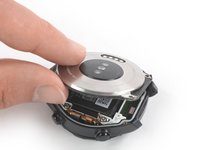
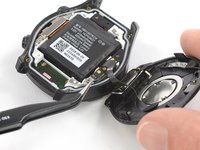
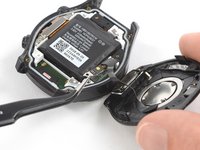
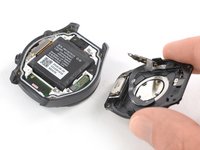
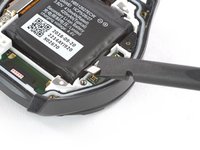
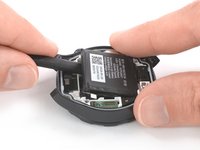
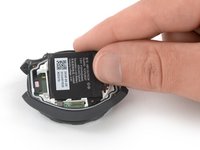
Dobla cuidadosamente el ensamblaje de la tapa trasera hacia el lado opuesto de las dos coronas del reloj.
-
-
-
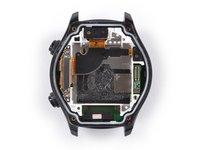
Remueve el tornillos Phillips #00 (1.8 mm de largo)
PH#00 didn’t work for me, it was a PH#0000 that was the only size which would work. I may have a different version of the watch as I also didn’t have 4 plastic covers to remove, and the screws had washers on them.
-
-
-
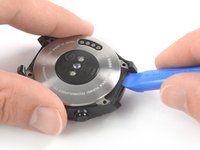
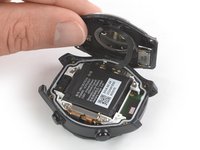
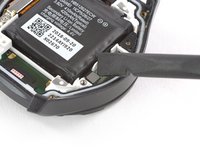
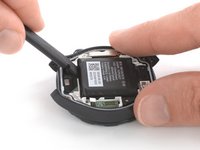
Para evitar daños en los cables flexibles que corren por debajo de la batería, sólo haga palanca en las áreas marcadas en rojo.
-
-
-
Aplica un iOpener caliente a la pantalla para aflojar el adhesivo que mantiene la batería en su lugar. Aplica el iOpener durante al menos dos minutos.
-
-
-
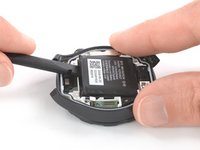
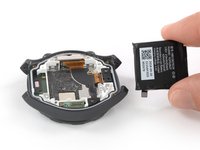
Inserta el extremo plano de un spudger entre el borde inferior de la batería y la cubierta trasera.
-
Usa el spudger para sacar con cuidado la batería de su hueco.
Ho cambiato la batteria tutto ok ma mi esce temperatura esterna troppo bassa e poi si spegne, cosa vuoi che? E cosa posso fare?
-


Para volver a montar tu Huawei Watch 2 sigue estas instrucciones al revés.
Si es posible, enciende tu Huawei Watch 2 y prueba tu reparación antes de instalar el nuevo adhesivo debajo de la batería y volver a sellar.
Para un rendimiento óptimo, calibra la batería recién instalada: Cárgala al 100% y sigue cargándola durante al menos 2 horas más. Luego usa tu dispositivo hasta que se apague debido a que la batería está baja. Finalmente, cárgala sin interrupción al 100%.
Lleva tus desechos electrónicos a un centro de reciclaje certificado.
¿La reparación no salió según lo planeado? Consulta nuestra [comunidad de Respuestas] para obtener ayuda en la resolución de problemas.
Cancelar: No complete esta guía.
39 personas más completaron esta guía.
Un agradecimiento especial a estos traductores:
100%


Estos traductores nos están ayudando a reparar el mundo! ¿Quieres contribuir?
Empezar a traducir ›


17 comentarios
Trickiest part is getting the heart rate sensor connector back in. There’s a little hook at the end opposite the screw hole that has to be slipped into place before laying the rest of it down. Took a few tries before it got seated. Whole thing took 10-15 mins start to finish.
I wish I had read this comment before following these instructions, this was the only step that was frustrating until i noticed the hook.
Like Richard, I found this the trickiest part of the job. I had not realised there was a very tiny hook and eventually positioned it accurately by luck rather than skill or judgement. I also had difficulty getting the battery connector seated properly and, again, it was by trial and error that I eventually got it attached correctly.
before you begin make sure you have a t2 star screwdriver and hear a drier or something to heat up the battery from top so it will come off easier.
if you in usa you can get one from micro center called Mako Precision bit set it about 38$
but if you just want to do this job you can get from online for about 3$. and one prier flatspudger like the plastic one they sail here
and one tweezer. Without these tools, you cant complete job
Wie wird der neue Akku eingebaut? Zwischen dem lockeren Steg schieben funktioniert nicht. Bei mir hat es nur einmal mit dem alten Akku gefunzt. Steg ab und das Akkuband auf 1/100 mm an die richtige Stelle gedrückt und dann vorsichtig den Steg montiert. Mit dem neuen Akku keine Chance!
Doch jetzt nach 2 .Monaten ging die Uhr nur noch mit Netzstrom und jetzt auch das nicht mehr.
Bei Neueinbau immer nur Blitz oder x Symbol.
Beim Blitz startet die Uhr und macht nach 30 sec Neustart.
Werde noch einen Versuch starten und einen Akku kaufen. Wenn der hoffenlich geladen ist, startet die Uhr sobald die Kontakte an die richtige Stelle gedrückt werden. So ging es mit dem alten Akku.
Hat jemand Erfahrungen und gute Ratschläge?
Very good and comprehensive guide, thank you. I replaced my watch battery in under an hour. My only suggestion would be to perhaps give some detail regarding re-attaching the connectors. I found this the most challenging part of the job and took a while to get them positioned accurately and seated properly. Other than that, following your excellent guide, everything went very smoothly.
Mit dem original Akku aus China hat es funktioniert. Wichtig ist, den Steg entfernen und die Akkulasche von oben an die richtige Stelle drücken. Er rastet dann leicht ein und die Uhr bootet. Vorsichtig den Steg schräg aufsetzen, damit die Lasche links einrastet und dann rechts das Schräubchen montieren.
Tuto extrêmement bien rédigé.
aucun problèmes lors de l’opération.
Améliorations possible => ajouter une étape montrant le positionnement du crochet pour la remise en place du connecteur du capteur de fréquence cardiaque.
Thanks. It worked ! IFIXIT was out of stock on this battery replacement but I found a battery on eBay that was advertised as NEW and it is a Huawei branded battery. Hopefully it IS indeed new. After insertion, it did charge up to 100% and we will see how long it lasts. I was only getting about 4 hours on my old battery. Thanks for posting the procedure.
I have replaced the battery. (|About five times, im fairly sure I have the hook on correctly. It boots up with no problem but after a minute it keeps saying "Shutting down due to low ambient temprature". I have had it on my wrist and its not a cold day? Any ideas? Is the watch dead?
Where can I buy an original HUAWEI GT 2 watch battery?
martinozigrino@gmail. com
Where can I buy an original HUAWEI GT 2 watch battery?
Battery reconnection was insanely hard. It's the last time I try this. I'll just give it to a proper watch repairer and go to the pub. If you get a black and white batter on the watch screen with a white x in the middle, battery isn't connected.
I was surprized to find out that the battery connector was actually welded on my GT2 pro...