Saltar al contenido principal
Razer Blade Stealth 2017 SSD Replacement

Razer Blade Stealth 2017 SSD Replacement

Helene Willits

Helene Willits y 6 otros contribuidores

Última actualización: November 16, 2022

15 minuto
Moderado
Guía de Estudiante Destacada

Introducción

Ir al paso 1

This guide outlines how to replace the SSD on your Razor Blade Stealth if it damaged or non-functional. If the computer presents a blank screen and does not boot up, the SSD may be damaged. If you want to increase the SSD storage on the computer, swap the SSD using this guide. Some iFixit tools are required for this replacement.

Qué necesitas

Kits de reparación

Estos kits contienen todas las piezas y herramientas necesarias para completar esta guía.

Partes

Herramientas

  • T5 Torx Screwdriver
    T5 Torx Screwdriver
  • Spudger
    Spudger
  • Phillips #00 Screwdriver
    Phillips #00 Screwdriver

Ver más…

  1. Razer Blade Stealth 2017 SSD Replacement, Battery: paso 1, imagen 1 de 2 Razer Blade Stealth 2017 SSD Replacement, Battery: paso 1, imagen 2 de 2
    • Before you begin, be sure to turn off your laptop and discharge the battery down to 25%.

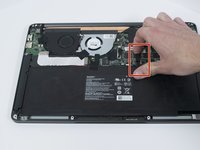
    • Use a Torx T5 screwdriver to remove the eight, 3mm screws on the bottom cover of the laptop.

    • Whenever you remove screws from the device, remember to save and label them.

  2. Razer Blade Stealth 2017 SSD Replacement: paso 2, imagen 1 de 1
    • Remove the bottom cover of the laptop by sliding it away from the hinge.

    • Do not force the cover up!

  3. Razer Blade Stealth 2017 SSD Replacement: paso 3, imagen 1 de 2 Razer Blade Stealth 2017 SSD Replacement: paso 3, imagen 2 de 2
    • Use your fingernail to pry up and disconnect the battery from the motherboard.

  4. Razer Blade Stealth 2017 SSD Replacement: paso 4, imagen 1 de 1
    • Use a Phillips #00 screwdriver to remove the six, 5mm screws securing the battery.

  5. Razer Blade Stealth 2017 SSD Replacement: paso 5, imagen 1 de 2 Razer Blade Stealth 2017 SSD Replacement: paso 5, imagen 2 de 2
    • Remove any tape attached to the battery.

    • Use the plastic spudger to pry out the battery.

  6. Razer Blade Stealth 2017 SSD Replacement, SSD: paso 6, imagen 1 de 2 Razer Blade Stealth 2017 SSD Replacement, SSD: paso 6, imagen 2 de 2
    • Use a plastic spudger to disconnect one end of the interconnect cable.

    • Remove any tape attached to the interconnect cable.

  7. Razer Blade Stealth 2017 SSD Replacement: paso 7, imagen 1 de 1
    • Lift the black plastic cover and interconnect cable to expose the SSD.

    • Use a Phillips #00 to remove the one, 2mm screw on the left side of the SSD.

  8. Razer Blade Stealth 2017 SSD Replacement: paso 8, imagen 1 de 1
    • Remove the SSD from the motherboard by sliding it out at an angle.

Conclusión

To reassemble your device, follow these instructions in reverse order.

2 personas más completaron esta guía.

Helene Willits

Miembro Desde 10/10/19

776 Reputación

6 Guías creadas

Equipo

Cal Poly, Team S11-G3, Regan Fall 2019 Miembro de Cal Poly, Team S11-G3, Regan Fall 2019

CPSU-REGAN-F19S11G3

4 Miembros

7 Guías creadas

0 comentarios

Agregar Comentario

Ver Estadísticas:

Ultimas 24 horas: 1

Ultimos 7 días: 5

Ultimos 30 días: 21

Todo El Tiempo: 5,093