Saltar al contenido principal
Nokia 6310i Antenna Replacement

Nokia 6310i Antenna Replacement

Wilson Tam

Wilson Tam y 5 otros contribuidores

Última actualización: January 24, 2025

5 minuto
Moderado

Introducción

Ir al paso 1

This guide is to instruct the reader about the steps on replacing the internal antenna. The phone will have to be disassembled to reach to the antenna. A proper set of Torx (Star) screw-driver is necessary to complete the procedures.

Qué necesitas

Herramientas

  1. Nokia 6310i Antenna Replacement, Battery: paso 1, imagen 1 de 2 Nokia 6310i Antenna Replacement, Battery: paso 1, imagen 2 de 2
    • Press and hold the battery release button and slide the battery away from the Nokia logo

  2. Nokia 6310i Antenna Replacement, SIM card: paso 2, imagen 1 de 3 Nokia 6310i Antenna Replacement, SIM card: paso 2, imagen 2 de 3 Nokia 6310i Antenna Replacement, SIM card: paso 2, imagen 3 de 3
    • Slide the SIM card lock away from the SIM card.

    • The SIM card pops out. Remove the SIM card.

  3. Nokia 6310i Antenna Replacement, Back Cover: paso 3, imagen 1 de 1
    • Unscrew and remove the four T6 Torx screws.

  4. Nokia 6310i Antenna Replacement: paso 4, imagen 1 de 3 Nokia 6310i Antenna Replacement: paso 4, imagen 2 de 3 Nokia 6310i Antenna Replacement: paso 4, imagen 3 de 3
    • Insert a plastic opening tool between the faceplate and the black backplate. Gently pry them apart, working from the lower end to the upper side of the phone.

  5. Nokia 6310i Antenna Replacement: paso 5, imagen 1 de 3 Nokia 6310i Antenna Replacement: paso 5, imagen 2 de 3 Nokia 6310i Antenna Replacement: paso 5, imagen 3 de 3
    • Use the plastic opening tool to separate the top part of the backplate.

    • The plastic clips at the top require slightly more force to separate.

  6. Nokia 6310i Antenna Replacement, Antenna: paso 6, imagen 1 de 2 Nokia 6310i Antenna Replacement, Antenna: paso 6, imagen 2 de 2
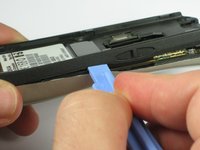
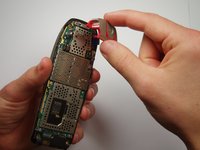
    • Remove the screw holding the antenna to the circuit board.

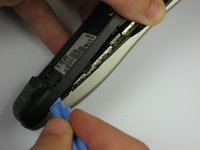
    • Carefully lift off the antenna from the circuit board.

Conclusión

To reassemble your device, follow these instructions in reverse order.

3 personas más completaron esta guía.

Wilson Tam

Miembro Desde 09/29/10

77 Reputación

1 Guía escrita

Equipo

Cal Poly, Team 14-41, Forte Fall 2010 Miembro de Cal Poly, Team 14-41, Forte Fall 2010

CPSU-FORTE-F10S14G41

Miembros de 5

22 Guías creadas

2 comentarios

Thanks for a nice and helpful instruction.

The rubber power-on button had broken down so I just removed the damaged parts. Now using a toothpick to push the microswitch directly.

Only using the phone indoors for nostalgic reasons, playing Snake :-)

Brgrds Ove

ove.tandberg - Contestar

Thanks for antenna help

I have had about three 6310i’s and the on/off button was the failure problem in all three.

Andrew Richards - Contestar

Agregar Comentario

Ver Estadísticas:

Ultimas 24 horas: 0

Ultimos 7 días: 3

Ultimos 30 días: 29

Todo El Tiempo: 8,263