Saltar al contenido principal
Lenovo ThinkPad X1 Yoga 2nd Generation Fan Replacement

Lenovo ThinkPad X1 Yoga 2nd Generation Fan Replacement

Alex Shacoski

Alex Shacoski y 6 otros contribuidores

Última actualización: May 7, 2024

5 minuto
Fácil
Necesita mejores imágenes

Introducción

Ir al paso 1

If your laptop crashes due to overheating or is noisier than normal the fan may need to be replaced. To determine whether you need to replace the fan or clean it using compressed air, place your hand over the fan and check for airflow. If you cannot feel anything replace the fan using this guide. Make sure to replace the fan with a carbon CPU cooling fan, preferably Lenovo ThinkPad X1 Yoga 2nd Generation’s own fan part. This guide is not particularly difficult but be careful when handling parts such as the ribbon cable to avoid damaging internal components.

Qué necesitas

Partes

Herramientas

Ver más…

  1. Lenovo ThinkPad X1 Yoga 2nd Generation Fan Replacement, Back Cover: paso 1, imagen 1 de 1
    • Ensure the laptop is powered off and the charging cable is disconnected before opening the back cover.

    • Flip over the laptop to access the back cover.

  2. Lenovo ThinkPad X1 Yoga 2nd Generation Fan Replacement: paso 2, imagen 1 de 2 Lenovo ThinkPad X1 Yoga 2nd Generation Fan Replacement: paso 2, imagen 2 de 2
    • Use a Phillips #0 screwdriver to remove the eight 8 mm screws.

  3. Lenovo ThinkPad X1 Yoga 2nd Generation Fan Replacement: paso 3, imagen 1 de 1
    • Remove the back cover.

    • A popping sound may occur when the back cover is removed.

  4. Lenovo ThinkPad X1 Yoga 2nd Generation Fan Replacement, Fan: paso 4, imagen 1 de 2 Lenovo ThinkPad X1 Yoga 2nd Generation Fan Replacement, Fan: paso 4, imagen 2 de 2
    Herramienta utilizada en este paso:
    Tweezers
    $4.99
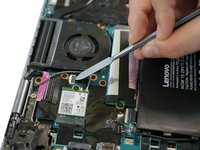
    • Lift up the small, metal tab using a spudger.

    • Do not use the metal spudger unless if it's being used for serious prying power. The metal spudger may damage or puncture internal components in the device if too much pressure is applied.

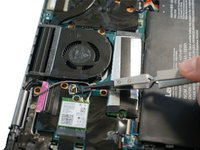
    • Gently lift the ribbon cable from its socket using nylon-tipped reverse tweezers.

  5. Lenovo ThinkPad X1 Yoga 2nd Generation Fan Replacement: paso 5, imagen 1 de 1
    • Using the Phillips #0 screwdriver, unscrew the four 4 mm screws directly next to the fan.

  6. Lenovo ThinkPad X1 Yoga 2nd Generation Fan Replacement: paso 6, imagen 1 de 2 Lenovo ThinkPad X1 Yoga 2nd Generation Fan Replacement: paso 6, imagen 2 de 2
    • Loosen the four 5 mm screws in the metal extension attached to the fan.

    • The screws do not need to be completely removed from the fan.

    • Remove the fan using your fingers.

Conclusión

To reassemble your device, follow these instructions in reverse order.

Alex Shacoski

Miembro Desde 02/10/20

276 Reputación

2 Guías creadas

Equipo

Cal Poly, Team S22-G3, Regan Winter 2020 Miembro de Cal Poly, Team S22-G3, Regan Winter 2020

CPSU-REGAN-W20S22G3

Miembros de 5

7 Guías creadas

3 comentarios

When you remove a heasink (or heat transfer pipe) from a chip, shouldn't you re-apply any thermal paste? Surely it had some?

Edward Dekkers - Contestar

after pressing power button Cooling fan runs for 2 sec then it stays off . What is the problem ?

Tonmoy Arafin - Contestar

Is there any upgrade that one can do to the fan or pipe except new thermal paste? I find it quite loud and inefficient. Isn't there a third-party one which is quieter?

Toaster Roaster - Contestar

Agregar Comentario

Ver Estadísticas:

Ultimas 24 horas: 1

Ultimos 7 días: 2

Ultimos 30 días: 47

Todo El Tiempo: 1,142