Saltar al contenido principal
Lenovo ThinkPad X1 Carbon 6th Gen Fingerprint Scanner Replacement

Lenovo ThinkPad X1 Carbon 6th Gen Fingerprint Scanner Replacement

Michael Megna

Michael Megna y 3 otros contribuidores

Última actualización: August 9, 2023

10 - 15 minutos
Moderado

Introducción

Ir al paso 1

In this guide, you will learn how to replace the fingerprint scanner in a Lenovo ThinkPad X1 Carbon 6th Gen. This may be necessary if your scanner is no longer reading your fingerprint. Before replacing your fingerprint scanner, try updating or reinstalling the fingerprint scanner drivers first. Be sure to power off your device and disconnect it from any power source before beginning.

Qué necesitas

Herramientas

  • Phillips #0 Screwdriver
    Phillips #0 Screwdriver
  • iFixit Opening Tool
    iFixit Opening Tool
  • Spudger
    Spudger

Ver más…

  1. Lenovo ThinkPad X1 Carbon 6th Gen Fingerprint Scanner Replacement, Back Cover: paso 1, imagen 1 de 2 Lenovo ThinkPad X1 Carbon 6th Gen Fingerprint Scanner Replacement, Back Cover: paso 1, imagen 2 de 2
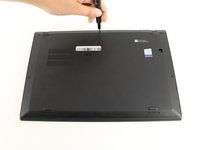
    • Use a Phillips #0 screwdriver to unscrew the five screws that secure the back cover to the laptop.

    • The screws do not completely come off from the back cover. Loosen until the screws are completely loose.

  2. Lenovo ThinkPad X1 Carbon 6th Gen Fingerprint Scanner Replacement: paso 2, imagen 1 de 2 Lenovo ThinkPad X1 Carbon 6th Gen Fingerprint Scanner Replacement: paso 2, imagen 2 de 2
    • Use a Jimmy to lift the cover directly up off of the locating pins.

    • Though a metal opening tool is shown in the image, we recommend using plastic opening tools to minimize any cosmetic damage.

    • Remove the back cover.

    • If you encounter resistance when lifting the cover, revisit the screws to see if any of them are still threaded on to the device.

  3. Lenovo ThinkPad X1 Carbon 6th Gen Fingerprint Scanner Replacement, Battery: paso 3, imagen 1 de 2 Lenovo ThinkPad X1 Carbon 6th Gen Fingerprint Scanner Replacement, Battery: paso 3, imagen 2 de 2
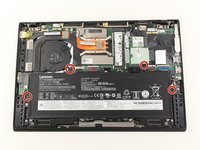
    • Use the Phillips #0 screwdriver to remove the four 5 mm screws that secure the battery to the laptop frame.

  4. Lenovo ThinkPad X1 Carbon 6th Gen Fingerprint Scanner Replacement: paso 4, imagen 1 de 1
    • Take out the battery by lifting it from the top edge of the laptop, and then pulling away from the motherboard.

  5. Lenovo ThinkPad X1 Carbon 6th Gen Fingerprint Scanner Replacement, Fingerprint Scanner: paso 5, imagen 1 de 2 Lenovo ThinkPad X1 Carbon 6th Gen Fingerprint Scanner Replacement, Fingerprint Scanner: paso 5, imagen 2 de 2
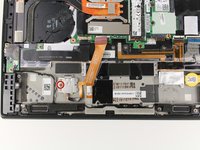
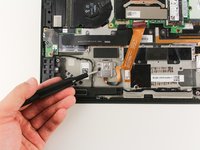
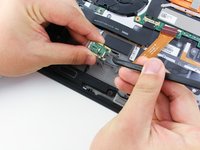
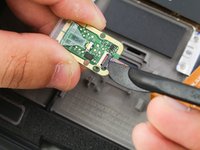
    • Use the Phillips #0 screwdriver to remove the 2mm screw that secures the cover of the fingerprint scanner.

  6. Lenovo ThinkPad X1 Carbon 6th Gen Fingerprint Scanner Replacement: paso 6, imagen 1 de 1
    • Remove the cover by grabbing it and gently pulling up and to the left.

  7. Lenovo ThinkPad X1 Carbon 6th Gen Fingerprint Scanner Replacement: paso 7, imagen 1 de 2 Lenovo ThinkPad X1 Carbon 6th Gen Fingerprint Scanner Replacement: paso 7, imagen 2 de 2
    • Use a nylon spudger to lift up the black bar that secures the cable.

    • Disconnect the ribbon cable from the fingerprint scanner by pulling the cable directly out.

Conclusión

To reassemble your device, follow these instructions in reverse order.

Una persona más ha completado esta guía.

Michael Megna

Miembro Desde 01/23/20

1,310 Reputación

7 Guías creadas

Equipo

Cal Poly, Team S19-G4, White Winter 2020 Miembro de Cal Poly, Team S19-G4, White Winter 2020

CPSU-WHITE-W20S19G4

Miembros de 3

23 Guías creadas

0 comentarios

Agregar Comentario

Ver Estadísticas:

Ultimas 24 horas: 0

Ultimos 7 días: 7

Ultimos 30 días: 38

Todo El Tiempo: 1,662