Saltar al contenido principal

How to Replace a Ceiling Fan Lighting Circuit Power-Limiting Device

Qué necesitas

  1. How to Replace a Ceiling Fan Lighting Circuit Power-Limiting Device, Power-Limiting Device: paso 1, imagen 1 de 1
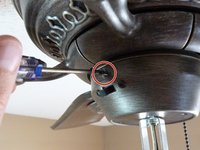
    • Shut off electrical power to the ceiling fan by switching the appropriate circuit breaker to the “OFF” position.

    • Continuing the procedure with the power on could result in death or serious injury.

  2. How to Replace a Ceiling Fan Lighting Circuit Power-Limiting Device: paso 2, imagen 1 de 2 How to Replace a Ceiling Fan Lighting Circuit Power-Limiting Device: paso 2, imagen 2 de 2
    • Remove the glass-bowl lampshade by loosening the threaded finial.

    • The threaded finial is the only component securing the glass bowl lamp shade. Ensure you provide adequate support to the glass bowl lamp shade while unscrewing, and be careful not to let it fall.

  3. How to Replace a Ceiling Fan Lighting Circuit Power-Limiting Device: paso 3, imagen 1 de 1
    • Remove the light bulbs from their sockets.

  4. How to Replace a Ceiling Fan Lighting Circuit Power-Limiting Device: paso 4, imagen 1 de 2 How to Replace a Ceiling Fan Lighting Circuit Power-Limiting Device: paso 4, imagen 2 de 2
    • Use a Phillips #1 screwdriver to remove the three 12 mm screws to separate the lower switch housing from the upper switch housing. .

    • The three screws are evenly spaced around the perimeter of the switch housing

    • Pull the lower switch housing straight down, with minimal force, to separate the lower and upper switch housing.

  5. How to Replace a Ceiling Fan Lighting Circuit Power-Limiting Device: paso 5, imagen 1 de 1
    • Unclip the pigtail connector that attaches the wires from the lower switch housing to the upper switch housing.

    • The lower switch housing should now be completely untethered from the upper switch housing.

  6. How to Replace a Ceiling Fan Lighting Circuit Power-Limiting Device: paso 6, imagen 1 de 3 How to Replace a Ceiling Fan Lighting Circuit Power-Limiting Device: paso 6, imagen 2 de 3 How to Replace a Ceiling Fan Lighting Circuit Power-Limiting Device: paso 6, imagen 3 de 3
    • To remove the power-limiting device (Part No. 98480-02) from the circuit:

    • Loosen and remove the twist-on wire connectors.

    • Disconnect the terminal connectors.

    • If you are removing the power-limiting device, proceed to Step 7.

    • If you are replacing the power-limiting device, install the new power-limiting device in the same configuration as the old power-limiting device, and skip to Step 9.

  7. How to Replace a Ceiling Fan Lighting Circuit Power-Limiting Device: paso 7, imagen 1 de 2 How to Replace a Ceiling Fan Lighting Circuit Power-Limiting Device: paso 7, imagen 2 de 2
    • Remove the terminal connectors disconnected in the previous step from the wires attached to the switch housing.

    • After cutting, strip off about two inches of the insulation in preparation for wire termination.

  8. How to Replace a Ceiling Fan Lighting Circuit Power-Limiting Device: paso 8, imagen 1 de 2 How to Replace a Ceiling Fan Lighting Circuit Power-Limiting Device: paso 8, imagen 2 de 2
    • Reinstall the light pull-switch into the circuit.

    • Terminate the hot and neutral wires with the appropriate wire bundle using twist-on wire connectors.

    • After the completion of this step, there should be 4 white wires connected bound with one twist-on wire connector, and 2 black wires bound using a second twist-on wire connector.

    • Wire color-coding in accordance with the NFPA 70 - National Electrical Code is applicable. White wires are designated as neutral wires, black wires are designated as hot wires.

  9. How to Replace a Ceiling Fan Lighting Circuit Power-Limiting Device: paso 9, imagen 1 de 1
    • Reattach the pigtail connector from the upper and lower switch housings.

    • The pigtail connector will easily “clip” into place if the two ends are oriented properly.

  10. How to Replace a Ceiling Fan Lighting Circuit Power-Limiting Device: paso 10, imagen 1 de 2 How to Replace a Ceiling Fan Lighting Circuit Power-Limiting Device: paso 10, imagen 2 de 2
    • Replace the three 12 mm screws securing the lower switch housing to the upper switch housing with a Phillips #1 screwdriver.

  11. How to Replace a Ceiling Fan Lighting Circuit Power-Limiting Device: paso 11, imagen 1 de 1
    • Reinstall the light bulbs in the sockets

  12. How to Replace a Ceiling Fan Lighting Circuit Power-Limiting Device: paso 12, imagen 1 de 1
    • Reinstall the glass bowl lamp shade and replace the threaded finial.

    • The threaded finial is the only component securing the glass bowl lamp shade. Ensure you provide adequate support to the glass bowl lamp shade while reattaching the finial.

  13. How to Replace a Ceiling Fan Lighting Circuit Power-Limiting Device: paso 13, imagen 1 de 1
    • Restore electrical power to the ceiling fan by positioning the appropriate circuit breaker to the “ON” position.

Conclusión

The lamp fixture on your ceiling fan should now light without issue!

0 comentarios

Agregar Comentario

Ver Estadísticas:

Ultimas 24 horas: 10

Ultimos 7 días: 79

Ultimos 30 días: 351

Todo El Tiempo: 5,782