Saltar al contenido principal
How to Rekey a Kwikset Deadbolt Lock

How to Rekey a Kwikset Deadbolt Lock

cmcmilla

cmcmilla y 7 otros contribuidores

Última actualización: May 7, 2024

15 - 25 minutos
Moderado

Introducción

Ir al paso 1

This guide will help with the process of Re-keying a Deadbolt Lock in your door. For purposes of clarity, this guide has the deadbolt out of the door so each part can be seen with as much detail as possible. Re-keying a lock is useful for improving the security of a home and it can replace previous keys that you have lost or may have been unknowingly copied. Many steps of this process contain small parts, so proceed with caution in this fix.

Note: This re-keying was performed on a Kwikset deadbolt, but the procedure should be the same for most brands.

  1. How to Rekey a Kwikset Deadbolt Lock, How to Rekey a Kwikset Deadbolt Lock: paso 1, imagen 1 de 1
    • Remove the mounting screws from the thumb-turn side of the lock assembly using a Phillips screwdriver.

  2. How to Rekey a Kwikset Deadbolt Lock: paso 2, imagen 1 de 1
    • Remove the cylinder assembly from the lock assembly.

  3. How to Rekey a Kwikset Deadbolt Lock: paso 3, imagen 1 de 1
    Herramienta utilizada en este paso:
    Tweezers
    $4.99
    • Remove the retaining clip from the back of the cylinder assembly using tweezers or pliers.

    • The clip is delicate and can be broken.

  4. How to Rekey a Kwikset Deadbolt Lock: paso 4, imagen 1 de 1
    • Remove the tail from the assembly.

    • Note the direction the slit in the tail is facing so you can place it back into the cylinder the same way in came out.

  5. How to Rekey a Kwikset Deadbolt Lock: paso 5, imagen 1 de 1
    • Remove the spring cover with the cylinder in the upright position using a Flathead screwdriver.

    • The springs are compressed and may jump out at you.

  6. How to Rekey a Kwikset Deadbolt Lock: paso 6, imagen 1 de 1
    • Remove the springs carefully with tweezers or pliers and set the springs aside as they will need to be put back in during reassembly.

    • Be careful when pulling the springs out of the assembly. If the springs are bent or stretched too much, they will be unusable.

  7. How to Rekey a Kwikset Deadbolt Lock: paso 7, imagen 1 de 1
    • Remove the top pins using tweezers or pliers.

    • There are two sets of pins, bottom and top, be careful not to mix them. Top pins are flat on both sides. These pins are the top pins and they will be reused for reassembly.

  8. How to Rekey a Kwikset Deadbolt Lock: paso 8, imagen 1 de 1
    • Remove the plug from the cylinder assembly in the upright position so the bottom pins do not fall out.

  9. How to Rekey a Kwikset Deadbolt Lock: paso 9, imagen 1 de 1
    • Remove the bottom pins from the plug. This can be done easily by turning over the plug and dumping them out.

    • There are two sets of pins, bottom and top, be careful not to mix them. Bottom pins have a cone shape on both ends. These pins are the bottom pins and they will be replaced for reassembly.

  10. How to Rekey a Kwikset Deadbolt Lock: paso 10, imagen 1 de 1
    • Place the new keys into the plug.

  11. How to Rekey a Kwikset Deadbolt Lock: paso 11, imagen 1 de 3 How to Rekey a Kwikset Deadbolt Lock: paso 11, imagen 2 de 3 How to Rekey a Kwikset Deadbolt Lock: paso 11, imagen 3 de 3
    • Place the bottom pins into the pin holes until the top of the new pin matches the shear line.

    • Pins that are in the correct position will be flush with the shear line. Incorrect pin placement will be above or below the shear line. The red circle displays an incorrect placement as the pin is above the shear line.

Conclusión

To reassemble your device, follow these instructions in reverse order from step 8.

17 personas más completaron esta guía.

cmcmilla

Miembro Desde 09/21/15

382 Reputación

1 Guía escrita

Equipo

5 comentarios

worked according to the instructions

MICHAEL RATWAY - Contestar

Huh?? What do you do after the last instruction?

Laura Stover - Contestar

Follow the instructions in reverse order starting from step 8.

Michelle Cloutier -

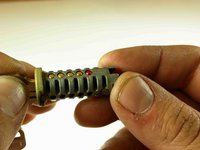
Worked exactly as described. Watch those springs! They fly out easily, and are prone to bend when reinstalled.

Robert Mayberry - Contestar

Any new key or do I need Kwikset keys for step #10?

atexit8 - Contestar

Agregar Comentario

Ver Estadísticas:

Ultimas 24 horas: 7

Ultimos 7 días: 15

Ultimos 30 días: 52

Todo El Tiempo: 54,338